
Welcome to this comprehensive guide on integrating Okta with Couchbase Server!
In this article, we will walk you through the step-by-step process of setting up a secure and seamless authentication flow using Okta as the Identity Provider (IdP) and Couchbase Server as the SAML Service Provider (SP). By the end of this guide, you’ll have a fully functional SSO setup, allowing users to log in and log out of Couchbase server UI using SAML.
Prerequisites
Before delving into the intricacies of SAML integration, it’s crucial to have a solid grasp of SAML’s fundamentals and debugging techniques. If you haven’t already, I strongly recommend revisiting my previous article on the basics of SAML and its debugging process. Equipped with that foundational knowledge, you’ll find this article on SAML integration much more enlightening and easier to comprehend. Taking the time to understand the core concepts will undoubtedly enhance your experience and comprehension as we dive deeper into the subject.
Before diving into the configuration steps, it’s essential to ensure you have everything you need for a smooth setup process. Below are the prerequisites you should have in place.
Required software and accounts
-
- Okta Developer Account: You’ll need an Okta Developer account to configure Okta as your Identity Provider. If you don’t have one, you can sign up for a free account here.
- Couchbase Server: Make sure you have Full Admin or at least External User Security Admin access. This is crucial for configuring SAML settings in Couchbase Server.
- Text Editor: A text editor like Visual Studio Code, Sublime Text, or Notepad++ will be useful for editing XML files or scripts, if needed.
Required knowledge and skills
-
- Basic Understanding of SAML: Familiarity with SAML concepts like Assertions, IdP, SP, and SSO will be beneficial.
- XML Basics: Since SAML uses XML-based assertions, a basic understanding of XML will help you in the setup process.
Required data
-
- Couchbase server URL: Make sure that your Couchbase Server is accessible via the internet and you know the external facing URL.
- Signing key and Certificate: You have a Private Key and Certificate and, optionally, a Chain file that you can upload which will be used to sign and decrypt SAML messages.
Optional but helpful
-
- Network Tools: Tools like curl or Postman can be helpful for testing HTTP requests and SAML assertions.
- Debugging Tools: Browser-based debugging tools or plugins can assist in troubleshooting SAML responses and requests such as Saml Tracer.
- Certificate formating tools: Browser-based X.509 certificate tool to format certificates.
By ensuring you have these prerequisites in place, you’ll be prepared to follow along with the rest of this guide. In the next section, we’ll provide an overview of how SAML authentication works to give you a better understanding of what you’ll be configuring.
Configuring Okta as the IdP
Now that we’ve covered the basics, it’s time to configure Okta to act as your Identity Provider (IdP). We need to start with the IdP as the Couchbase server expects a metadata file or URL in order to enable SAML.
Create a new SAML application in Okta
-
- Login to Okta Developer Console: Navigate to your Okta Developer Console and log in.
- Go to Applications: From the dashboard, click on the Applications tab.

- Add Application: Click the Create App Integration button to create a new application.
- Select SAML 2.0: Choose SAML 2.0 as the sign-on method.

- Click Next to proceed to the application settings.


Configure SAML application settings in Okta
-
- General Settings:
- Name: Enter a name for the application. I will use: couchbase
- Click Next
- SAML Settings:
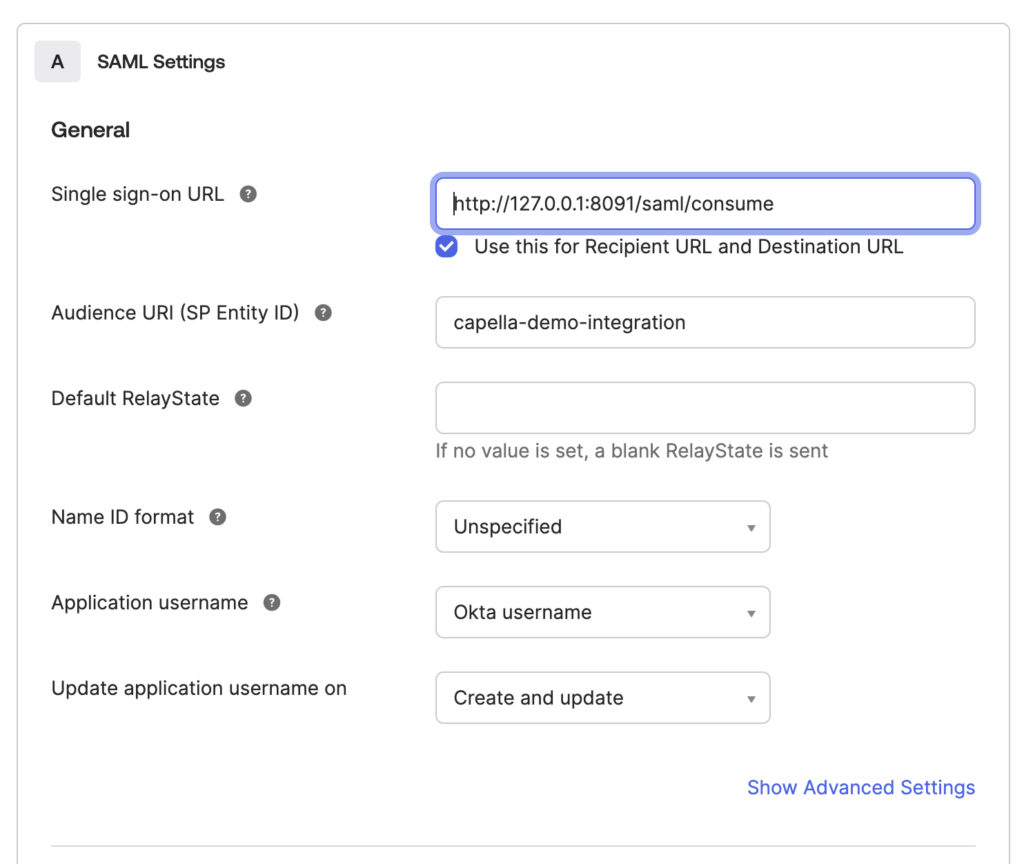
- Single Sign-On URL (ACS URL): At this point we will use a placeholder: https://www.nowhere.com, as we do not have this URL yet. Later on we’ll come back to finish the configuration of the ACS.
- Audience URI (SP Entity ID): Set the Entity ID for Couchbase server. This is a unique identifier that Okta will use to recognize your service. I will use “couchbase-demo-integration”
- Name ID Format: Usually set to “Unspecified” or “EmailAddress”, depending on your requirements. I will use Unspecified for this configuration.
- Application Username: Choose how usernames will be mapped (usually “Email” or “Okta Username”).

- Finish: Click “Finish” or “Next” until you complete the application setup.
- General Settings:

Download Okta metadata
-
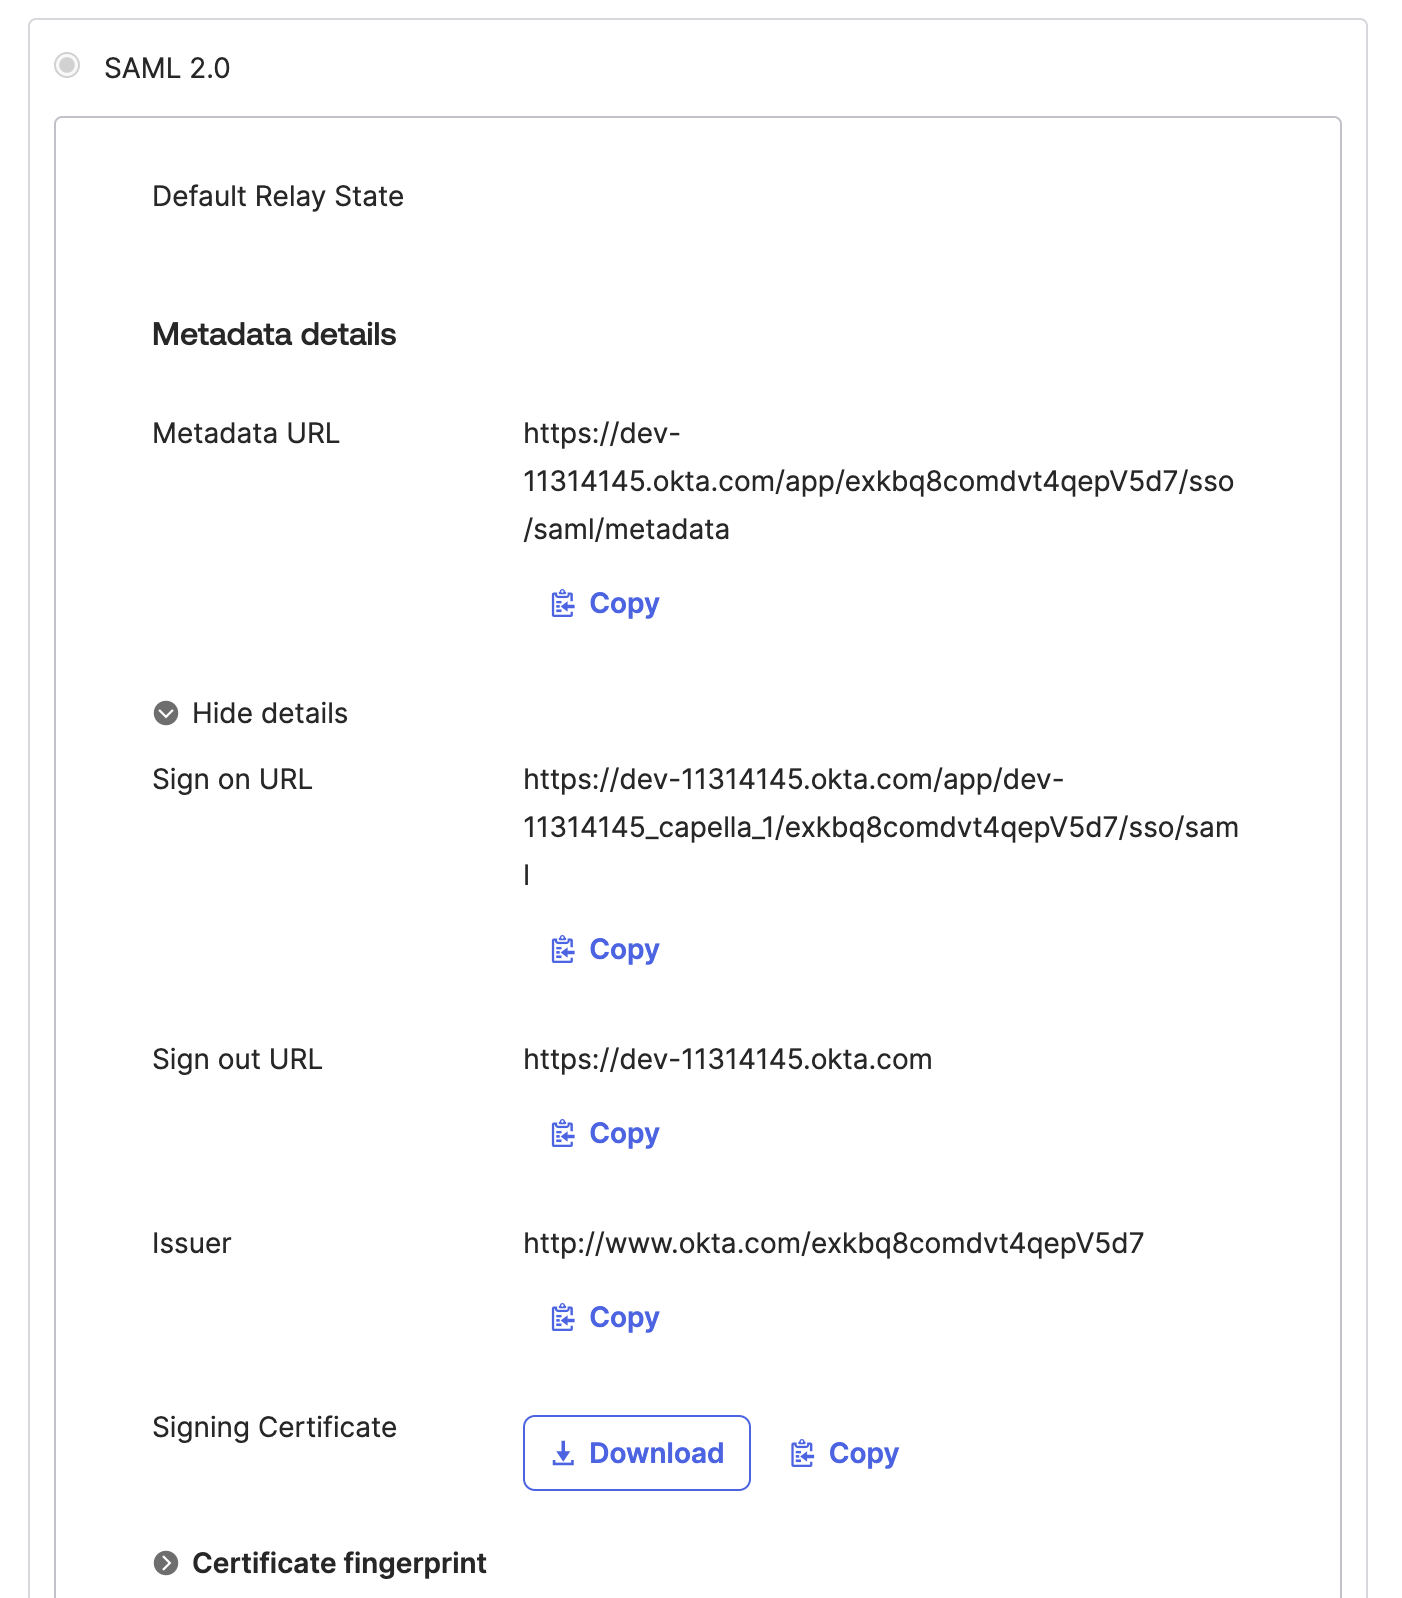
- View Setup Instructions: After creating the application, go to the “Sign On” tab and click “More details”.

- Keep this page open: Please keep this page open as we will copy fields from this page when we are setting up Couchbase server in the next step.

- View Setup Instructions: After creating the application, go to the “Sign On” tab and click “More details”.

Setting up Couchbase Server to act as a SP
Now that you have Okta set up as an Identity Provider (iDP), it’s time to prepare Couchbase server to act as a SAML Service Provider (SP). This section will guide you through the initial setup and configuration steps.
Initial configuration
-
- Login to your Couchbase server UI: Log in to the administrative UI of Couchbase server. This is where you’ll configure the SAML settings.

- Click on Security: Select security in the left hand side navigation.
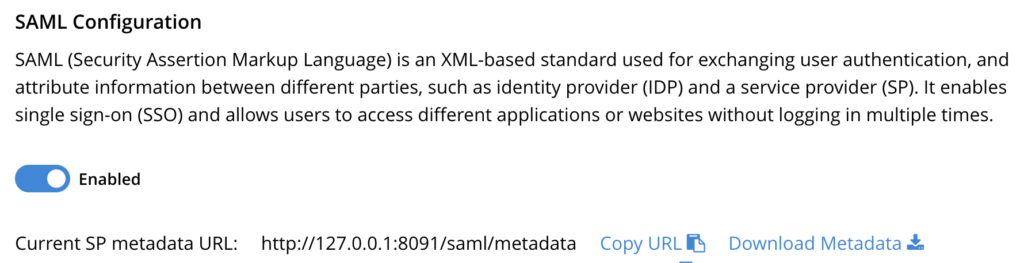
- Click on the SAML tab: on the top Locate the SAML tab and click on it. This will open the SAML configuration page.

- Enable SAML Authentication: There is a checkbox below the text. Toggle this setting on.

- Login to your Couchbase server UI: Log in to the administrative UI of Couchbase server. This is where you’ll configure the SAML settings.


Metadata configuration
-
- SP Entity ID: Set the Entity ID for Couchbase server. This is a unique identifier that Okta will use to recognize your service. Use the same Entity ID you used on the Okta screen: couchbase-demo-integration
- Organization detail: Fill in the Org Name and contact fields with your information.
- SP Base URL Type: Select Custom URL and use the url your service is accessible from the internet. I will specify http://127.0.0.1:8091 as I am running Couchbase server locally.
- Sign Metadata: Make sure that the Sign metadata using certificates specified below toggle is enabled.


Certificate management
-
- Upload Private Key: Open the Key and Certificate section, and upload your private key.
- Upload Certificate: also upload your certificate.
- Certificate chain: Optionally if you need a certificate chain, please upload that as well.


Identity Provider configuration
-
- Open Metadata: Open the metadata section of this configuration

- Configure IDP metadata: Go back to your Okta configuration screen and copy the Metadata URL

- Open it: Paste the url in a new browser window
- Copy the content: Select the whole file and copy the content to the clipboard
- Paste the XML: Go back to Couchbase server and change the Load IDP metadata from URL to File and paste the XML into the textarea:

It’s worth noting that you have the option to directly load the Identity Provider’s metadata by specifying its URL. If you choose this approach, ensure that the corresponding Certificate Authority (CA) certificates are uploaded as well otherwise the Couchbase server will not be able to download the metadata from the IdP. - Enable Verify remote peer: Toggle the Verify remote peer to make sure it is on

- Trusted fingerprints: Make sure you enable all the Fingerprint validation toggles:

- Open fingerprints: Go back to your Okta screen and open the Certificate fingerprint section

- Copy fingerprint: Copy the SHA1 (formatted) fingerprint to your clipboard and paste into the Trusted Fingerprints textarea in Couchbase.


- Change Name ID format: Okta by default uses Unspecified. You need to make sure they match in Okta and Couchbase Server. I will change Couchbase from persistent to unspecified by changing this field to urn:oasis:names:tc:SAML:1.1:nameid-format:unspecified to match Okta’s default.
- Save configuration: Click on Save to persist the configuration so far.

- Open Metadata: Open the metadata section of this configuration


Configuring Okta as the IdP continued…
Now that you have Couchbase, and you have the ACS endpoint, you need to go back to Okta to finish the configuration.
Change placeholder
SAML Settings:
-
- Go to General: Go back to Okta and open the General Tab
- Open SAML Settings: Scroll down to SAML Settings and the Edit link
- Next: Click next to go the SAML Settings tab
- Single Sign-On URL (ACS URL): Enter the Assertion Consumer Service (ACS) URL that you configured in Couchbase server. You need to copy the “Current SP consume URL” from Couchbase server UI and paste the value into this field.


-
- Audience URI (SP Entity ID): At this point you need to double check if the “SP Entity ID” in Couchbase server is the same as the “Audience URI” in Okta.
- Finish: First press “Next” then “Finish” at the bottom of the screen to save your changes.
Assign users to the application
-
- Go to Assignments: Navigate to the Assignments tab in your application.
- Assign Users: Click Assign and then Assign to People to add users who will be using this SAML SSO setup.
- Done: Confirm the assignment.
Upload SP certificate and enable logout
-
- Open SAML Configuration: Go back to SAML Configuration screen in the Couchbase server UI
- Save SP Certificate: Click on the Download Metadata button
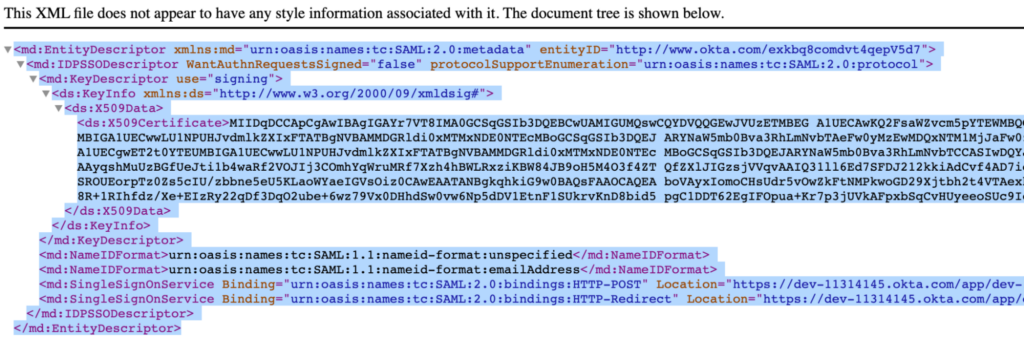
- Open file: Open the Metadata file you just downloaded in a text editor
- Extract certificate: Find <KeyDescriptor> inside this file, within that you will find the <X509Certificate> tag which contains the certificate.
- Format Certificate: Open https://www.samltool.com/format_x509cert.php or a similar tool to format this certificate to include headers.

- Save certificate: Save the formatted certificate into a new file using a text editor of your choice.
- Navigate to Okta: Go back to your Okta console and open the application
- Go to General: Go back to Okta and open the General Tab
- Open SAML Settings: Scroll down to SAML Settings and the Edit link
- Next: Click next to go the SAML Settings tab
- Show Advanced: Click on Show Advanced Settings
- Navigate to Signature certificate: Scroll down to the field called Signature certificate
- Upload certificate: Upload the certificate you saved in step 6
- Enable Signed Requests: Below the Upload certificate field, you can find the Enable Signed Request setting. You need to enable the Validate SAML requests with signature certificates toggle so that the iDP can validate the SAMLRequests received from Couchbase.

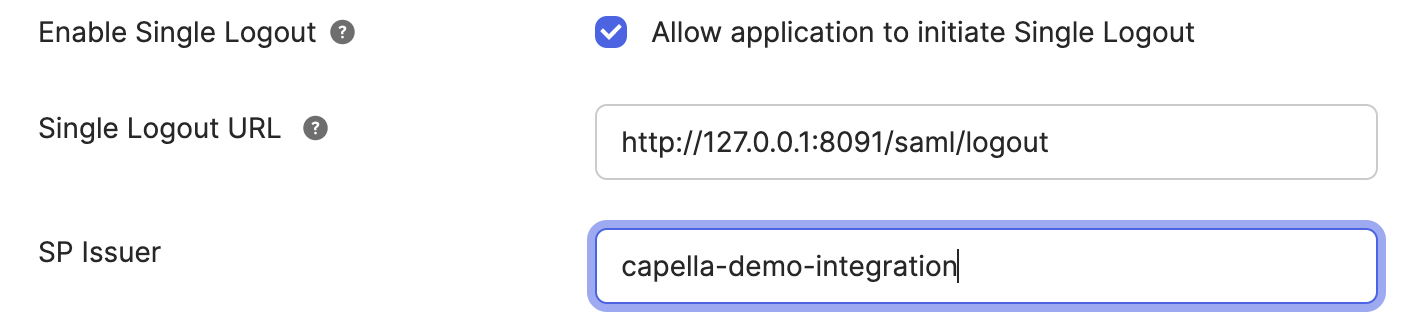
- Enable Single Logout: It is also possible to enable Single logout. In this case Couchbase server will log out the user from the iDP when the user clicks the logout button on the Couchbase server UI.
- First you need to go to Couchbase server and copy the Logout URL

- Paste it into the Single Logout URL field in Okta
- Also copy the Entity ID to the SP Issuer field
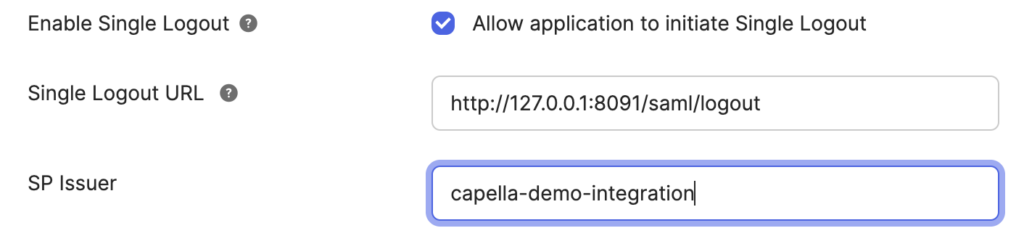
- Please note the logout will only work if you go back to Okta and copy the Metadata information again and refresh it in Couchbase server as the Original metadata did not have logout enabled.
- First you need to go to Couchbase server and copy the Logout URL
- Finish: First press “Next” then “Finish” at the bottom of the screen to save your changes.


By following these steps, you should have successfully configured Okta as the Identity Provider (IdP) for your SAML Service Provider (SP). The next section will cover how to map user attributes between Okta and Couchbase server.
Mapping Okta users to Couchbase Server users
After successfully configuring Okta as your Identity Provider (IdP) and Couchbase server as the Service Provider (SP), the next step is to ensure that user attributes are correctly mapped between the two. Attribute mapping is crucial for a seamless user experience and for ensuring that the necessary user information is available in your application.
User to user mapping
The most simple way to map users is to create external users in Couchbase server that match the users in Okta. In this example I did just that.
-
- Find email in Okta: Go back to your Okta dashboard and find the email address of your user.
- Open Couchbase server UI: Open Couchbase server UI
- Click on Security: On the left you can find the security link
- Open the Users tab: On the top you will find the Users/Groups tab click on that to list the users in Couchbase Server:

- Add user: Click on the Add user button on the top right corner
- External user: You need to make sure you set up your user as “External” see our documentation.
- Fill in username: You copy the Okta username into this field

- Set up roles: On the right hand side you need to select the exact roles your user should have
- Set up Groups: (Optional) You can also add your external user to any Couchbase server groups you specified earlier

User to group mapping
Another way to map users is to create groups in Couchbase server that match the groups in Okta.
-
- Navigate to Okta: Go back to your Okta console and
- Create a group: Create a group in Okta called test
- Open the application: Select the application you configured earlier.
- Go to General: Go back to Okta and open the General Tab
- Open SAML Settings: Scroll down to SAML Settings and the Edit link
- Next: Click next to go the SAML Settings tab
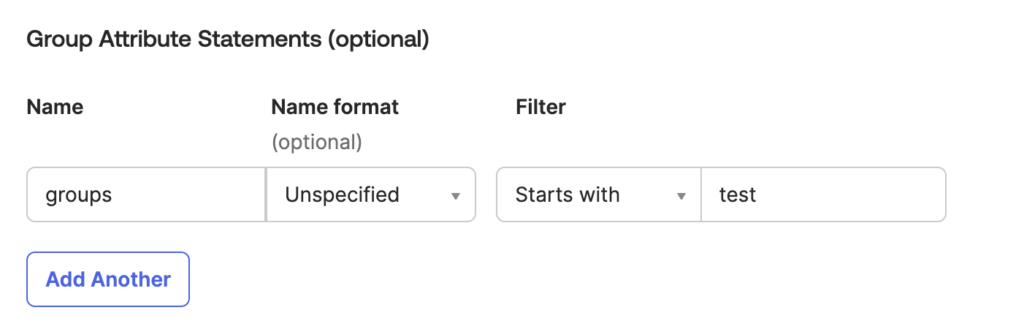
- Create a group mapping: Scroll down to the Group Attribute Statements, and create a new mapping. In this case I am creating a assertion called groups
- Navigate to the Couchbase server UI: Go back to the Couchbase server UI and open the SAML settings
- Open Single sign on settings: Scroll down and open Settings > Single sign on
- Setup group mapping: Enter the name of the group claim you have created on the Okta side.


You need to make sure that you have a Couchbase server group that matches the name of your Okta group for this to work. Once the groups are created you will be able to log in with an Okta user to Couchbase where the Couchbase roles will be inferred from the group mapping.
Conclusion
Congratulations! If you’ve followed along with this comprehensive guide, you should now have a fully functional SAML-based Single Sign-On (SSO) and Single Logout (SLO) setup between Okta and Couchbase server.
In summary, integrating Couchbase server with Okta via SAML not only streamlines the authentication process but also enhances security, providing a seamless user experience without compromising on data integrity. We’ve walked through the essential steps to set up this connection, and I hope you find this guide useful. If you encounter any challenges or have further questions, feel free to reach out through our support channels.