One of the many advantages of using a document-based database such as Couchbase is the ability to use a flexible data model to store data without the constraints of a rigid, predetermined schema. Many customers choose a NoSQL database to support the ingestion of data from multiple sources. But what if you need your data transformed so that it matches your existing data? Maybe you need it all in a uniform format for reporting purposes. Whatever the reason, this is a perfect use for the Eventing Service in Couchbase.
Couchbase Eventing Service
The eventing service is a built-in feature of Couchbase Enterprise Edition that allows the application of JavaScript functions, or lambdas, that respond to mutation events. Whenever a document is created, modified, or deleted, an action can be taken by executing pure business logic in your JavaScript. There are a number of actions that can be taken, such as data enrichment, calling of external workflows (via RESTful API calls), and timer-based events (resuming execution in the future). Think of events as a legacy database post-trigger on steroids.
Data consolidation
In this simplified example, imagine you have just acquired two new data sources for customer data. This data might be coming from a normalized source, or in a flat file, or both, and you want this data to match your existing customer data stored in a denormalized format.
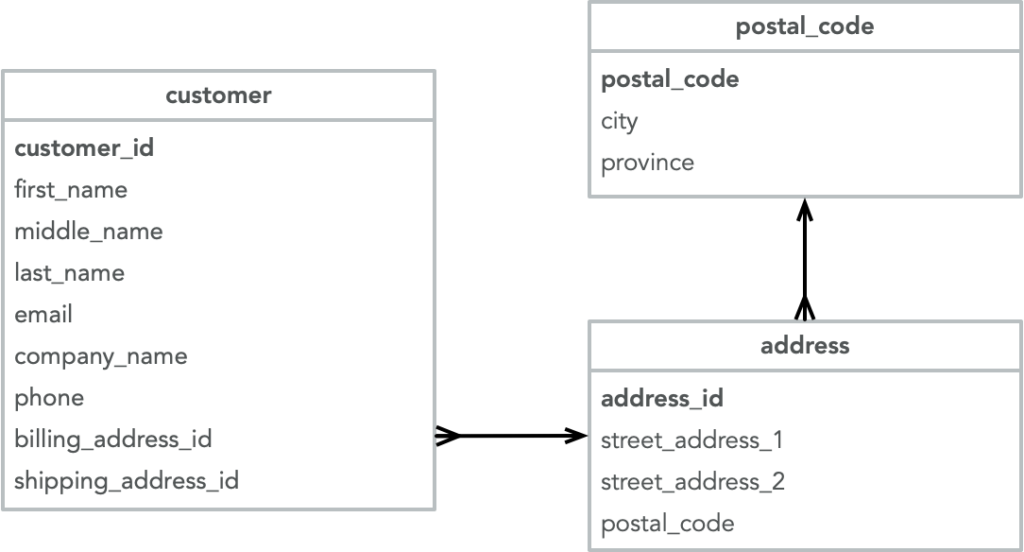
The first data source is a normalized database (clean and accurate) containing customers in Canada. Each customer record points to a billing and a shipping address, and each address is normalized to eliminate redundancy of city and province data:
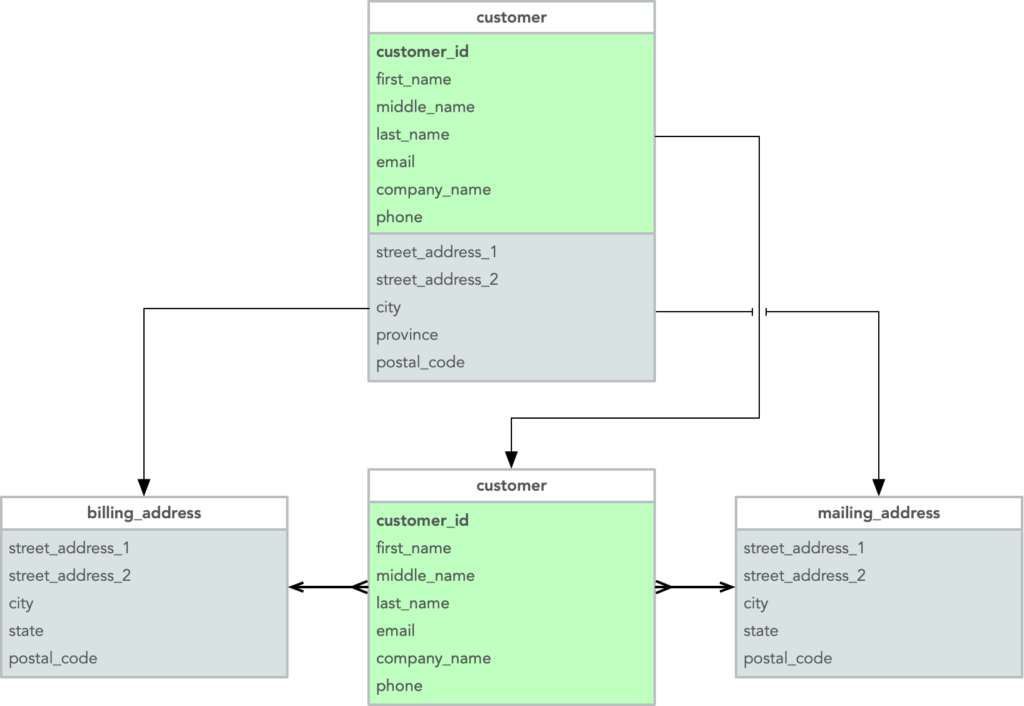
The second data source is a flat file also containing Canadian customers, but that does not track separate billing and shipping addresses. As you can see, only a single address data element is stored within the customer record:

We need to transform this data as it comes in so that it matches our existing customer database which is denormalized such that billing and shipping addresses are attached to the customer data (from the second source) as sub-documents:

Let’s start with an easy solution first, the flat file import. The process for transforming this data involves copying the customer data (name, email, phone, company name) into a new document. The address data then needs to be copied into subdocuments for both billing and mailing addresses. Because we only have one address per customer, we’ll copy this address into both the billing and the mailing address subdocument:
JavaScript code to consolidate the tables
The Eventing code to accomplish this is quite simple:
|
1 2 3 4 5 6 7 8 9 10 11 12 13 14 15 16 17 18 19 20 21 22 23 24 25 26 27 28 |
1 function OnUpdate(doc, meta) { 2 const new_doc = {}; // New customer document 3 const address = {}; // New address document 4 5 new_doc['first_name'] = doc.first_name; 6 new_doc['last_name'] = doc.last_name; 7 new_doc['email'] = doc.email; 8 new_doc['phone'] = doc.phone; 9 new_doc['company_name'] = doc.company_name; 10 11 address['street_address_1'] = doc.street_address_1; 12 address['street_address_2'] = doc.street_address_2; 13 address['city'] = doc.city; 14 address['state'] = doc.province; 15 address['zip_code'] = doc.postal_code; 16 17 // Add address document to customer document as subdocuments 18 new_doc['billing_address'] = address; 19 new_doc['mailing_address'] = address; 20 21 // This creates the new document in the destination bucket 22 dest_bkt[doc.email] = new_doc; 23 24 // Delete original document - uncomment below 25 // delete sch2[meta.id]; 26 27 log("Doc created/updated", meta.id); 28 } |
The above code should be easy enough to understand, even for non JavaScript coders, but I’ll break this down by section just to be sure.
-
- Line 1 above is called anytime a document in the source bucket is mutated (created or modified). We’ll see below how we define the source bucket.
- Lines 2-3 create JavaScript objects to hold the new customer document and the address document that will be used as subdocuments within the customer document.
- Lines 5-15 copy the properties from the original document into the customer and address objects.
- Lines 18 and 19 assign the address document as customer subdocuments for both mailing and billing address properties.
- Line 22 actually creates the document in the Couchbase destination bucket. We’ll see below how we define the destination bucket.
- Finally line 25 will delete the original document, although it’s commented out here.
- Line 27 logs the operation. You may want to comment/remove this after testing.
Set up environment
To test this script, we’ll need to set up our Couchbase environment. First of all, we’ll need a Couchbase cluster running the data service as well as the eventing service. This can be as small as a single node cluster running in Docker, or a larger multi-node cluster running in Capella.
Once we have the cluster up and running, we’ll need to create the buckets for importing data, and a final destination bucket. The eventing service also requires a metadata bucket. Create the following four buckets, each with the minimum required quota of 100mb:
-
- schema1
- schema2
- customer
- eventing_merge
I also recommend enabling flush for this exercise.
Creating an eventing function
Now we need to create the eventing function. Select the eventing tab, and then click Add Function. Use the following settings:
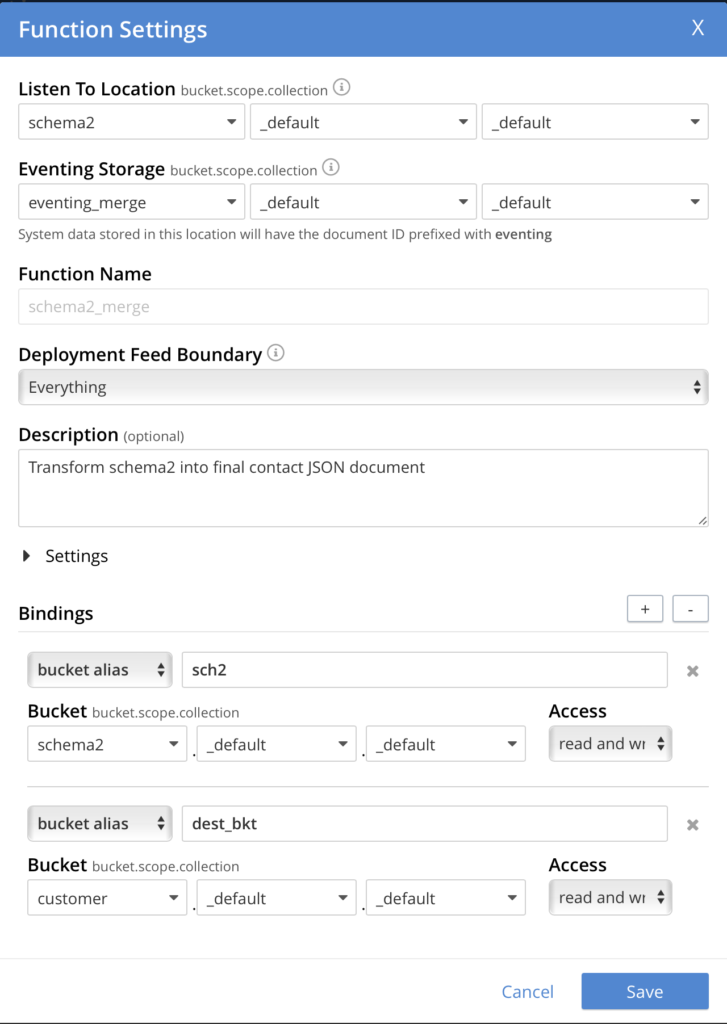
Next click on Next: Add Code and replace the default OnUpdate function with the code from above. Click Save and Return. At this point the code has been stored, but the function needs to be deployed in order for it to begin processing data. Click on the function name to open up its settings and go ahead and deploy the function now.
Creating test JSON documents
Now let’s test it by creating a document in the schema2 bucket. Add a document using wile.e.coyote@acmecorp.com as the document key, and with the following document body:
|
1 2 3 4 5 6 7 8 9 10 11 12 13 14 15 |
{ "customer_id": null, "first_name": "Wile", "middle_name": "E", "last_name": "Coyote", "email": "wile.e.coyote@acmecorp.com", "title": "Genius", "company_name": "Acme Corporation", "phone": "123-555-1212", "street_address_1": "694 York Circle", "street_address_2": "", "city": "Hackettstown", "province": "NJ", "postal_code": "07840" } |
In just a moment, you should see the statistics for the event indicate success:

Now look in the customer bucket, and you should see the document above has been transformed. Notice how the address now exists as subdocuments within the properties billing_address and mailing_address:

Transforming to sub-documents
Now let’s tackle the more complex schema transformation. Migrating the relational structure to match our sub-document structure looks something like this:
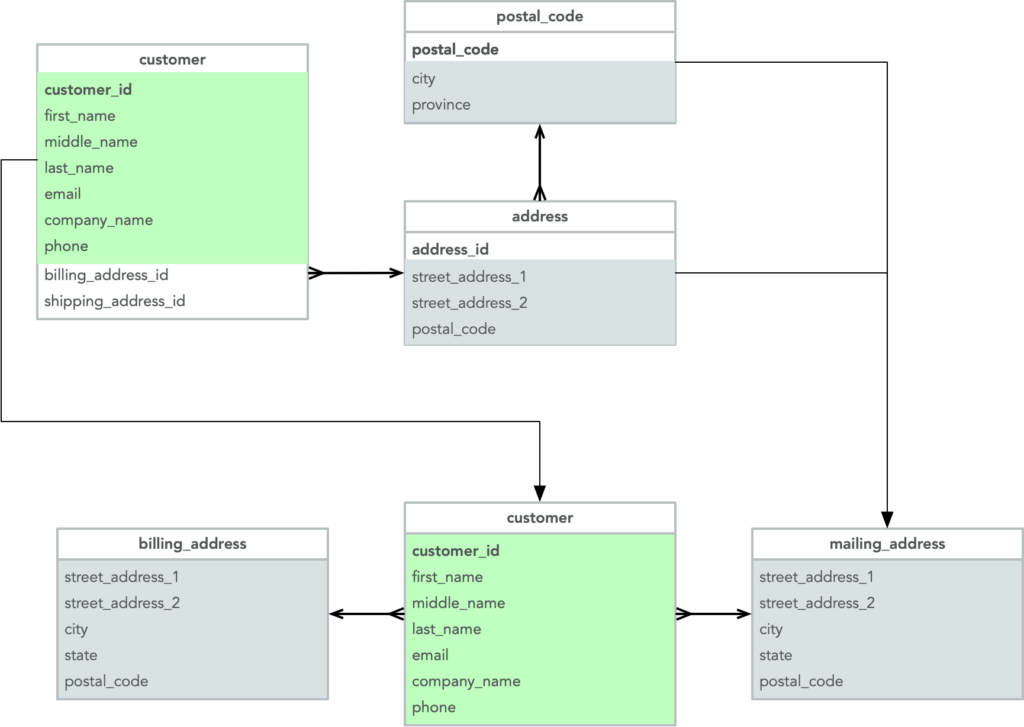
We’ll need to denormalize the address and postal code tables into a single subdocument, one each for the shipping/mailing and billing addresses. In this case, the data from the three tables is stored in collections within the bucket.
JavaScript code for denormalization
|
1 2 3 4 5 6 7 8 9 10 11 12 13 14 15 16 17 18 19 20 21 22 23 24 25 26 27 28 29 30 31 |
1 function OnUpdate(doc, meta) { 2 let new_doc = {}; 3 let bill_addr = {}; 4 let mail_addr = {}; 5 6 new_doc['first_name'] = doc.first_name; 7 new_doc['last_name'] = doc.last_name; 8 new_doc['email'] = doc.email; 9 new_doc['phone'] = doc.phone; 10 new_doc['company_name'] = doc.company_name; 11 12 bill_addr = bkt_addr[doc.billing_address_id]; 13 mail_addr = bkt_addr[doc.shipping_address_id]; 14 15 bill_addr['city'] = bkt_pc[bkt_addr[doc.billing_address_id].postal_code].city; 16 mail_addr['city'] = bkt_pc[bkt_addr[doc.shipping_address_id].postal_code].city; 17 18 bill_addr['state'] = bkt_pc[bkt_addr[doc.billing_address_id].postal_code].province; 19 mail_addr['state'] = bkt_pc[bkt_addr[doc.shipping_address_id].postal_code].province; 20 21 new_doc['billing_address'] = bill_addr; 22 new_doc['mailing_address'] = mail_addr; 23 24 log(new_doc); 25 26 dest_bkt[doc.email] = new_doc; 27 28 // Delete existing customer (leave address/postal_code for other customers who share this) 29 // delete bkt_cust[meta.id]; 30 log("Doc created/updated", meta.id); 31 } |
We’ll break down this code again as before.
-
- Lines 2-4 create JavaScript Objects to store the new document as well as the subdocuments for the mailing and billing addresses.
- Lines 6-10 copy the contact properties to the new document.
- Lines 12 and 13 copy the address data from the address collection using the document key stored in the contact address_id property.
- Lines 15-19 pull the city and province data out of the province collection, using the province_id from the address document as the document key.
- Lines 21 and 22 then attach these document objects as subdocuments to the new contact document.
- Finally, line 26 writes the new document to the destination bucket.
- Line 29, if uncommented, will delete the original contact document from the source bucket. Note that we do not want to also delete the associated address and province documents because they may be used by other contacts.
Creating the eventing function for denormalization
Create this eventing function using the following settings, and paste the above code in to replace the OnUpdate function. When finished, go ahead and deploy the function.
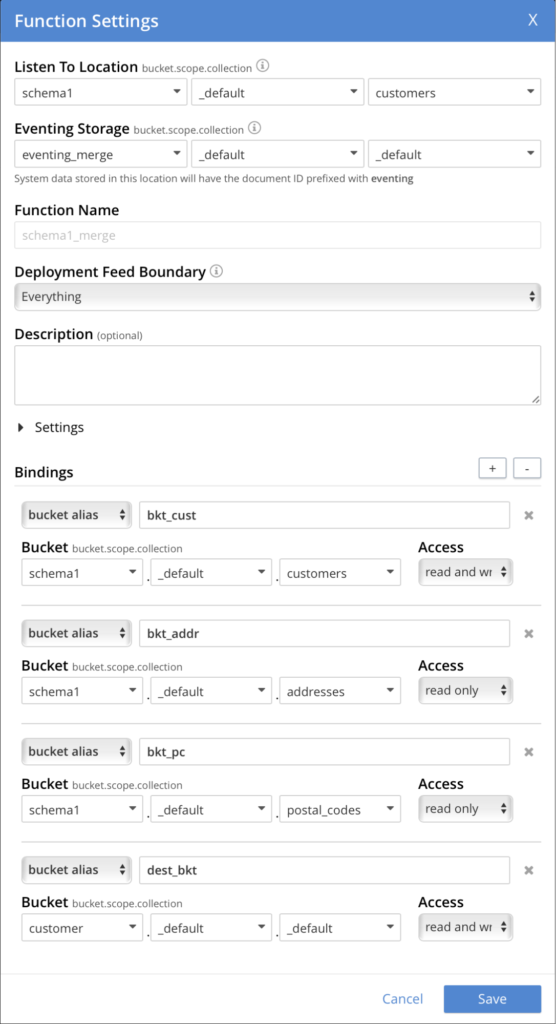
To test this function, we’ll need to create collections in the schema1 bucket (use the default scope) with the names: addresses, customers, postal_codes. Then create the following documents (in this order, otherwise the lookups in the function will fail):
Postal_codes collection, with document ID 43062:
|
1 2 3 4 5 |
{ "postal_code": "43062", "city": "Pataskala", "province": "OH" } |
Postal_codes collection, with document ID 23228:
|
1 2 3 4 5 |
{ "postal_code": "23228", "city": "Henrico", "province": "VA" } |
Addresses collection, with document ID 000071:
|
1 2 3 4 5 6 |
{ "address_id": "000071", "street_address_1": "85 Hartford Road", "street_address_2": "", "postal_code": "23228" } |
Addresses collection, with document ID 000086:
|
1 2 3 4 5 6 |
{ "address_id": "000086", "street_address_1": "460 Broad Dr.", "street_address_2": "", "postal_code": "43062" } |
Finally, in the customers collection, with document ID blinded_by@science.com:
|
1 2 3 4 5 6 7 8 9 10 11 12 |
{ "customer_id": null, "first_name": "Thomas", "middle_name": null, "last_name": "Dolby", "email": "blinded_by@science.com", "title": null, "phone": "867-5309", "billing_address_id": "000086", "shipping_address_id": "000071", "company_name": "The Golden Age of Wireless" } |
Fairly quickly you should see the statistics for this function show success:

And if you look at the document in the customers bucket, you should see the following transformation with the two addresses denormalized into subdocuments.

Closing thoughts
This is a very simplistic example. In a production environment, you’ll likely add code to handle exceptions.
Also you may increase the number of workers from 1 to the number of vCPUs if you have a large dataset and require greater performance.
The eventing functions used in this blog can be found in the following github repo: https://github.com/djames42/cb_eventing_merge. In this repository are also a couple of scripts (both a Bash script and a Python script) that can be used to build out a single node cluster with the eventing functions and larger sample datasets pre-loaded.
Resources
-
- Download: Download Couchbase Server 7.1
- GitHub: https://github.com/djames42/cb_eventing_merge.
References