Couchbase Server 5.5 includes the ability to keep a record of all N1QL actions taken by users. This is part of Couchbase’s more general audit functionality, introduced in 5.0. Auditing is only available in Enterprise edition.
Auditing lets the administrators of the system track who is accessing what data in the system. This is important when the data being stored is sensitive in some way, such as information about users. Couchbase Server 5.5 supports auditing of N1QL statements, and lets the administrator specify what types of statements (SELECTs? INSERTs?) should actually be audited.
It is important to understand what Couchbase Server 5.5 does not do. In particular, it does not allow record-level auditing. If an UPDATE statement is run and modifies five records, the audit record will include the whole statement that ran, including any parameters passed in, and it will say that five records were updated. It will not say what specific records were updated, or what their values were before or after the operation. Fundamentally, N1QL auditing audits statements, not records.
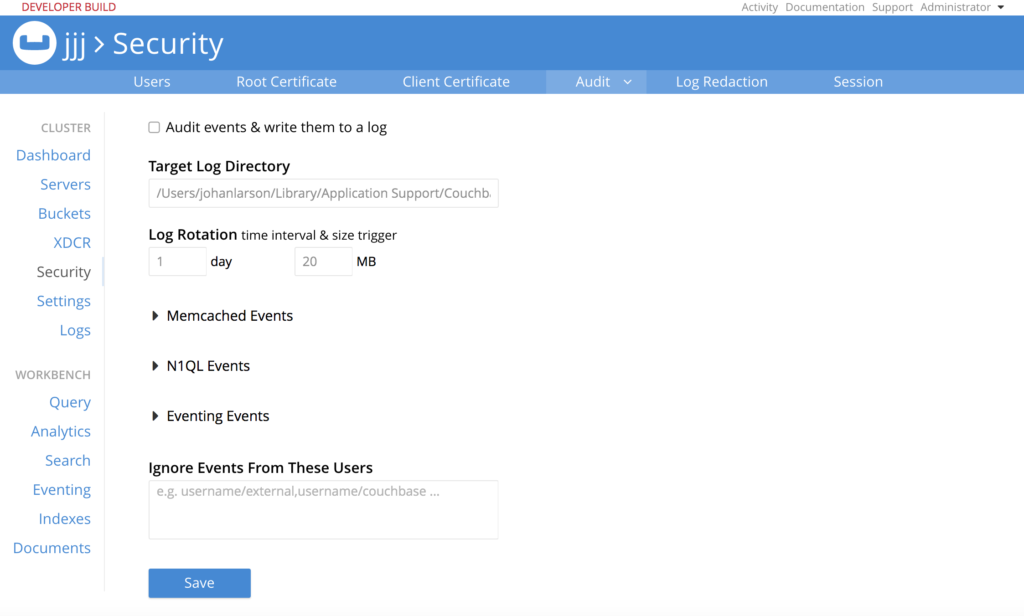
To configure audit, log in to the Couchbase Admin console. Navigate to the Security tab (on the side) and to the Audit tab (at the top of the screen). You should now see a screen like this:

This tab lets you configure auditing in general. The checkbox at the top indicates whether auditing should be done at all. “Target Log Directory” shows where to put the audit log records. The records appear in a file named “audit.log” in the target log directory. The next set of text boxes control log rotation by size and time interval.
Next are three dropdowns for various types of events, giving you fine control over what sorts of activities should be logged. Generally speaking, audit only what you must. The actual throughput cost of auditing depends on how much is audited, and the type of statements being audited. Ten percent throughput loss due to auditing is a reasonable off-the-cuff estimate, but you should definitely test the actual effect before rolling out a new system.
Finally, you can whitelist users in the “Ignore Events From These Users” box. These are users who are trusted so completely their actions do not need to be logged. For example, you may have an automated script that inserts new data. You trust this script completely. Creating a whitelisted user and having the script use that user’s credentials may be useful to avoid generating too many audit records.
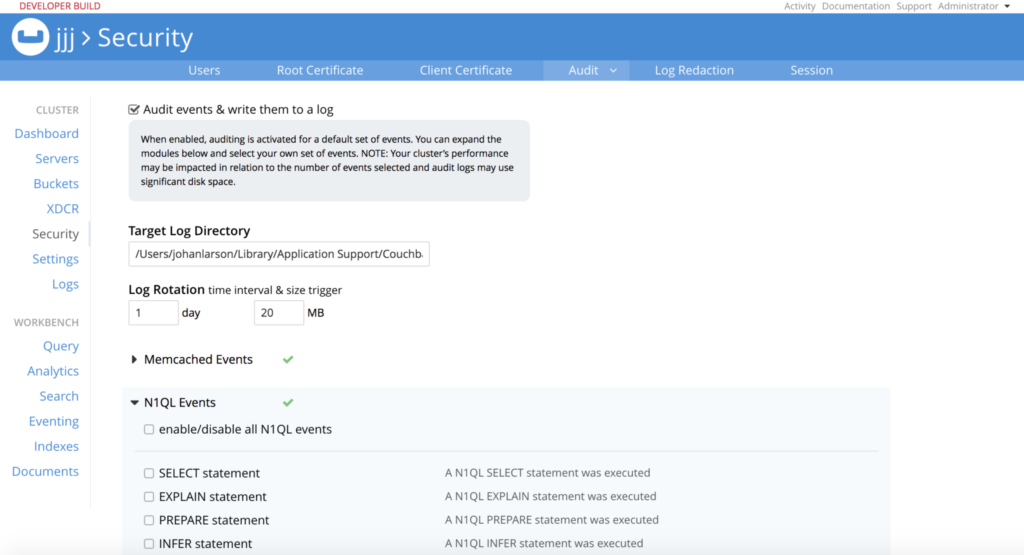
Toggle the “N1QL Events” dropdown, to see the types of events available for N1QL.

There are two general types. First are events corresponding to N1QL statement types. For example, you can choose to audit all INSERT events, or all DELETE events. It might for example be reasonable to audit all events that modify data (INSERT/DELETE/UPDATE/UPSERT), but ignore statements that only retrieve data (SELECT).
Second are events corresponding to APIs exposed by the query engine. The N1QL query engine makes a number of APIs available, typically for monitoring the system. Each of these API endpoints is a separate event type. For example, there is one for the /admin/stats endpoint, and another for the /admin/ping endpoint. You have separate control over whether to audit accesses to these APIs.
Plain Query
We’ll start by auditing a simple SELECT statement.
Go to the “Buckets” page of the admin console, and create a bucket named “test” (no quotes). Memory quota 100 MB is fine for our purposes. Then go to the Query and create a primary index on the new bucket, to allow us to run N1QL queries on it.
create primary index on test
The go back to the audit configuration screen and select “Audit events & write them to a log” at the top, and the “SELECT statement” option under “N1QL Events”. Then press “Save” at the bottom of the screen.
Then run a query like this.
curl http://localhost:8093/query/service -d "statement=select * from test" -u Administrator:password
And let’s have a look at the audit log. The “Target Log Directory” field of the audit configuration screen has the directory where the audit log is stored. We’ll use the “tail” command to show the last few records of the audit log in this directory. On Mac systems, this command works:
tail ~/Library/Application\ Support/Couchbase/var/lib/couchbase/logs/audit.log
You should see several long lines of JSON text. Each line is one audit record. The last one is the record for the statement we sent. Reformatted, it looks like this:
|
1 2 3 4 5 6 7 8 9 10 11 12 13 14 15 16 17 18 19 20 21 22 |
{ "timestamp": "2018-03-14T05:53:34.976-07:00", "real_userid": { "source": "local", "user": "Administrator" }, "requestId": "d0554df3-fd99-40f5-b911-b3e4f0faf050", "statement": "select * from test", "isAdHoc": true, "userAgent": "curl\/7.43.0", "node": "127.0.0.1:8091", "status": "success", "metrics": { "elapsedTime": "822.147\u00b5s", "executionTime": "785.755\u00b5s", "resultCount": 0, "resultSize": 0 }, "id": 28672, "name": "SELECT statement", "description": "A N1QL SELECT statement was executed" } |
Let’s go through these field by field:
- “timestamp” shows the time from the query node.
- “real_userid” shows what user credential was supplied with the request. In this case it is the build-in user, “Administrator”.
- “requestId” is the UUID the query engine generates for every request. These IDs are unique with very high probability.
- “statement” is the actual statement we executed.
- “isAdHoc” is true in this case, showing that we sent an actual statement for execution, rather than running a prepared statement.
- “userAgent” is the User-Agent string from the original request. This is useful for distinguishing whether the request came from an SDK, or the CBQ shell, or the Query WorkBench.
- “node” is the IP address from which the request was received.
- “status” shows what happened to the request. In this case, it succeeded.
- “metrics” is a set of statistics about the result. This matches the metrics that were sent with the result of the original request.
- “id” is the event type ID. The audit records for all SELECT queries have the same id, 28672.
- “name” is the short name of the event type. This will be the same for all SELECT queries.
- “description” is the long name of the event type. This is also the same for all SELECT queries.
Note that the audit record provides for only one user, although the query engine allows for multiple credentials per request. This is by design. N1QL allowed multiple credentials for queries back when our credentials were per-bucket, and multiple credentials were therefore necessary for multi-bucket joins. But as of 5.0, with RBAC, multiple credentials are no longer necessary. We support them for backward compatibility, but the right way to handle such cases is to create users with credentials for multiple buckets, and use one such user for each query. If you insist on using multiple credentials for an audited query, the query will get audited, but there will be a separate audit record for every credential supplied. That’s a bit awkward, so we strongly suggest updating the permissions model to use RBAC permissions in such cases.
Prepare Statement
Now let’s consider a more sophisticated case, with a prepared statement. First, go back to the audit configuration screen, and turn on auditing of SELECT and PREPARE statements. Remember to hit “Save” at the bottom of the screen.
Now, we’ll first prepare a statement. Here we are preparing a SELECT statement, with name “example”. Note that the statement has an unnamed parameter.
curl http://localhost:8093/query/service -d "statement=prepare example as select * from test where one=?" -u Administrator:password
Then, we’ll execute the statement, supplying an argument for the statement. In this case, the statement will run, but return no results.
curl http://localhost:8093/query/service -d 'prepared="example"&args=["bar"]'
Now let’s have a look at the audit log again.
tail ~/Library/Application\ Support/Couchbase/var/lib/couchbase/logs/audit.log
The log will show two events, one for the PREPARE, and one for the SELECT executed from the prepared statement:
|
1 2 3 4 5 6 7 8 9 10 11 12 13 14 15 16 17 18 19 20 21 22 23 24 25 26 27 28 29 30 31 32 33 34 35 36 37 38 39 40 41 42 43 44 45 46 47 |
{ "timestamp": "2018-03-14T06:27:39.884-07:00", "real_userid": { "source": "local", "user": "Administrator" }, "requestId": "9f76b8c2-ed9f-42f8-bc5c-31fb3326a661", "statement": "prepare example as select * from test where one=?", "isAdHoc": true, "userAgent": "curl\/7.43.0", "node": "127.0.0.1:8091", "status": "success", "metrics": { "elapsedTime": "6.591126ms", "executionTime": "6.515079ms", "resultCount": 1, "resultSize": 1279 }, "id": 28674, "name": "PREPARE statement", "description": "A N1QL PREPARE statement was executed" } { "timestamp": "2018-03-14T06:27:52.992-07:00", "real_userid": { "source": "internal", "user": "unknown" }, "requestId": "56c5278b-5842-45a9-8549-5c7f52f109a7", "statement": "", "positionalArgs": [ "\"bar\"" ], "isAdHoc": false, "userAgent": "curl\/7.43.0", "node": "127.0.0.1:8091", "status": "success", "metrics": { "elapsedTime": "1.363373ms", "executionTime": "1.334763ms", "resultCount": 0, "resultSize": 0 }, "id": 28672, "name": "SELECT statement", "description": "A N1QL SELECT statement was executed" } |
The fields of the audit records are similar to the earlier execution of a SELECT statements, but two fields bear notice:
- “positionalArgs” contains the argument supplied with the query.
- “isAdHoc” is in this case false, because the SELECT was executed from a prepared statement that was sent earlier.
API Request
Next, let’s try auditing one of the query engine APIs. Go to the audit configuration page, and turn on the “/admin/ping API request” event type. Don’t forget to save the configuration at the bottom of the page.
Now send a ping:
curl -v http://localhost:8093/admin/ping
Don’t expect much, the “{}” at the bottom is the entire result:
|
1 2 3 4 5 6 7 8 9 10 11 12 13 14 |
* Trying ::1... * Connected to localhost (::1) port 8093 (#0) > GET /admin/ping HTTP/1.1 > Host: localhost:8093 > User-Agent: curl/7.43.0 > Accept: */* > < HTTP/1.1 200 OK < Date: Wed, 14 Mar 2018 13:54:24 GMT < Content-Length: 2 < Content-Type: text/plain; charset=utf-8 < * Connection #0 to host localhost left intact {} |
Then let’s have a look at the audit log (again, using the location on Macs):
tail ~/Library/Application\ Support/Couchbase/var/lib/couchbase/logs/audit.log
The resulting audit log message, formatted, looks like this:
|
1 2 3 4 5 6 7 8 9 10 11 12 13 |
{ "timestamp": "2018-03-14T06:54:24.887-07:00", "real_userid": { "source": "internal", "user": "unknown" }, "httpMethod": "GET", "httpResultCode": 200, "errorMessage": "", "id": 28697, "name": "/admin/ping API request", "description": "An HTTP request was made to the API at /admin/ping." } |
Here “timestamp” and “real_userid” fields work as before, in the SELECT example. “httpMethod” is the type of HTTP request. “httpResultCode” and “errorMessage” indicate what happened with the request. “Id”, “name” and “description” are specific to the audit event; these fields will be identical for all audit records created for /admin/ping events.
Forward Filtering
(This is an advanced topic. You don’t need to know the material in this section to use N1QL auditing effectively. But a look under the hood may be of interest to advanced users.)
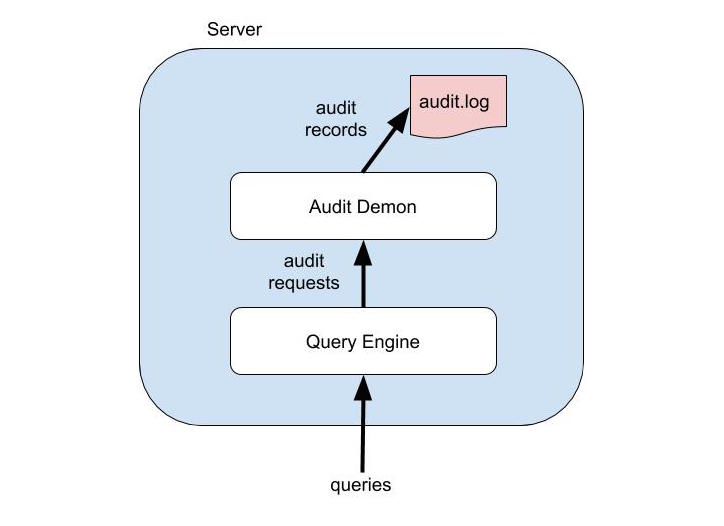
Auditing is controlled in each server by an executable called the audit demon. The audit demon creates all records in the audit log. In 5.0, the audit demon was responsible for all filtering of events; clients sent records for all auditable events, and the audit demon would create audit records in the log, or not, depending on the filtering configuration. Unfortunately this would be very inefficient when auditing is highly filtered an clients are doing a lot of potentially auditable work. A client such as the query engine might generate millions of records only to have them thrown away by the audit demon when they arrived.

To alleviate this problem, in 5.5 Couchbase supports forward filtering. The query engine is aware of the current audit configuration, and sends only the currently audited records to the audit demon. It also sends a special audit record to indicate that it has received the new configuration and is aware of it.
This dual filtering is why you may see two types of configuration records in the audit log. A record like this indicates the audit demon has received a new configuration:
|
1 2 3 4 5 6 7 8 9 10 |
{"rotate_size":20971520,"log_path":"/Users/johanlarson/Library/Application Support/Couchbase/var/lib/couchbase/logs","rotate_interval":86400, "disabled_userids":[],"auditd_enabled":true, "disabled":[20485,20488,20489,20490,20491,28673,28675,28676,28677,28678,28679,28680,28681,28682, 28683,28684,28685,28686,28687,28688,28689,28690,28691,28692,28693,28694,28695,28697,28698,28699, 28700,28701,28702,32770,32771,32772,32780], "enabled:[20480,20482,20483,28672,28674,32768,32769,32773,32774,32775,32776,32777,32778,32779,32781,32782], "real_userid":{"source":"ns_server","user":"Administrator"},"sessionid":"8b3d16bffa8444ce596b64a78c0185f7", "remote":{"ip":"127.0.0.1","port":52153}, "timestamp":"2018-03-14T06:25:30.370-07:00","id":8240,"name":"configured audit daemon", "description":"loaded configuration file for audit daemon"} |
And a record like this indicates that the query engine has received a new configuration:
|
1 2 3 |
{"timestamp":"2018-03-14T06:25:30.427-07:00", "real_userid":{"source":"","user":""},"uuid":"26571424","id":28703, "name":"N1QL configuration","description":"States that N1QL is using audit configuration with specified uuid"} |
Note the UUID that identifies the configuration. You can get this UUID from the configuration, like this:
curl http://localhost:8091/pools/default -u Administrator:password
Look for the “auditUid” field.
You can get the complete audit configuration like this:
curl http://localhost:8091/settings/audit -u Administrator:password
|
1 2 3 4 5 6 7 |
{"disabled":[20485,20488,20489,20490,20491,28673,28675,28676,28677,28678, 28679,28680,28681,28682,28683,28684,28685,28686,28687,28688,28689, 28690,28691,28692,28693,28694,28695,28698,28699,28700,28701,28702, 32770,32771,32772,32780], "uid":"18635804","auditdEnabled":true,"disabledUsers":[], "logPath":"/Users/johanlarson/Library/Application Support/Couchbase/var/lib/couchbase/logs", "rotateInterval":86400,"rotateSize":20971520} |
Loading the Audit Log
Couchbase Server currently only supports one destination for audit records: a file on the server. But sometimes it would be useful to get the audit records into the database itself. This is not difficult, since the audit records are JSON. But loading the log does require use of a utility, cbimport.
Assuming you have the audit log created in the standard location on a Mac, and you have created the “test” bucket, this incantation loads the audit.log file into the “test” bucket:
/Applications/Couchbase\ Server.app/Contents/Resources/couchbase-core/bin/cbimport json -c http://localhost:8091 -u Administrator -p password -b test -g "#UUID#" -d file:///Users/johanlarson/Library/Application\ Support/Couchbase/var/lib/couchbase/logs/audit.log -f lines
That’s rather a lot to take it, and you would need slightly different variations on other systems, so let’s go through this step by step.
- /Applications/Couchbase\ Server.app/Contents/Resources/couchbase-core/bin/cbimport is the full path to the cbimport command on a Mac. For other systems, the utilities are located elsewhere. See this document.
- -c http://localhost:8091 is the URL of the server where Couchbase is running
- -u Administrator -p password is the username and password of the user we are uploading the data as (in this case the default administrator.)
- -b test is the name of the bucket we are uploading the data into.
- -g “#UUID#” is the type of key to generate for each document entered into the bucket. In this case, we are using a UUID, but there are many other options. Check the cbimport documentation for more information.
- -d file:///Users/johanlarson/Library/Application\ Support/Couchbase/var/lib/couchbase/logs/audit.log is a file URL pointing to the location of the audit log. Note the three forward slashes and the backslash to allow a space in the URL path. The logs, including the audit log, are placed in standard directories that vary from system to system. See this document for more information.
Once the audit records are in the system, you can query them just like any other data.Go to the Query WorkBench to try it out.
This query shows how many audit records you have:
select count(*) as num from test
And this query breaks down the count by audit record type:
select name, count(*) as num from test group by name
Summary
- Requests to query engine are auditable as of Couchbase Server 5.5 EE.
- Auditing in general supports filtering by event type and user whitelisting.
- Requests are marked as events by query type and API endpoint.
- Additional documentation about auditing of N1QL statements is available here.
- Download Couchbase Server 5.5 here.
Is it possible to audit only selective documents? For e.g. I only want to audit documents with type=’hotels’
No, it’s not possible to be selective by document characteristics.