Couchbase Mobile 2.0 supports certificate pinning on all Couchbase mobile platforms. Certificate pinning is a technique used by applications to “pin” a host to it’s certificate/public key. Communication between Couchbase Lite and Sync Gateway is encryped and secured using SSL/TLS. The SSL/TLS protocol relies on a Public Key Infrastructure (PKI) mechanism using a X.509 certificate to establish the Sync Gateway server’s identity. The certificate is typically issued/signed by a trusted Certificate Authority and is installed on the Sync Gateway.
In a development environment, this certificate may be self-signed.
If the trustworthiness of the certificate is somehow compromised or if you are using a self signed certificate, then the identity of the server cannot be reliably established and there can be no confidentiality guarantees on the communication between the client and server. To alleviate these issues, Couchbase Lite supports certificate pinning. To accomplish certificate pinning, the public-key certificate is typically delivered to the client appv via an out-of-band channel and bundled with the client app. By pinning the certficate, the verifying client app no longer needs to rely on a third party CA for verifying the signature. This technique is also required to communicate with Sync Gateway confgured with self signed certificates.
This post will discuss how to pin certificates within your Coucbase Lite Version 2.0 enabled Android app. Version 1.4 of Couchbase Lite only supported certificate pinning in iOS and that was discussed in this blog post.
You can download the latest pre-release builds of Couchbase Mobile 2.0 from here.
Background
If you are familiar with SSL/TLS or have read this blog post, you can skip ahead to the “Supporting Certificate Pinning with Couchbase Mobile” section of this blog post.
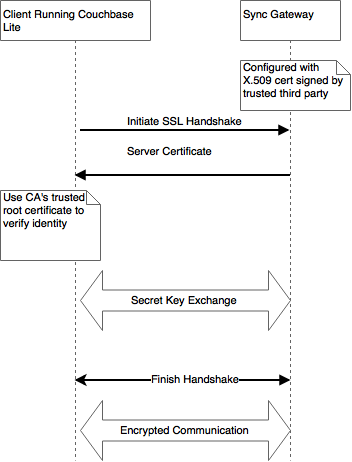
Communication between Couchbase Lite and Sync Gateway is encryped using SSL/TLS.At a very high level, the TLS protocol works as follows.
A X.509 certificate containing the public key and server identity is installed on the Sync Gateway. This public key certificate may be signed by a trusted third party Certificate Authority or may be self-signed, the latter typically the case in development environments.
During connection establishment, the client app running Couchbase Lite verifies the identity of the Sync Gateway using the server certificate. Couchbase Lite uses the trusted CA’s root certificate to validate the certificate. Once verified, the client proceeds with the secret key exchange. The shared secret is then used to encyrpt communication between the client and Sync Gateway.

Please refer to the RFC for specifics on the SSL/TLS protocol.
There are some issues with this approach :-
– While under most circumstances, it is reasonable to rely on the trustworthiness of the CA, it is possible for a CA itself to be compromised. If that happens, then there is no reliable way to authenticate the Sync Gateway because the CA that is used for the verification itself is not trustworthy!
– The client-server communication may be subject to a Man-in-the-Middle (MiTM) attack whereby a rogue server impersonating as a Sync Gateway can issue a fake certificate representing the Sync Gateway, signed by a bogus CA. If the client is somehow misled to include the fake CA’s certificate in it’s trusted root Certificate Authority store, then the client will trust the fake certificate signed by the bogus CA. This will result in the client now communicating with a bogus Sync Gateway.
– If you are using self-signed certificates in your development environment, there is no way for the client to reliably validate the identity of the server.
Certificate Pinning
One common way to handle the issues listed above is to “pin” the Sync Gateway server to it’s certificate/public key. In this technique, the Couchbase Lite is pre-configured with the trusted Sync Gateway certificate. So during connection establishment, Couchbase Lite uses this pre-configured certificate to verify the identity of the server. This removes the reliance on an external third party CA for verification of certificate.
The OWASP website is a good reference on Certificate Pinning.
Caveat
It is important to note that since the applications are bundled with the certificate, every time the certificate expires, the application needs to be updated with the new certificate. This may be a bit more challenging in mobile environments where the onus is on the users to upgrade their apps. So be aware of when the certificates expire and make appropriate plans to publish the applications with the new certificates in advance of the certificate expiration.
Supporting Certificate Pinning with Couchbase Mobile
This post assumes that you are familiar with developing Android apps and configuring your app to use Couchbase Lite 2.0. If not, please review this Getting Started guide. We will use Sync Gateway 1.5 in the cloud backed by a Couchbase server persisting the data in the cloud. The Couchbase Server is not relevant for the discussions in this post.
Installing Certificate on the Sync Gateway
Follow the instructions in the Couchbase Developer Portal to generate / install relevant server certificate on your Sync Gateway
Couple of points to note during certificate generation:-
- The certificate and corresponding private key must be in .pem format
- Install the certificates in a location accesible to the Sync Gateway. Failing to do so will result in an error when you launch the Sync Gateway with the config file.
|
1 2 3 4 5 |
2017–12–10T16:05:21.303–05:00 Using metadata purge interval of 3.00 days for tombstone compaction. 2017–12–10T16:05:21.305–05:00 Starting admin server on 127.0.0.1:4985 2017–12–10T16:05:21.310–05:00 Starting server on :4984 … 2017–12–10T16:05:21.310–05:00 HTTP: Protocols enabled: [http/1.1] on 127.0.0.1:4985 2017–12–10T16:05:21.311–05:00 FATAL: Failed to start HTTP server on 127.0.0.1:4985: open cert.pem: no such file or directory – rest.(*ServerConfig).Serve() at config.go:716 |
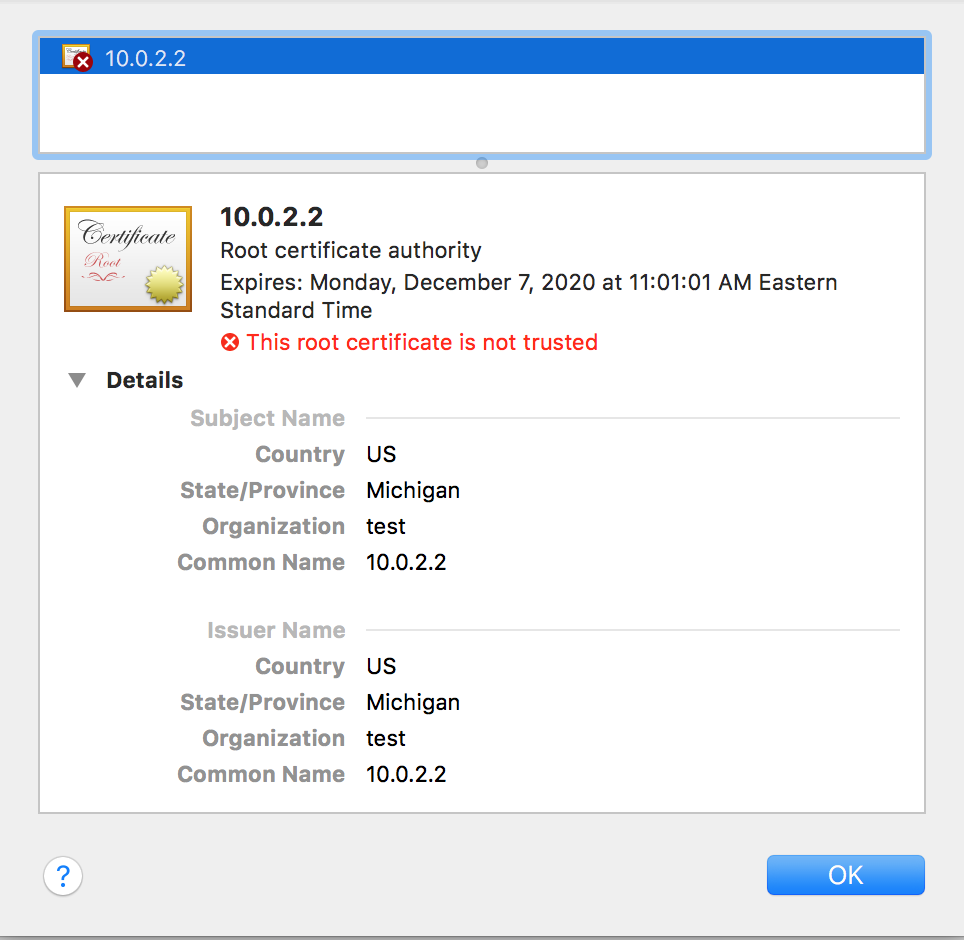
- If you are generating a self-signed certificate, probably the most important field is the
CommonName. It should be your Sync Gateway’s FQDN. If you Sync Gateway does not have one, then you must specify use10.0.2.2for localhost or the static IPAddress of your Sync Gateway.

Sync Gateway Config File
Confirm that the Sync Gateway config file includes the following properties
|
1 2 |
"SSLCert": "ssl/cert.pem", "SSLKey": "ssl/privkey.pem", |
Verifying SSL Setup in your Sync Gateway
To verify that you can connect to your Sync Gateway over SSL, run the following curl command in a terminal command. Replace localhost in command below with IP Address of your Sync Gateway.
|
1 |
curl -k -X GET https://localhost:4984 -H 'cache-control: no-cache' –verbose |
If configuration is correct, you should see something like this in the output
|
1 2 3 4 5 6 7 8 9 10 11 12 13 14 15 16 17 18 19 20 21 22 23 24 25 26 27 28 29 30 31 32 33 34 35 36 37 38 39 40 41 42 43 |
* Rebuilt URL to: https://localhost:4984 / * Trying ::1… * TCP_NODELAY set * Connected to localhost (::1) port 4984 (#0) * ALPN, offering http/1.1 * Cipher selection: ALL:!EXPORT:!EXPORT40:!EXPORT56:!aNULL:!LOW:!RC4:@STRENGTH * successfully set certificate verify locations: * CAfile: /Users/priya.rajagopal/anaconda/ssl/cacert.pem CApath: none * TLSv1.2 (OUT), TLS header, Certificate Status (22): * TLSv1.2 (OUT), TLS handshake, Client hello (1): * TLSv1.2 (IN), TLS handshake, Server hello (2): * TLSv1.2 (IN), TLS handshake, Certificate (11): * TLSv1.2 (IN), TLS handshake, Server key exchange (12): * TLSv1.2 (IN), TLS handshake, Server finished (14): * TLSv1.2 (OUT), TLS handshake, Client key exchange (16): * TLSv1.2 (OUT), TLS change cipher, Client hello (1): * TLSv1.2 (OUT), TLS handshake, Finished (20): * TLSv1.2 (IN), TLS change cipher, Client hello (1): * TLSv1.2 (IN), TLS handshake, Finished (20): * SSL connection using TLSv1.2 / ECDHE-RSA-AES256-GCM-SHA384 * ALPN, server accepted to use http/1.1 * Server certificate: * subject: C=US; ST=Michigan; O=Couchbase; CN=localhost * start date: Dec 8 14:00:33 2017 GMT * expire date: Dec 7 14:00:33 2020 GMT * issuer: C=US; ST=Michigan; O=Couchbase; CN=localhost * SSL certificate verify result: self signed certificate (18), continuing anyway. > GET / HTTP/1.1 > Host: localhost:4984 > User-Agent: curl/7.52.1 > Accept: / > cache-control: no-cache > < HTTP/1.1 200 OK < Content-Length: 130 < Content-Type: application/json < Server: Couchbase Sync Gateway/1.5.1 < Date: Fri, 08 Dec 2017 14:27:07 GMT < * Curl_http_done: called premature == 0 * Connection #0 to host localhost left intact {"couchdb":"Welcome","vendor":{"name":"Couchbase Sync Gateway","version":1.5},"version":"Couchbase Sync Gateway/1.5.1(4;cb9522c)"} |
- Convert the PEM certificate in der format using command below
|
1 |
openssl x509 -inform PEM -in cert.pem -outform DER -out cert.cer |
You can refer to this SSL cheat sheet for details on the various openSSL commands.
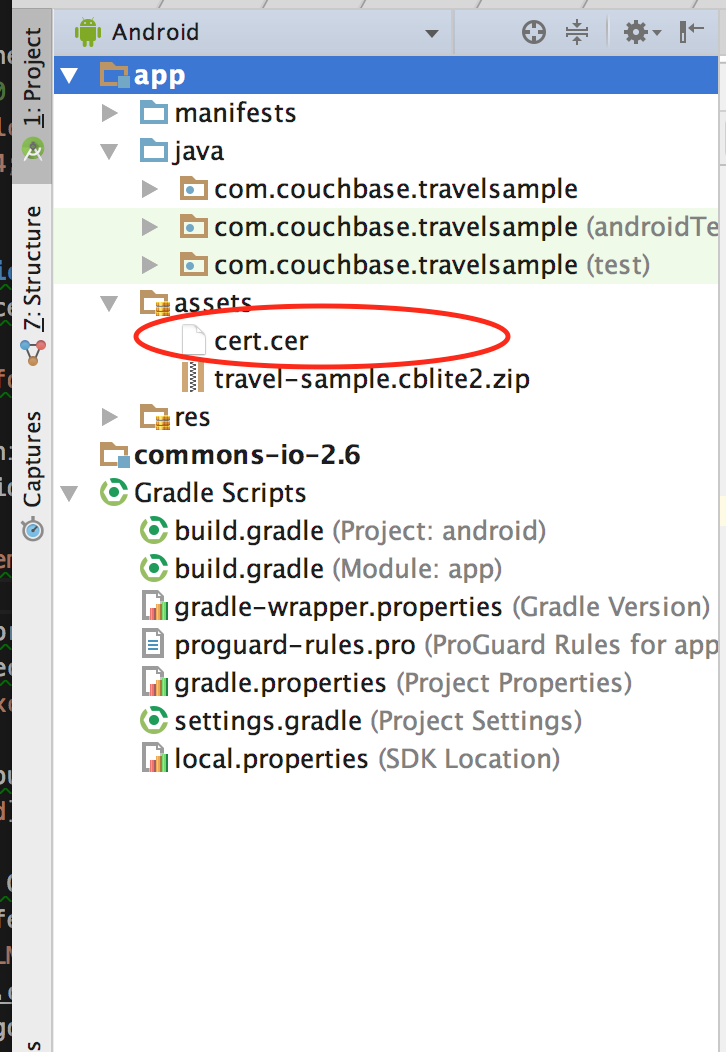
- Copy the
cert.pemfile into your Assets folder. Your Android Studio project folder should be similar to this

- Pinning the Sync Gateway Server Certificate
- In order to pin the certificate, we must first load the certificate that is bundled with the Assets folder.
|
1 2 3 4 5 6 7 8 9 10 11 12 13 |
private byte[] getPinnedCertFile(Context context) { AssetManager assetManager = context.getAssets(); InputStream is = null; byte[] bytes = new byte[0]; try { is = assetManager.open("cert.cer"); return (IOUtils.toByteArray(is)); } catch (IOException e) { e.printStackTrace(); } return null; } |
In this example, we are using IOUtils utility classes from [Apache Commons IO](https://commons.apache.org/proper/commons-io/description.html) to convert the certificate read from File Input Stream to byte array. You can choose any other tool/method for the conversion.
– Configure the Replicator with the pinned certificate. In a real app, you will to do a null check in the certificate before you set it. Omitting the checks here for brevity.
|
1 2 3 4 5 6 7 8 9 10 |
ReplicatorConfiguration config = new ReplicatorConfiguration(database, new URLEndpoint(url)); config.setReplicatorType(ReplicatorConfiguration.ReplicatorType.PUSH_AND_PULL); config.setContinuous(true); config.setAuthenticator(new BasicAuthenticator(username, password)); // Get the certificate bundled in with the app byte[] pinnedServerCert = this.getPinnedCertFile(context); // Set pinned certificate. config.setPinnedServerCertificate(pinnedServerCert); Replicator replicator = new Replicator(config); |
That’s it! With just couple of steps, you can enable certificate pinning in your Android App with Couchbase Mobile 2.0.
What Next
This blog post discussed the benefits of certificate pinning within your mobile apps and how you can enable certificate pinning with Couchbase Lite 2.0. The example discussed an Android app but the approach would be similar on other platforms as well.
If you have questions or feedback, please leave a comment below or feel free to reach out to me at Twitter @rajagp or email me priya.rajagopal@couchbase.com. The Couchbase Forums are another good place to reach out with questions.