A few weeks ago I had written about continuously deploying an application written with the Go programming language using a popular service called Travis CI. This example demonstrated creating an application that used a Couchbase NoSQL database, creating unit tests, executing those tests in the Golang continuous integration pipeline, and finally deploying the application to some remote server when everything is successful.
Travis CI isn’t the only service that offers these features. In fact, you can host your own CI / CD service using Jenkins.
We’re going to see how to use Jenkins for a pipeline for a Golang application, enabling continuous integration and continuous deployment.
If you haven’t already read my previous Golang with Travis CI tutorial, I recommend you do as it provides a lot of useful explanations. A lot of the same material will show up here but will be explained differently, so two explanations could be helpful.
If you want to truly experience this Jenkins with Golang tutorial, you’re going to need Couchbase Server installed somewhere. The goal is to have the application run and use that database instance after being deployed.
Developing a Go with Couchbase Application
To be successful with this tutorial, we’re going to need a Go application to test and deploy. If you want to jump ahead, I have uploaded a functional project to GitHub. It is actually the same project from the Travis CI example.
If you’d prefer to walk through the project, let’s take some time to do so.
Somewhere in your $GOPATH create a file called main.go and include the following Go code. We’re going to break it down after.
|
1 2 3 4 5 6 7 8 9 10 11 12 13 14 15 16 17 18 19 20 21 22 23 24 25 26 27 28 29 30 31 32 33 34 35 36 37 38 39 40 41 42 43 44 45 46 47 48 49 50 |
package main import ( "fmt" "os" gocb "gopkg.in/couchbase/gocb.v1" ) type BucketInterface interface { Get(key string, value interface{}) (gocb.Cas, error) Insert(key string, value interface{}, expiry uint32) (gocb.Cas, error) } type Database struct { bucket BucketInterface } type Person struct { Type string `json:"type"` Firstname string `json:"firstname"` Lastname string `json:"lastname"` } func (d Database) GetPersonDocument(key string) (interface{}, error) { var data interface{} _, err := d.bucket.Get(key, &data) if err != nil { return nil, err } return data, nil } func (d Database) CreatePersonDocument(key string, data interface{}) (interface{}, error) { _, err := d.bucket.Insert(key, data, 0) if err != nil { return nil, err } return data, nil } func main() { fmt.Println("Starting the application...") var database Database cluster, _ := gocb.Connect("couchbase://" + os.Getenv("DB_HOST")) cluster.Authenticate(gocb.PasswordAuthenticator{Username: os.Getenv("DB_USER"), Password: os.Getenv("DB_PASS")}) database.bucket, _ = cluster.OpenBucket(os.Getenv("DB_BUCKET"), "") fmt.Println(database.GetPersonDocument("8eaf1065-5bc7-49b5-8f04-c6a33472d9d5")) database.CreatePersonDocument("blawson", Person{Type: "person", Firstname: "Brett", Lastname: "Lawson"}) } |
The application doesn’t do a whole lot, but there is a lot going on.
In the imports, you’ll notice our use of the Couchbase SDK for Go. To be able to compile this project, you’ll need to download the SDK. It can be done with the following command:
|
1 |
go get gopkg.in/couchbase/gocb.v1 |
Before we start walking through the code, we need to take a step back and figure out how this application should work.
The goal here is to connect to the NoSQL database, Couchbase, retrieve some data, and create some data. Naturally, this would be pretty easy via the SDK, however, we want to create unit tests for our application. It is best practice to never test against a database in a unit test. Save that for your integration testing. If we’re not testing against the database, we need to create mock scenarios.
Instead of creating a bunch of craziness, the best way to divide between real and mock scenarios is to create an interface for both with Go. The main application will use the real classes as part of the interface, while the tests will use the mock.
For this reason, we need to create an interface for the Couchbase Go SDK Bucket component.
|
1 2 3 4 |
type BucketInterface interface { Get(key string, value interface{}) (gocb.Cas, error) Insert(key string, value interface{}, expiry uint32) (gocb.Cas, error) } |
A Couchbase Bucket has far more functions than Get and Insert, but those will be the only functions we use in this example. For simplicity later in the application, we’ll create a struct with the new interface.
|
1 2 3 |
type Database struct { bucket BucketInterface } |
There will be only one data model for this example. We’re going to be using a data model based on the Person data structure. It can change freely without affecting our application.
Take a look at one of our functions that we’ll eventually have unit tests for:
|
1 2 3 4 5 6 7 8 |
func (d Database) GetPersonDocument(key string) (interface{}, error) { var data interface{} _, err := d.bucket.Get(key, &data) if err != nil { return nil, err } return data, nil } |
In the GetPersonDocument function, we are using a BucketInterface and getting a particular document by the document key.
Likewise, if we wanted to create data, we have the following:
|
1 2 3 4 5 6 7 |
func (d Database) CreatePersonDocument(key string, data interface{}) (interface{}, error) { _, err := d.bucket.Insert(key, data, 0) if err != nil { return nil, err } return data, nil } |
I feel like I need to reiterate this, but these functions were designed to be more complex than they need to be. We’re doing this because we want to demonstrate some tests. If it would make you feel better, add some more complexity to them rather than just simple Get and Insert functionality.
Finally, we have the following which gets executed at runtime:
|
1 2 3 4 5 6 7 8 9 |
func main() { fmt.Println("Starting the application...") var database Database cluster, _ := gocb.Connect("couchbase://" + os.Getenv("DB_HOST")) cluster.Authenticate(gocb.PasswordAuthenticator{Username: os.Getenv("DB_USER"), Password: os.Getenv("DB_PASS")}) database.bucket, _ = cluster.OpenBucket(os.Getenv("DB_BUCKET"), "") fmt.Println(database.GetPersonDocument("8eaf1065-5bc7-49b5-8f04-c6a33472d9d5")) database.CreatePersonDocument("blawson", Person{Type: "person", Firstname: "Brett", Lastname: "Lawson"}) } |
When the application is run, we establish a connection to Couchbase using environment variables. The open Bucket is set to our BucketInterface, and then the two functions are executed.
So how do we test this?
Create a file in your project called main_test.go with the following code:
|
1 2 3 4 5 6 7 8 9 10 11 12 13 14 15 16 17 18 19 20 21 22 23 24 25 26 27 28 29 30 31 32 33 34 35 36 37 38 39 40 41 42 43 44 45 46 47 48 49 50 51 52 53 54 55 56 57 58 59 60 61 62 63 64 65 66 67 68 69 70 71 |
package main import ( "encoding/json" "os" "testing" "github.com/mitchellh/mapstructure" gocb "gopkg.in/couchbase/gocb.v1" ) type MockBucket struct{} var testdatabase Database func convert(start interface{}, end interface{}) error { bytes, err := json.Marshal(start) if err != nil { return err } err = json.Unmarshal(bytes, end) if err != nil { return err } return nil } func (b MockBucket) Get(key string, value interface{}) (gocb.Cas, error) { switch key { case "nraboy": err := convert(Person{Type: "person", Firstname: "Nic", Lastname: "Raboy"}, value) if err != nil { return 0, err } default: return 0, gocb.ErrKeyNotFound } return 1, nil } func (b MockBucket) Insert(key string, value interface{}, expiry uint32) (gocb.Cas, error) { switch key { case "nraboy": return 0, gocb.ErrKeyExists } return 1, nil } func TestMain(m *testing.M) { testdatabase.bucket = &MockBucket{} os.Exit(m.Run()) } func TestGetPersonDocument(t *testing.T) { data, err := testdatabase.GetPersonDocument("nraboy") if err != nil { t.Fatalf("Expected `err` to be `%s`, but got `%s`", "nil", err) } var person Person mapstructure.Decode(data, &person) if person.Type != "person" { t.Fatalf("Expected `type` to be %s, but got %s", "person", person.Type) } } func TestCreatePersonDocument(t *testing.T) { _, err := testdatabase.CreatePersonDocument("blawson", Person{Type: "person", Firstname: "Brett", Lastname: "Lawson"}) if err != nil { t.Fatalf("Expected `err` to be `%s`, but got `%s`", "nil", err) } } |
You’ll notice that this file is quite long and we’re also including another custom package. Before we analyze the code, let’s get that package downloaded. From the command line, execute the following:
|
1 |
go get github.com/mitchellh/mapstructure |
The mapstructure package will allow us to take maps and convert them to actual data structures such as the Person data structure that we had previously created. It essentially gives us a little flexibility in what we can do.
If you’d like to learn more about the mapstructure package, check out a previous article I wrote titled, Decode Map Values Into Native Golang Structures.
With the dependencies installed, now we can look at the code. Remember, how we used the Bucket from the Go SDK in our main code? In the test code, we aren’t going to do that.
|
1 2 3 |
type MockBucket struct{} var testdatabase Database |
In our test code, we are creating an empty struct, but we are setting it to the BucketInterface in the Database data structure that was created in our main code.
The actual setting of the data structure happens in the TestMain function which runs before all other tests:
|
1 2 3 4 |
func TestMain(m *testing.M) { testdatabase.bucket = &MockBucket{} os.Exit(m.Run()) } |
Now, since we are using a MockBucket, it doesn’t have all the functions that the gocb.Bucket might have had. Instead, we need to rely on the BucketInterface definition.
We need to create a Get and an Insert function as defined in the interface.
Starting with the Get function, we have the following:
|
1 2 3 4 5 6 7 8 9 10 11 12 13 14 15 16 17 18 19 20 21 22 23 24 |
func convert(start interface{}, end interface{}) error { bytes, err := json.Marshal(start) if err != nil { return err } err = json.Unmarshal(bytes, end) if err != nil { return err } return nil } func (b MockBucket) Get(key string, value interface{}) (gocb.Cas, error) { switch key { case "nraboy": err := convert(Person{Type: "person", Firstname: "Nic", Lastname: "Raboy"}, value) if err != nil { return 0, err } default: return 0, gocb.ErrKeyNotFound } return 1, nil } |
If we are using a MockBucket and we try to Get, we are expecting only one key to be valid. Remember, this is a test so we make the rules. If nraboy is used as a key, we return some mock data, otherwise, we return a key not found error. Because we’re working with potentially several types of data, we need to convert our data using the convert function. Essentially we’re marshaling an interface into JSON, then marshaling it back.
Now let’s have a look at that mock Insert function.
|
1 2 3 4 5 6 7 |
func (b MockBucket) Insert(key string, value interface{}, expiry uint32) (gocb.Cas, error) { switch key { case "nraboy": return 0, gocb.ErrKeyExists } return 1, nil } |
If we try to insert data using our mock Bucket, we are expecting that the key is not equal to nraboy, otherwise, throw an error.
With the interface functions created, we can focus on the actual tests that test the functions in the main Go code.
|
1 2 3 4 5 6 7 8 9 10 11 |
func TestGetPersonDocument(t *testing.T) { data, err := testdatabase.GetPersonDocument("nraboy") if err != nil { t.Fatalf("Expected `err` to be `%s`, but got `%s`", "nil", err) } var person Person mapstructure.Decode(data, &person) if person.Type != "person" { t.Fatalf("Expected `type` to be %s, but got %s", "person", person.Type) } } |
The TestGetPersonDocument will use our mock Bucket on the actual GetPersonDocument function. Remember, we’re using interfaces, so Go will figure out which interface function to use, whether that be the real Couchbase Go SDK function or the mock function that we used. Depending on the results is what happens in the test.
|
1 2 3 4 5 6 |
func TestCreatePersonDocument(t *testing.T) { _, err := testdatabase.CreatePersonDocument("blawson", Person{Type: "person", Firstname: "Brett", Lastname: "Lawson"}) if err != nil { t.Fatalf("Expected `err` to be `%s`, but got `%s`", "nil", err) } } |
The TestCreatePersonDocument is no different than the previous. We are calling the actual CreatePersonDocument, but we are using our mock Bucket with the mock Insert function.
At this point in time, we have a functional Go application with tests and we are ready for continuous integration and continuous deployment.
Installing and Configuring Jenkins for SSH and Golang Deployments
This next step assumes that you have a remote server that is ready to receive deployments. I did not, so I created a Docker container with Ubuntu. In fact, both my Jenkins installation and remote server are using Docker.
If you’d like to follow what I did, check this out. From the command line, execute the following to start an Ubuntu container:
|
1 |
docker run -it --name ubuntu ubuntu /bin/bash |
The above command will deploy an Ubuntu container and name it ubuntu. Once deployed, you’ll be connected via the interactive terminal. I didn’t open any ports because container to container communication won’t need a port mapped.
The Ubuntu container won’t have an SSH server available, so we need to install it. Within the Ubuntu shell, execute the following:
|
1 2 3 |
apt-get update apt-get install openssh-server service ssh restart |
The above commands will install openssh-server and start it. While we’re at it, we should probably create a public and private key combination for Jenkins to use.
Within the Ubuntu shell, execute the following:
|
1 |
ssh-keygen -t rsa |
When you’re done, copy the ~/.ssh/id_rsa.pub contents into ~/.ssh/authorized_keys as we’ll be using the private key on the Jenkins server.
Remember, I’m using Jenkins as a Docker container as well. You don’t have to use any containers if you don’t want to. Everything should translate over fine.
If using Docker, spin up a Jenkins container by executing the following:
|
1 |
docker run -d -p 8080:8080 -p 50000:50000 --name jenkins jenkins |
The above command will deploy Jenkins in detached mode and map some ports for us.
When you visit http://localhost:8080 in your web browser, follow the steps in the wizard and make sure you choose to install the recommended plugins.
Once you reach the main Jenkins dashboard, choose Manage Jenkins -> Manage Plugins as we need to download a few things.

We’re going to need a way to compile our Go code, so we’re going to need the Go plugin. We’re going to need to execute our own custom scripts for building, so we need the PostBuildScript plugin. Finally, we want to be able to publish to a remote server and execute commands, so we’ll need the Publish Over SSH plugin which comes with other plugins included.
After the plugins finish downloading, we need to configure them globally.
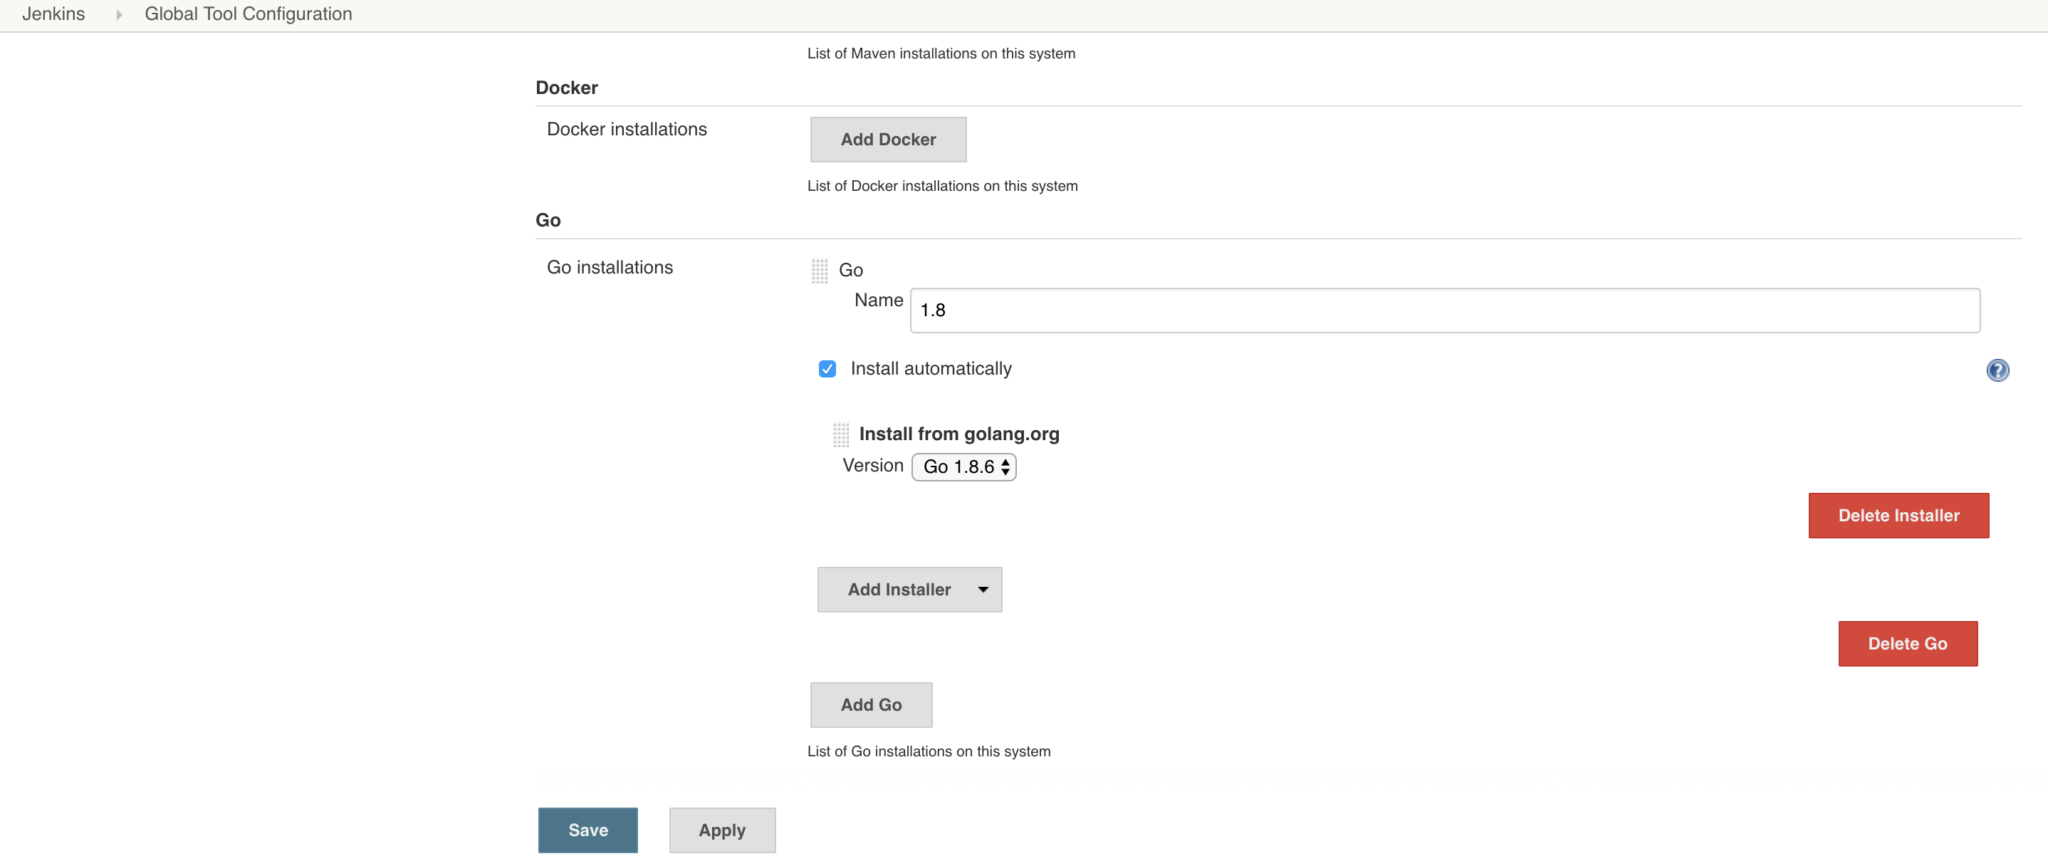
From the main Jenkins dashboard, choose Manage Jenkins -> Global Tool Configuration and search for the Go section.

You’ll want to define what versions of Go are available. For this project, we only need version 1.8, but the rest is up to you.
The next step is to configure our SSH keys for deployment. Remember, we’re not creating our workflow yet, just configuring Jenkins as a whole.
From the main Jenkins dashboard, choose Manage Jenkins -> Configure System and find the SSH section.
You’re going to want to provide your private key and server connection information. If both Jenkins and the remote server are Docker containers on the same network as mine, don’t forget to use the container IP addresses or hostnames, not localhost.
With everything configured, choose New Item from the main Jenkins dashboard.

You’re going to want to give it a name and select Freestyle Project so we can add our own workflow. Take note of the name, because the name will be the project binary that is built.
Now we can define our workflow.
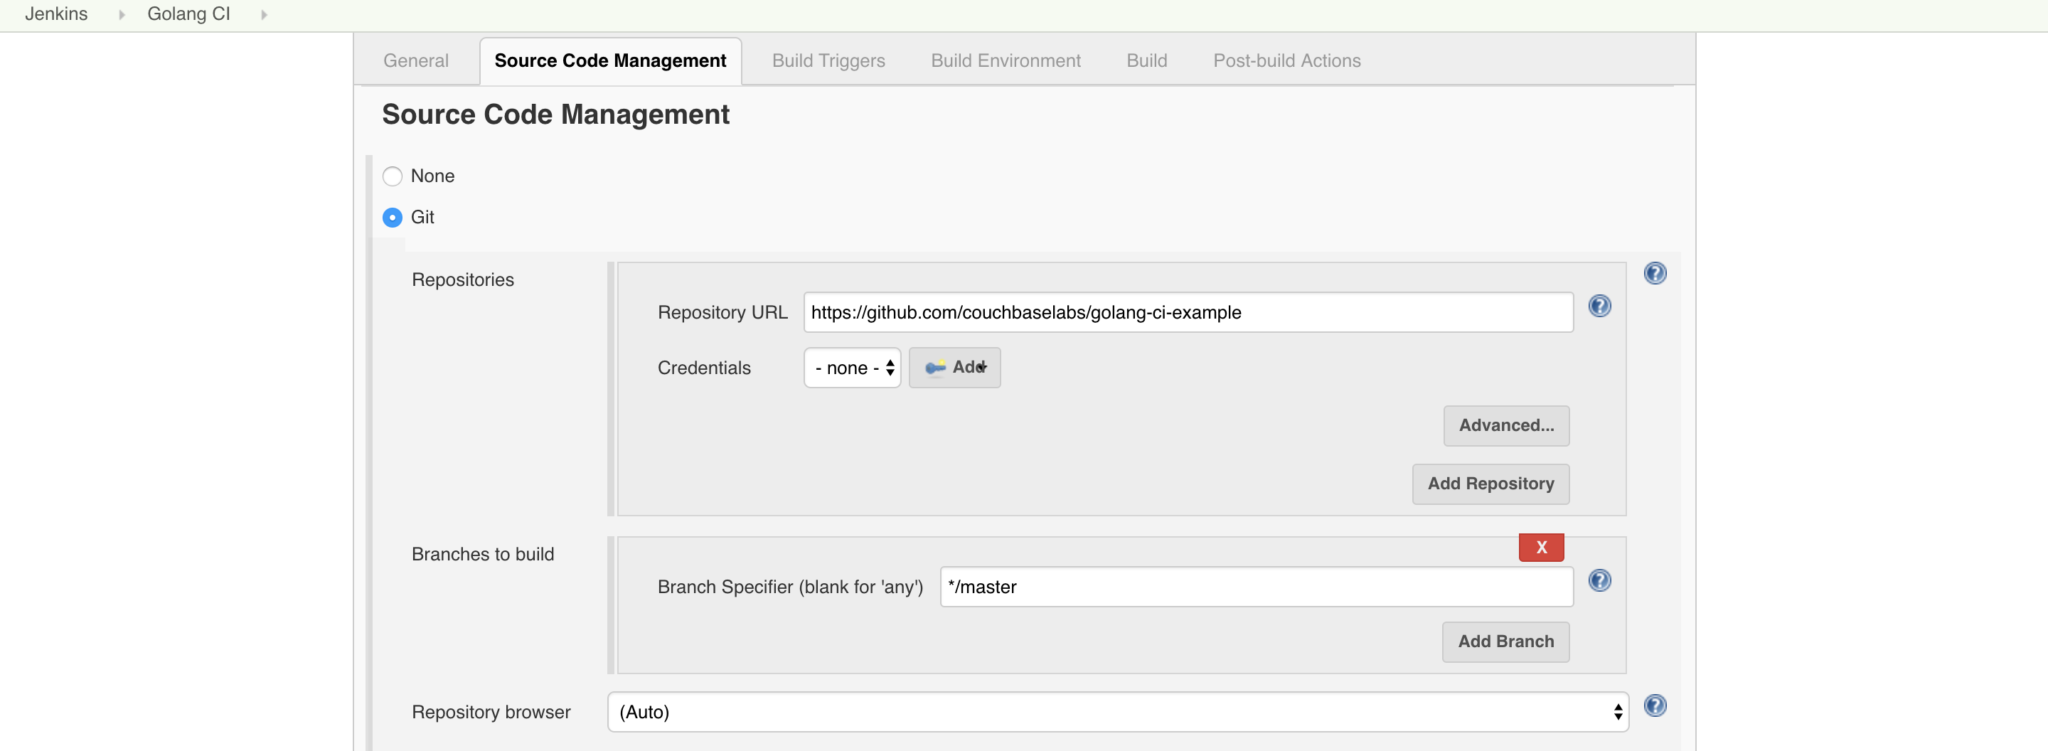
We’ll start with the Source Code Management section. Remember, I have this project on GitHub, so you should definitely take advantage of it.

Since Jenkins in this example is running on localhost and not a domain, we can’t really do anything with the build triggers. For this example, we’ll be triggering things manually.
Before we try to run any scripts, we need to set the build environment to the version of Go specified previously.

When the workflow starts, it will download and install that version of Go prior to running tests or builds.
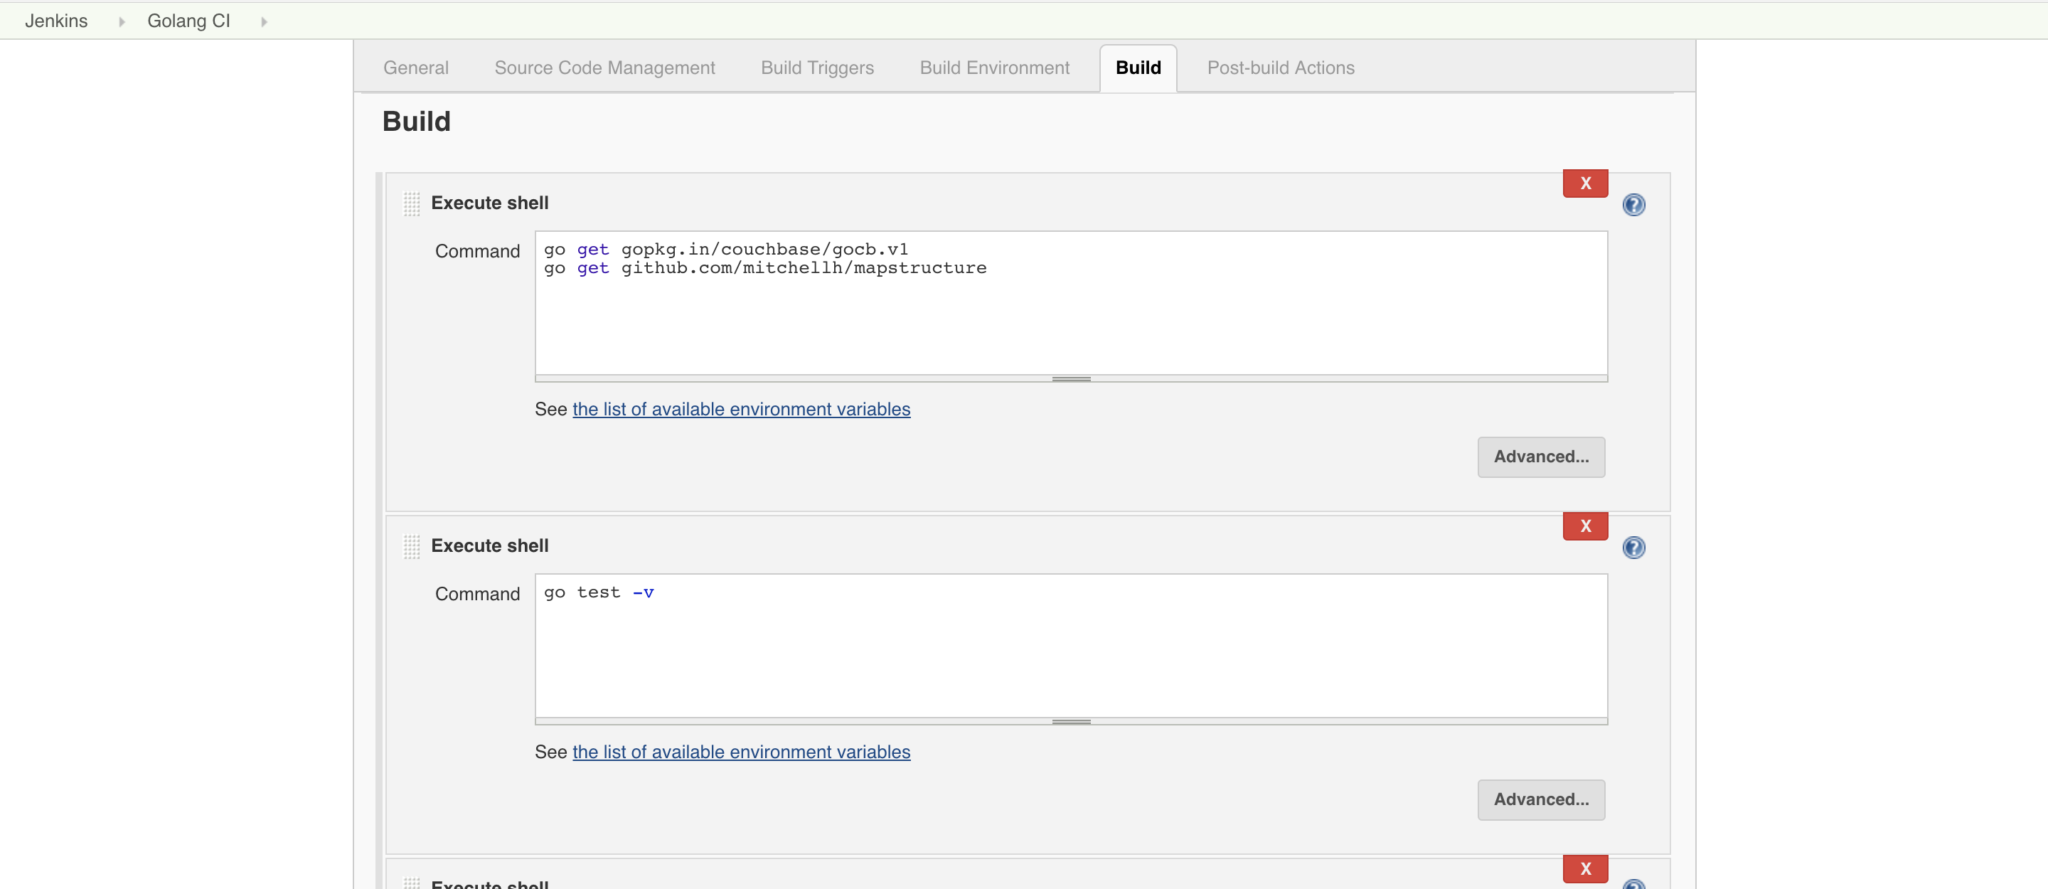
For the build phase, we’re going to accomplish three different steps, separated to keep the flow of things very clean.

The first build step is to download our Go packages. After we have our packages, we can run our tests. After we run our tests we can do a go build to create our binary. If any of these steps fail, the entire build fails, which is how it should be.
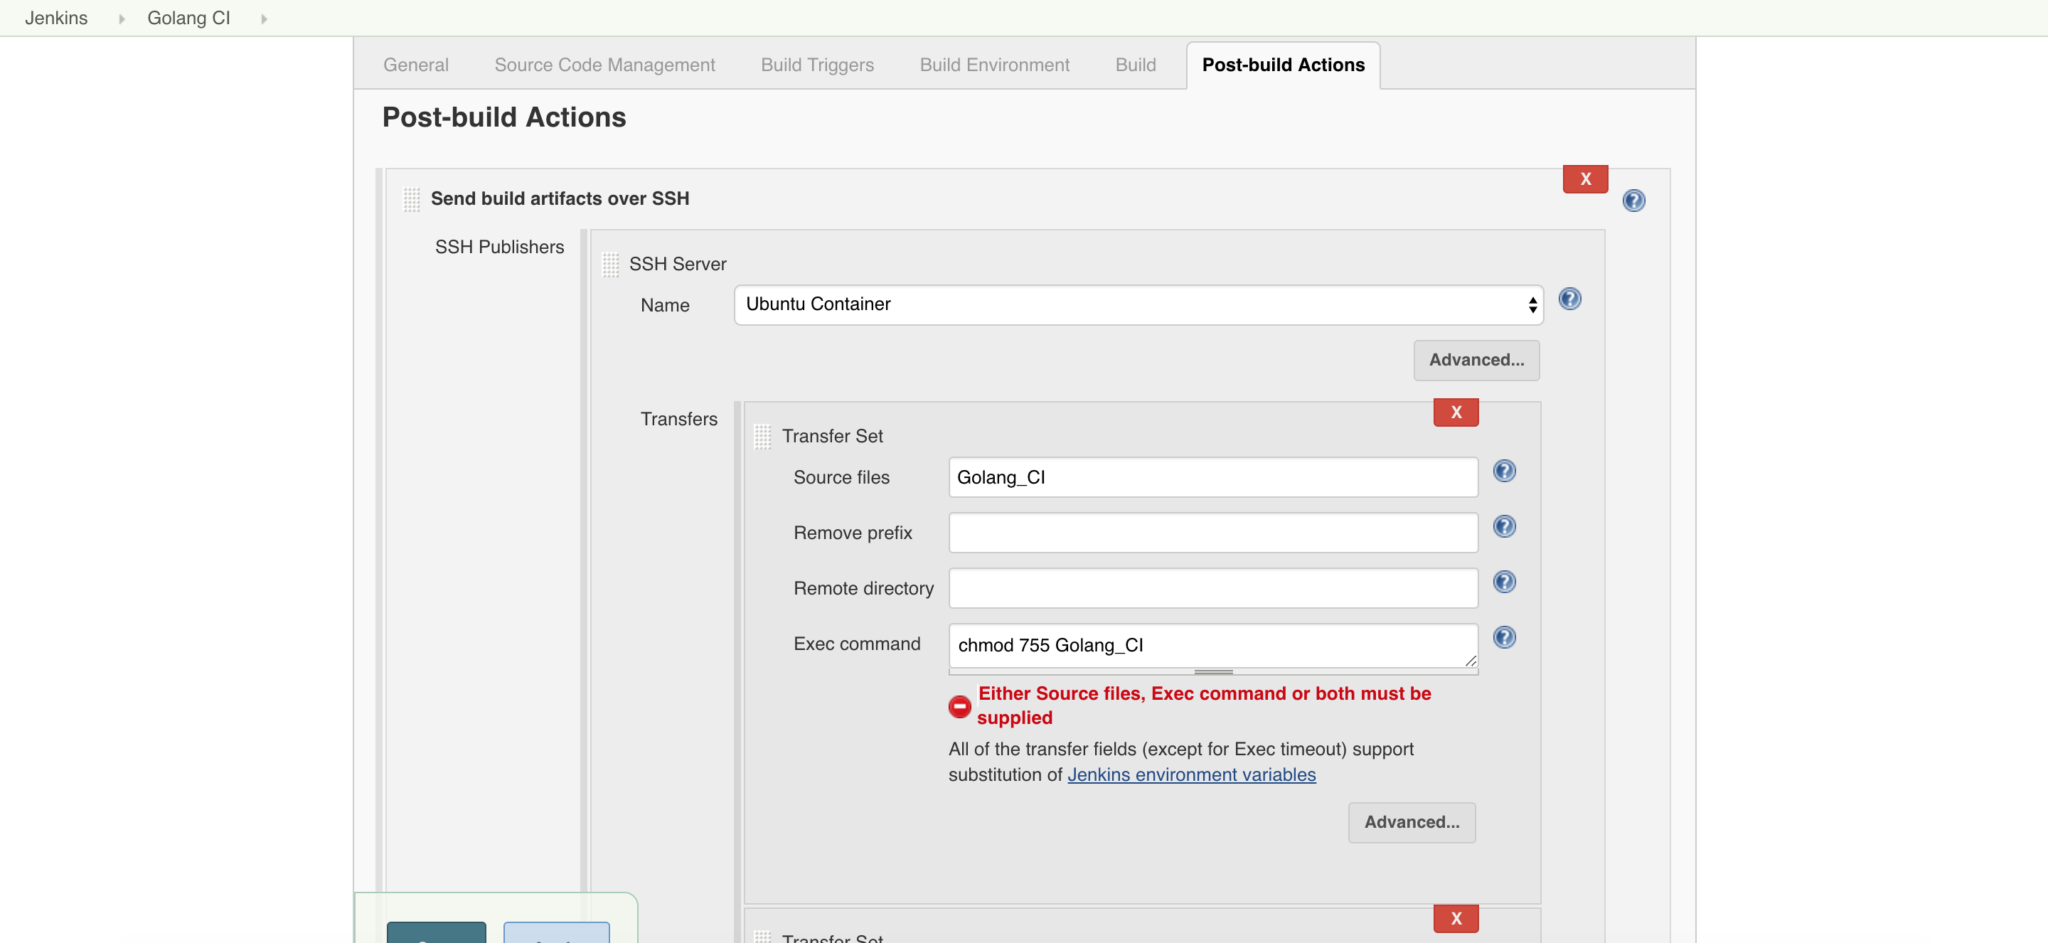
The final step is the deployment. In the Post-build Actions, we want to send our binary over SSH and run it.

There will actually be two transfer sets involved in this process.
The first phase is to take our source file, being the binary, and send it over using the SSH profile we had previously created. Once the file is transferred we will change the permissions so it can be executed.
After the file is uploaded, we want to actually execute it using another Transfer Set. Instead of having a source file in the second set, we’ll just have a command:
|
1 |
DB_HOST=ec2-34-226-41-140.compute-1.amazonaws.com DB_USER=demo DB_PASS=123456 DB_BUCKET=example ./Golang_CI |
Notice I’m passing in variables to be used as environment variables in the application. Swap them out with whatever you’re using, or think about another approach like having these variables set on your server for security.
In theory, you’d be deploying a web application and this final command is used to start the server with connection information.
Conclusion
You just saw how to configure Jenkins and Golang in a pipeline for continuous deployment. To top things off, we actually used Couchbase and Docker in this example to handle our remote server as well as our Jenkins server. Your setup may differ, but the steps are more or less the same.
If you’d like to learn more about using Jenkins and Go with Couchbase, check out the Couchbase Developer Portal.