A month ago, Kubernetes launched a beta for Local Persistent Volumes. In summary, it means that if a Pod using a local disk get killed, no data will be lost (let’s ignore edge cases here). The secret is that a new Pod will be rescheduled to run on the same node, leveraging the disk which already exists there.
Of course, its downside is that we are tying our Pod to a specific node, but if we consider the time and effort spent on loading a copy of the data somewhere else, being able to leverage the same disk becomes a big advantage.
Cloud-native databases, like Couchbase, are designed to handle gracefully nodes or Pods failures. Usually, those nodes are configured to have at least 3 replicas of the data. Therefore, even if you lose one, another one will take over, and the cluster manager or a DBA will trigger a rebalancing process to guarantee that it still has the same 3 copies.
When we put together the Auto-Repair pattern of Kubernetes, Local Persistent Volumes and the recovery process of cloud-native databases, we end up with a very consistent self-healing mechanism. This combination is ideal for use cases which demands high availability, that is why running databases in Kubernetes is becoming such a hot topic nowadays. I have mentioned in a previous blog post some of its advantages, but today, I would like to demonstrate it in action to show you why it is one of the next big things.
Let’s see how easy it is to deploy, recover from pod failures, and scale up and down a database for Kubernetes:
Video Transcription
Configuring your Kubernetes Cluster
Let’s start by configuring your Kubernetes cluster. For this demo, I do not recommend using MiniKube. If you don’t have a cluster for testing, you can create a quick one using tools like Stackpoint.
YAML Files
All files used in the video are available here:
|
1 |
https://github.com/deniswsrosa/microservices-on-kubernetes/tree/master/kubernetes |
Deploying Couchbase’s Kubernetes Operator
An Operator in Kubernetes, from a 10000 foot overview, is a set of custom controllers for a given purpose. In this demo, the Operator is responsible for joining new nodes to the cluster, trigger data rebalancing, and correctly scale up and down the database on Kubernetes:
- Configuring permissions:
|
1 |
./rbac/create_role.sh |
- Deploying the operator:
|
1 |
kubeclt create -f operator.yaml |

You can check the official documentation here.
Deploying a Database on Kubernetes
- Let’s create the username and password that we are going to use to log-in to the web console:
|
1 |
kubeclt create -f secret.yaml |
- Finally, let’s deploy our database on Kubernetes by simply executing the following command:
|
1 |
kubeclt create -f couchbase-cluster.yaml |
After a few minutes, you will notice that your database with 3 nodes is up and running:

I won’t get into too many details on how couchbase-cluster.yaml works (official doc here). But, I would like to highlight two important sessions in this file:
- The following session specifies the bucket name and the number of replicas of the data:
|
1 2 3 4 5 6 7 8 9 10 11 12 |
... buckets: - name: couchbase-sample type: couchbase memoryQuota: 128 replicas: 3 ioPriority: high evictionPolicy: fullEviction conflictResolution: seqno enableFlush: true enableIndexReplica: false ... |
- The session below specifies the number of servers (3) and which services should run in each node.
|
1 2 3 4 5 6 7 8 9 10 11 12 |
... servers: - size: 3 name: all_services services: - data - index - query - search dataPath: /opt/couchbase/var/lib/couchbase/data indexPath: /opt/couchbase/var/lib/couchbase/data ... |
Accessing your Database on Kubernetes
There are many ways in which you can expose the web console to the external world. Ingress, for instance, is one of them. However, for the purpose of this demo, let’s simply forward the port 8091 of the pod cb-example-0000 to our local machine
|
1 |
kubectl port-forward cb-example-0000 8091:8091 |
Now, you should be able to access Couchbase’s Web Console on your local machine at http://localhost:8091:
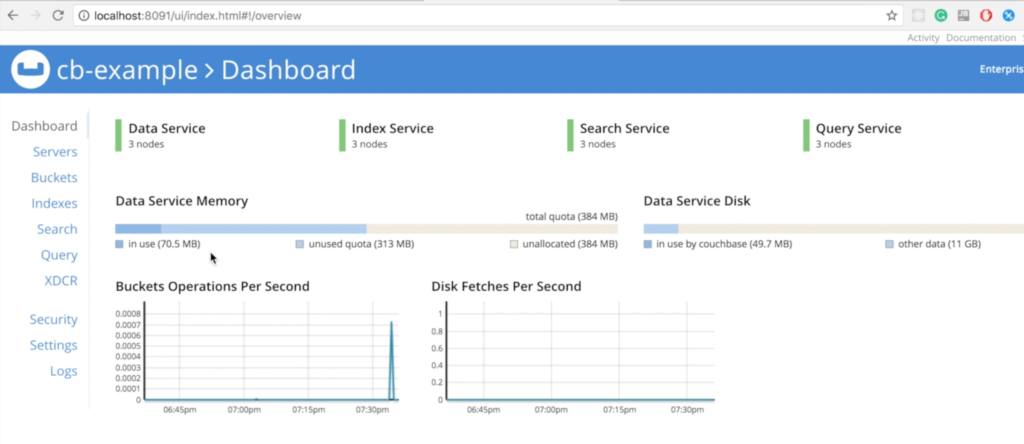
Notice that all three nodes are already talking with each other:

Recovering from a Database Node Failure on Kubernetes
I added some data to illustrate that nothing is lost during the whole process:
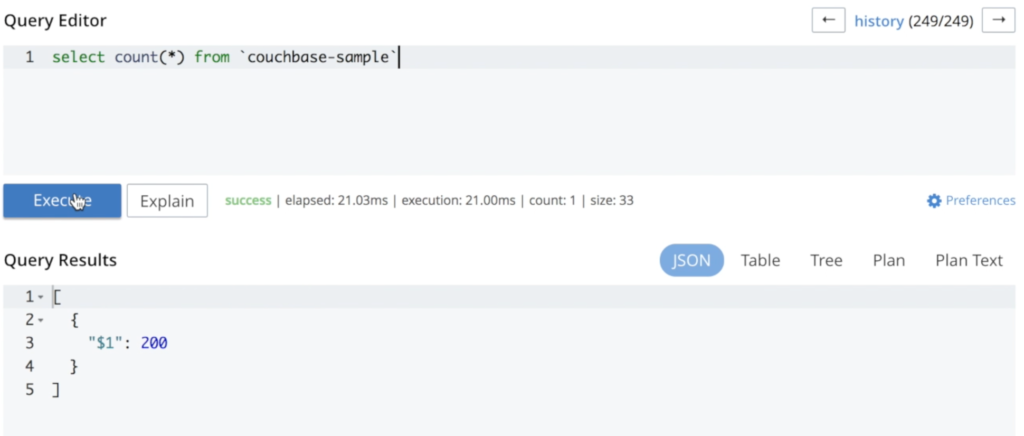
Now, we can delete a pod to see how the cluster behaves:
|
1 |
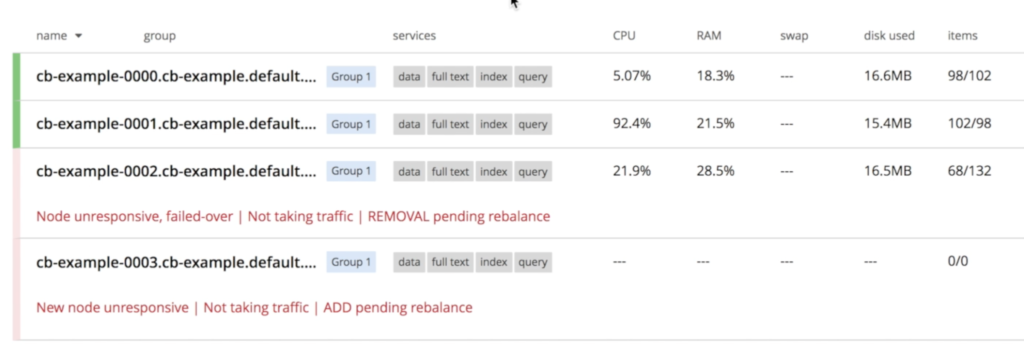
kubectl delete pod cb-example-0002 |

Couchbase will immediately notice that a node “disappeared” and the recovery process will start. As we specified at couchbase-cluster.yaml that we always want 3 servers running, Kubernetes will start a new instance called cb-example-0003:
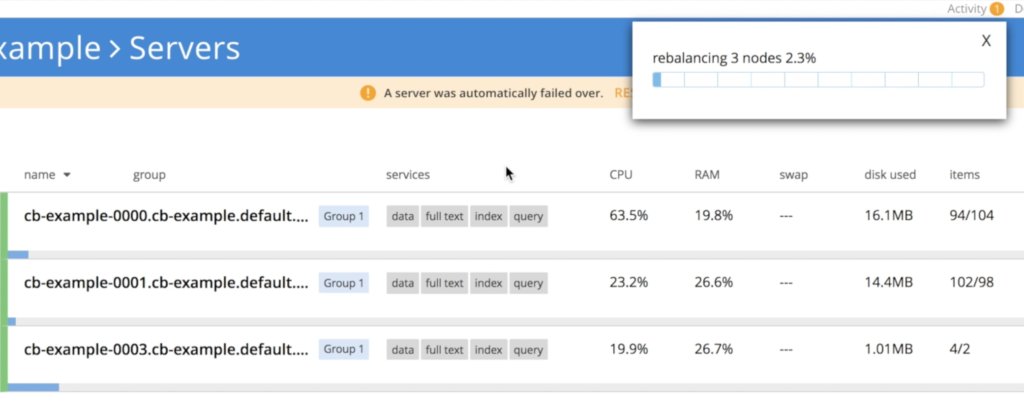
Once cb-example-003 is up, the operator kicks in to join the newly created node to the cluster, and then triggers data rebalancing
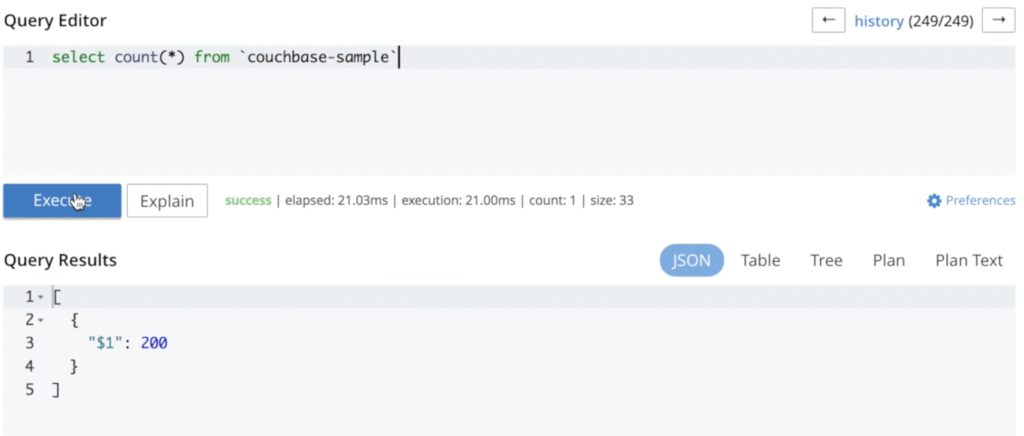
As you can see, no data was lost during this process. Rerunning the same query results in the same number of documents:
Scaling Up a Database on Kubernetes
Let’s scale up from 3 to 6 nodes; all we have to do is change the size parameter on couchbase-cluster.yaml:
|
1 2 3 4 5 6 7 8 9 10 11 12 |
... servers: - size: 6 name: all_services services: - data - index - query - search dataPath: /opt/couchbase/var/lib/couchbase/data indexPath: /opt/couchbase/var/lib/couchbase/data ... |
Then, we update our configuration by running:
|
1 |
kubectl replace -f couchbase-cluster.yaml |
After a few minutes you will see that all the 3 extra nodes were created:

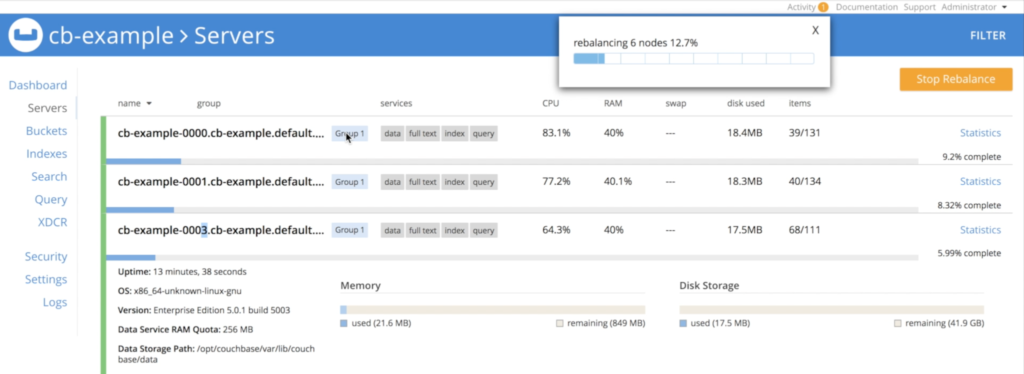
And again, the operator will automatically rebalance the data:
Scaling Down a Database on Kubernetes
The scaling down process is very similar to the scaling up one. All we need to do is to change the size parameter from 6 to 3:
|
1 2 3 4 5 6 7 8 9 10 11 12 |
... servers: - size: 3 name: all_services services: - data - index - query - search dataPath: /opt/couchbase/var/lib/couchbase/data indexPath: /opt/couchbase/var/lib/couchbase/data ... |
And then, we run the replace command again to update the configuration:
|
1 |
kubectl replace -f couchbase-cluster.yaml |
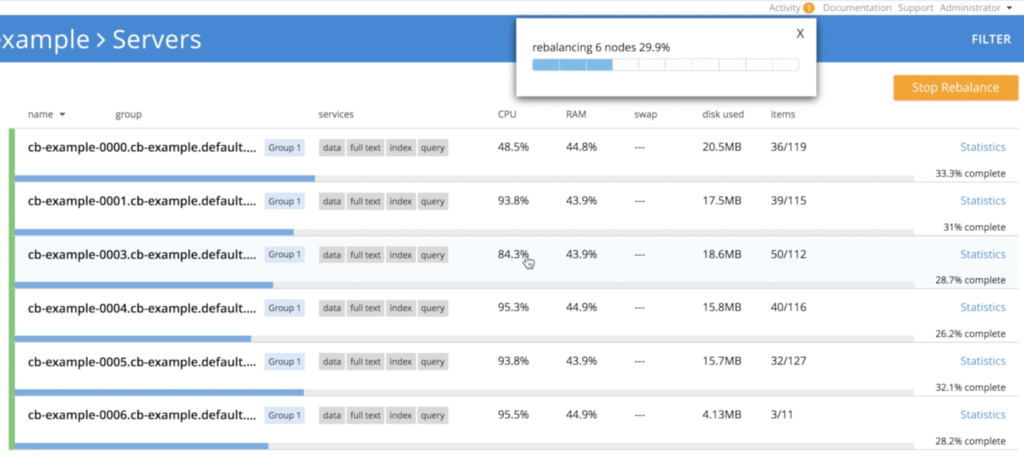
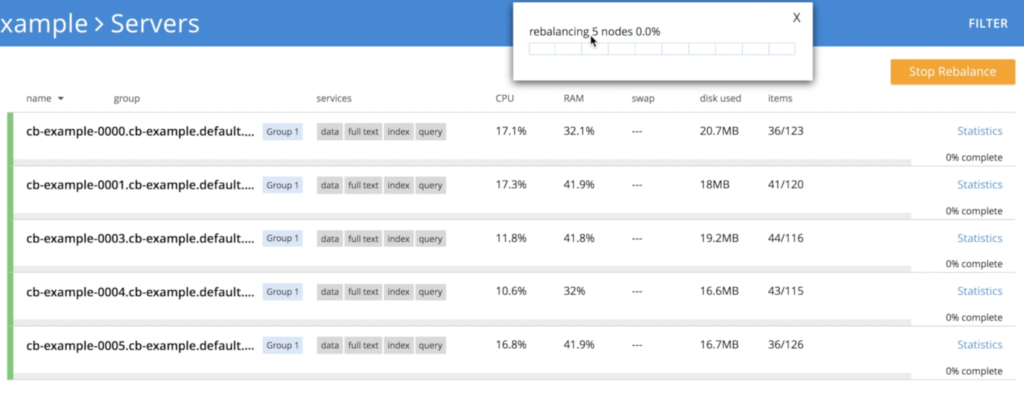
However, there is a small detail here as we can’t just kill 3 nodes at the same time without some risk of data loss. To avoid this problem, the operator scales down the cluster gradually, a single instance at a time, triggering rebalancing to ensure that all the 3 replicas of the data are preserved:
- Operator shutting down node cb-example-0006:
- Operator shutting down node cb-example-0005
- Shutting down node cb-example-0004

- Finally, we are back to 3 nodes again

Multidimensional Scaling
You can also leverage multi-dimensional scaling by specifying the services you want to run in each node:
|
1 2 3 4 5 6 7 8 9 10 11 12 13 14 15 16 |
... servers: - size: 3 name: data_and_index services: - data - index dataPath: /opt/couchbase/var/lib/couchbase/data indexPath: /opt/couchbase/var/lib/couchbase/data - size: 2 name: query_and_search services: - query - search ... |
What about other Databases in Kubernetes?
Yes! you can run some of them on Kubernetes already, like MySQL and Postgres as notable examples. They are also trying to automate most of those infrastructure operations we have discussed here. Unfortunately, they are not officially supported yet, so deploying them might not be as simple as this one.
If you want to read more about it, please refer to those two amazing talks at Kubecon:
Conclusion
Currently, databases are using Local Ephemeral Storages to store their data (Couchbase included). The reason for it is simple: It is the option which provides the best performance. Some databases are also offering support for Remote Persistent Storages despite the massive latency impact. We are looking forward to Local Persistent Storage going GA, as it will address most of the developers fears with this new trend.
So far, fully-managed databases were the only option you had if you want to get rid of the burden of managing your database. The price of this freedom, of course, comes in the form of some extra zeros in your bill and a very limited performance/architecture control. Leveraging Kubernetes for database scaling and self-management is emerging as a third option, lying between managing everything by yourself and relying on someone else to do it for you.
If you have any questions, please leave it in the comments or tweet me at @deniswsrosa. I will write part 2 of this article to answer all of them.
Absolutely fantastic post. Thanks for this Denis..
Hi Denis,
How can we expose the data service when running this on aws? I can access the admin console using the node’s public dns. I have opened all the required ports on aws security group. But the Java SDK based sample can’t connect. Is there a quick sample web app available as container which I can use to test from within the kubernetes cluster?
Dear Denis ,
Can you please help what I did wrong with MDS setup in CB 6.0 EE version with Kubernetes ?
servers:
– size: 3
name: dataservices
services:
– data
pod:
resources:
limits:
cpu: “10”
memory: 30Gi
requests:
cpu: “5”
memory: 20Gi
volumeMounts:
data: couchbase
default: couchbase
– size: 1
name: indexservices
services:
– index
pod:
resources:
limits:
cpu: “40”
memory: 75Gi
requests:
cpu: “30”
memory: 50Gi
volumeMounts:
data: couchbase
default: couchbase
– size: 1
name: queryservices
services:
– query
pod:
resources:
limits:
cpu: “10”
memory: 10Gi
requests:
cpu: “5”
memory: 5Gi
volumeMounts:
data: couchbase
default: couchbase
– size: 2
name: otherservices
services:
– search
– eventing
– analytics
pod:
resources:
limits:
cpu: “5”
memory: 10Gi
requests:
cpu: “2”
memory: 5Gi
volumeMounts:
data: couchbase
default: couchbase
It just throw below issue from templates :
Warning: Merging destination map for chart ‘couchbase-cluster’. Cannot overwrite table item ‘servers’, with non table value: map[all_services:map[pod:map serverGroups: services:[data index query search eventing analytics] size:5]]
REVISION: 1
When I want to continue install it throws below error :
Error: release filled-beetle failed: admission webhook “couchbase-admission-controller-couchbase-admission-controller.default.svc” denied the request: validation failure list:
data in spec.servers[1].services is required
data in spec.servers[2].services is required
data in spec.servers[3].services is required
I am pretty sure I am missing somewhere the loop condition in …\templates\couchbase-cluster.yaml as it is not liking multiple entries for MDS :
And this section seems to be the culprit :
servers:
{{- range $server, $config := .Values.couchbaseCluster.servers }}
name: {{ $server }}
{{ toYaml $config | indent 4 }}
{{- end }}
{{- if .Values.couchbaseTLS.create }}
Any clue what I am missing to get my MDS installation goes well ?
thanks for your help.