Data migration is full of challenges.
While migrating from a relational database (RDBMS) like SQL Server or Oracle, your main challenge comes at the time of denormalizing migrated documents as per the target data models. With the introduction of scopes and collections in the Couchbase Server 7.0 release it’s easy to categorize and organize documents within a bucket.
There are many options available to migrate data from SQL Server or Oracle into Couchbase, including:
-
- Importing CSV/JSON into Couchbase using
cbimport. - Writing a custom ETL code to move data from RDBMS into Couchbase.
- Importing CSV/JSON into Couchbase using
In most of the cases cbimport itself is sufficient to complete the data migration from an Oracle or SQL Server database to Couchbase because cbimport can import documents into a required scope and collection
In this article, I’m going to cover how you can use SQL++ queries (referred to below as N1QL) in Couchbase 7.0 to merge/denormalize imported documents from multiple collections within a scope.
Background Information
First, let’s review the parallels between RDBMS entities and their equivalent entities in Couchbase Server 7.0:
| RDBMS Entity | Couchbase Equivalent |
| Database | Bucket |
| Schema | Scope |
| Table | Collection |
| Row | Document |
| Column | Attribute |
Data migration from an RDBMS into Couchbase can have two variants:
- One-to-One mapping: Each RDBMS table is imported into a collection in Couchbase and each row of that table becomes a JSON document. This is the simplest migration as it does not require any denormalization and the whole process can be completed using
cbimportonly. - Many-to-One Mapping: Multiple tables from an RDBMS database combine into a single Couchbase document, or we can say normalized RDBMS tables get denormalized into Couchbase documents. To achieve denormalization, we have multiple options, such as:
- Denormalization at source: This means exporting data from Oracle/SQL Server in JSON format and the structure of that JSON matches the target Couchbase data model. Then you import that exported JSON document into Couchbase using
cbimport. However, this isn’t possible all the time, because you have to work on some complex queries to generate your target data model. Moreover, JSON export is not always supported by all databases. - Denormalization at middle layer: This is possible only if you are using some custom code (any programming language like C#, Java, etc.) to move data from RDBMS to Couchbase. This way, your code connects to the source database, reads data from source, modifies data as per the target Couchbase data model, and then writes data into Couchbase. However, this requires a lot of development work as you must write code for each target data model.
- Denormalization at destination: In this option, you move data from RDBMS to Couchbase either using
cbimportor by other means. Then you write some custom N1QL queries to perform denormalization at the Couchbase level. This is a suitable option in case the target data model has a maximum of three to four levels of child nesting. You can go for this option even if your nesting is more than three or four levels, but that introduces more complexity.
- Denormalization at source: This means exporting data from Oracle/SQL Server in JSON format and the structure of that JSON matches the target Couchbase data model. Then you import that exported JSON document into Couchbase using
Walkthrough Example: Migrating Data from RDBMS to Couchbase with Denormalization at Destination Using N1QL
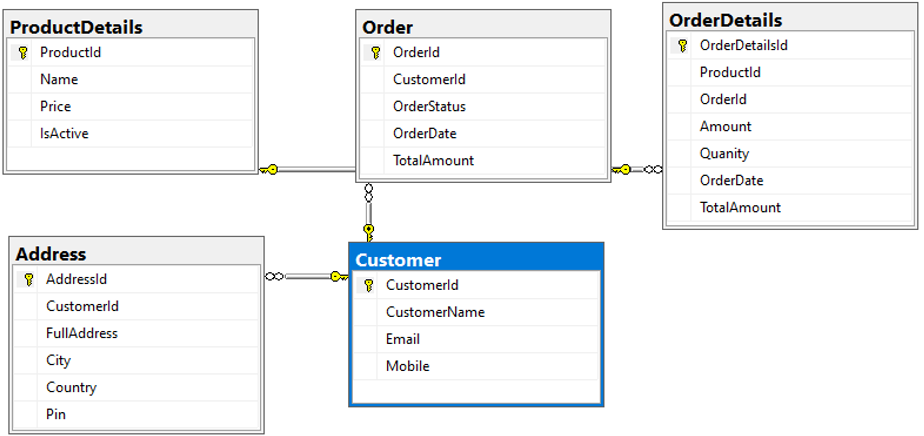
To demonstrate this migration and denormalization activity, I have created a sample database in SQL Server which contains five tables names: [Customer], [Address], [Order], [OrderDetails], and [ProductDetails]. Below is the database diagram to showcase relationships and column details:
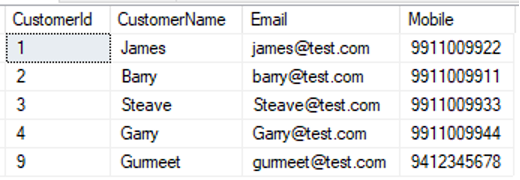
Below is the sample data loaded in each table:
select * from [dbo].[Customer] |
 |
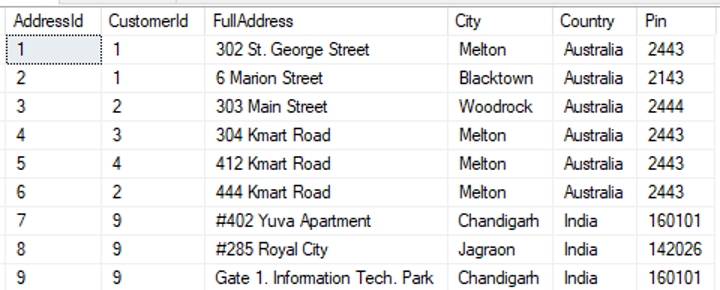
select * from [dbo].[Address] |
 |
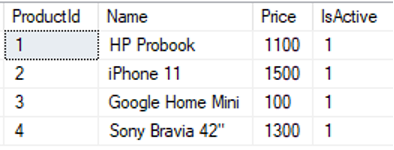
select * from [dbo].[ProductDetails] |
 |
select * from [dbo].[Order] |
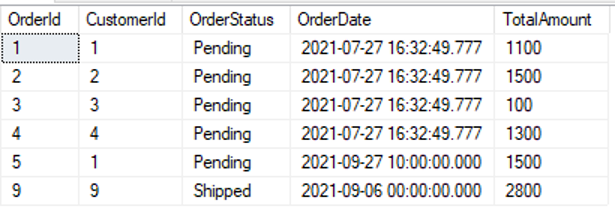 |
select * from [dbo].[OrderDetails] |
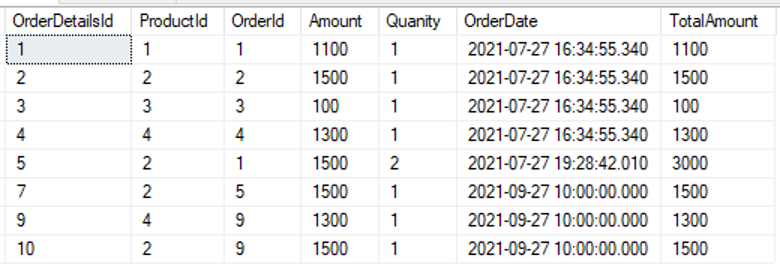 |
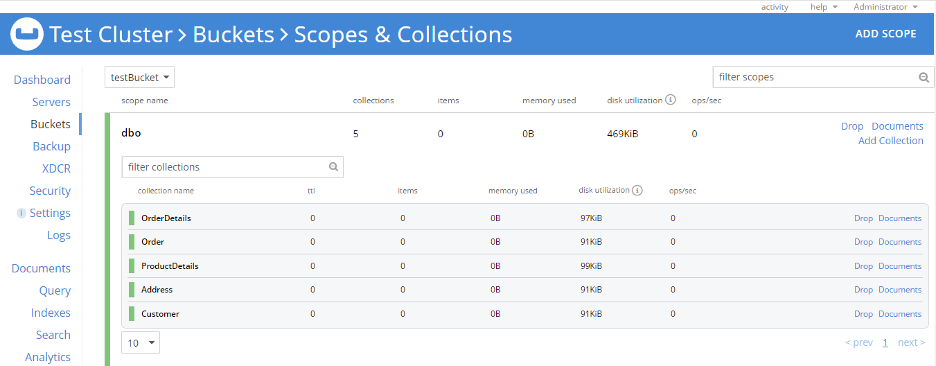
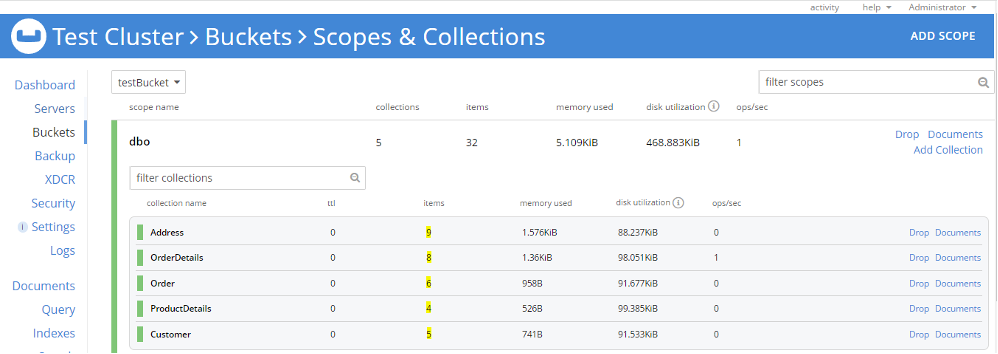
Couchbase 7.0 Setup: I have installed Couchbase 7.0 on a Windows machine and my test cluster is ready. I have created one bucket named testBucket. Further, I have created a scope named dbo corresponding to the RDBMS schema and then created five collections in the dbo scope. Here I’m keeping Collection names the same as the RDBMS table names. However, that’s not mandatory; scope and collection names can be anything of your choice.
Next, I import all RDBMS tables into this scope (dbo) using cbimport.
Let’s prepare for data import into Couchbase:
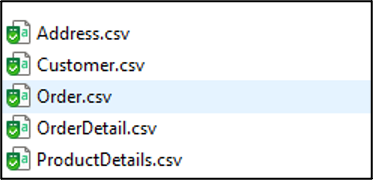
Step 1: Export table data into CSVs using the SQL Server export wizard.
Step 2: Import documents into Couchbase using cbimport:
Open Windows Command prompt and redirect to C:\Program Files\Couchbase\Server\bin and run cbimport command. Please refer to this documentation for more information about cbimport syntax. Below is the example to import the Customer.csv file which is placed at path D:/CSVs into the dbo scope and Customer Collection. Here the document key is Customer Id picked from the CSV Column name CustomerId.

Similarly, we can import Address, ProductDetail, Order and OrderDetail CSVs into corresponding collections within the dbo scope. At this time, we have five collections in dbo scope, and each collection has documents in it (highlighted below).
Step 3: Let’s verify the imported data. We can do this step either by looking at the document via the UI or we can verify document structure using N1QL. I have created five primary indexes for each collection to run a N1QL query for document verification. Verification can be done by matching the number of imported documents as well as document structure, attributes and data.
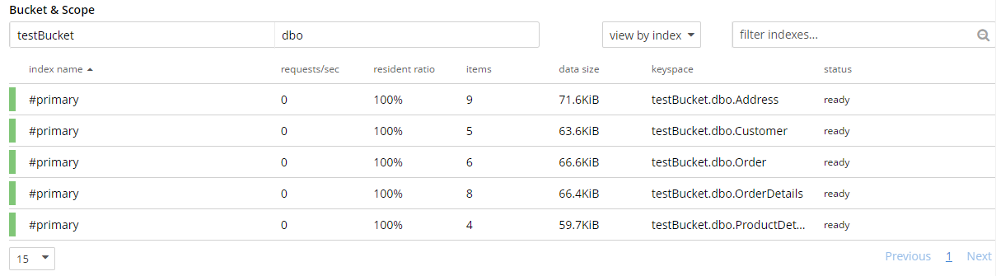
Note: To run a N1QL query, there must be some index present (primary or secondary) for that collection.
Below is the result of the N1QL query for each collection (I changed the query result view to “table”):
Select c.* from testBucket.dbo.Customer c |
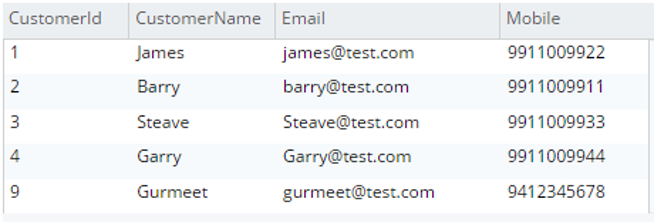 |
Select a.* from testBucket.dbo.Address a |
 |
Select p.* from testBucket.dbo.ProductDetails |
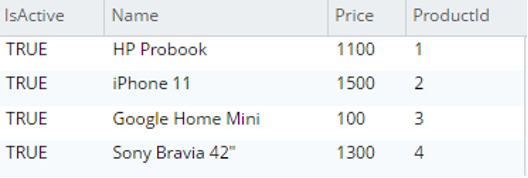 |
Select o.* from testBucket.dbo.Order o |
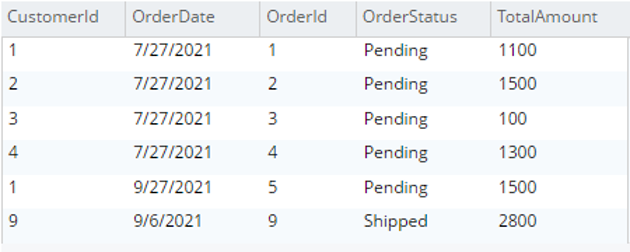 |
Select od.* from testBucket.dbo.OrderDetails |
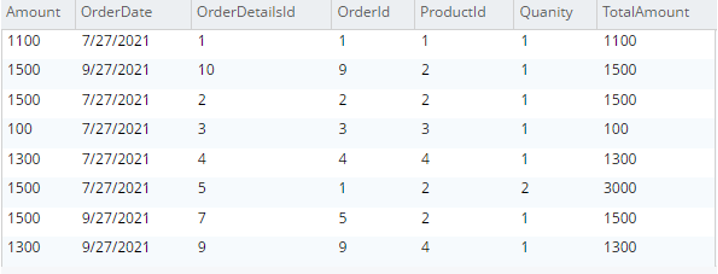 |
Documents are imported successfully, but this is a one-to-one mapping, i.e., each table is imported as a collection. For tables where we need only one-to-one mapping (e.g., ProductDetails); data migration is complete at this step.
However, for tables where we need to perform denormalization there are a few more steps before we get our final data model. For example, RDBMS tables Customer, Address, Order and OrderDetails must be merged into a single document. Your target data model should look something like:
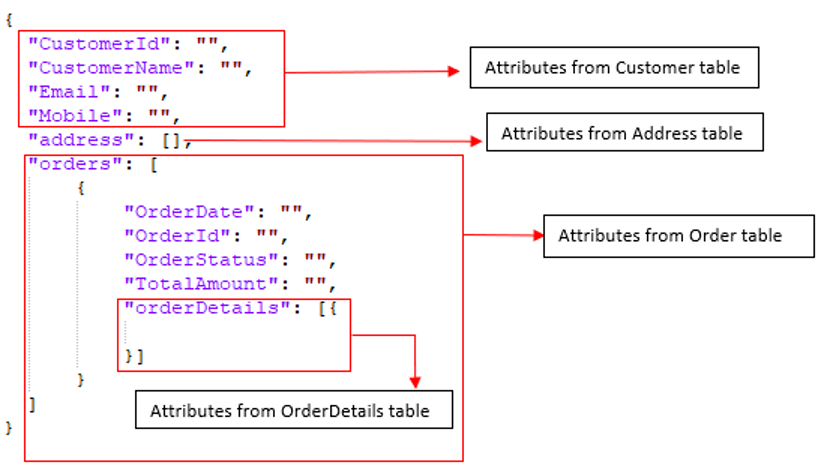
Step 4: For denormalization at the target destination (e.g., Couchbase Server), we’ll follow a bottom-up approach. First we’ll merge OrderDetails into Order, then we’ll merge Order and Address into Customer.
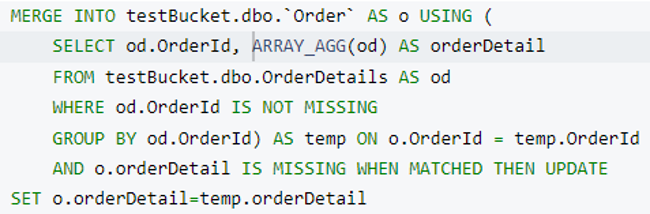
Let’s prepare a N1QL query to merge OrderDetails into an Order document. For this, we’ll use group by and ARRAY_AGG and the query will return an array of order details grouped by Order Id.
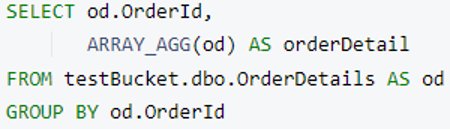
Note: You can use limit keyword after group by to restrict result size for faster execution on huge data.
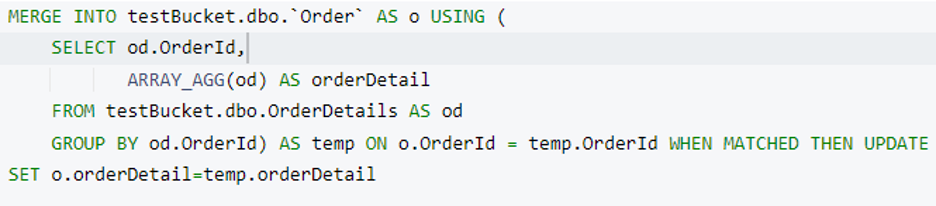
Now we have the orderDetails array ready. It’s time to merge it into an Order document. We’ll use the Couchbase MERGE statement to perform this operation. Here we’re adding a new attribute named orderDetail in every Order document when Order.OrderId and OrderDetails.OrderId are matched.
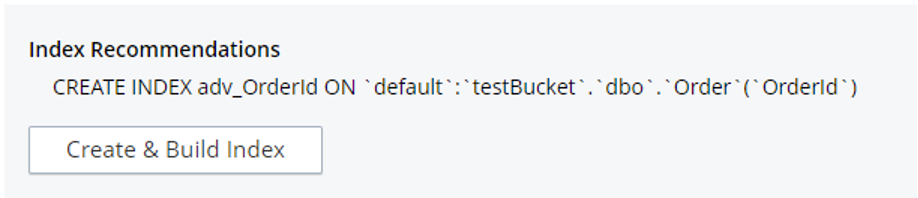
Before running this query, let’s have a look at the indexes we need for it. Our previous queries should work with the primary index, but for the merge part, we must create a secondary index. Don’t worry the Couchbase index advisor will help us.
Copy the above query in the Query Workbench and click on the “Index Advisor” button. It will automatically show the index creation statement that’s needed to run this query.
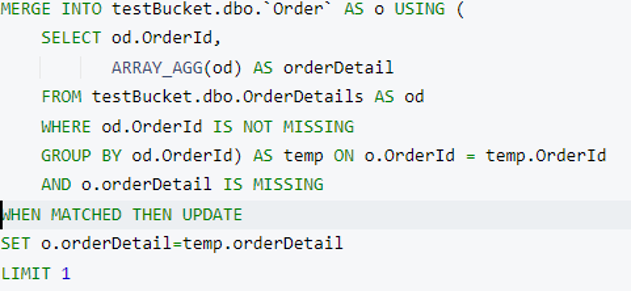
I am taking a reference from the index advisor and appending a WHERE clause to create a partial index on the Order collection.

This partial index covers only those Order documents where the orderDetail attribute is missing. In case we have millions of Order documents, the number of documents in this index will start being reduced when we run merge statements in chunks (using the LIMIT keyword). For example, at this point we have six documents covered by this index.
Creating a secondary index on the OrderDetail collection is similar, as shown below.

Now we have two indexes in a ready state.

Next, let’s execute a merge statement with a limit clause. I have updated the where clause in the subquery (where od.OrderId is not missing) to select the appropriate index during execution.
This statement will update one Order document and append its associated orderDetails as a child document. In my case, it picked the Order document with orderId=2 and updated it. Order Id 2 has only one orderDetails document, so it added it as an array.

Let’s have a look at the index. The document count decreased from six to five. This is because one document is not satisfying the partial index’s condition. This index will be updated as order documents are updated.

Now remove the Limit clause and run a merge query to update all order documents.
This statement brings the adv_OrderId index document count to zero as all Order documents now have an attribute orderDetail.

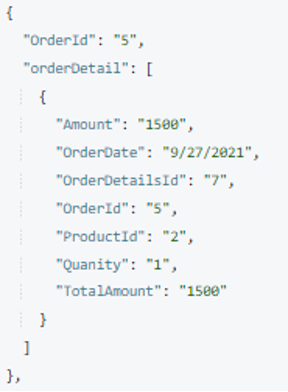
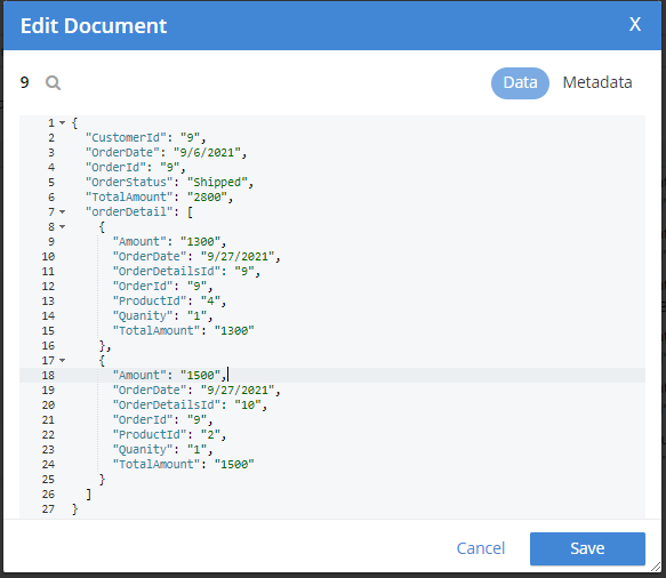
I randomly picked one order document (orderId=9) and included the output below.
Now we have an Order document ready with its child to merge into Customer. Let’s modify our merge query accordingly and create appropriate indexes for query execution:
The index for inner query/subquery:

The partial index for Customer collection:
![]()
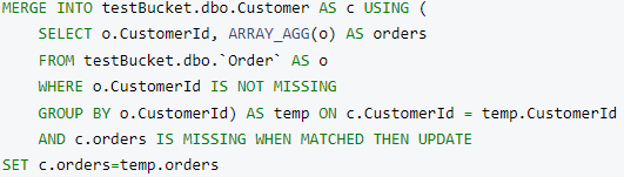
The merge query to merge Orders into Customer:
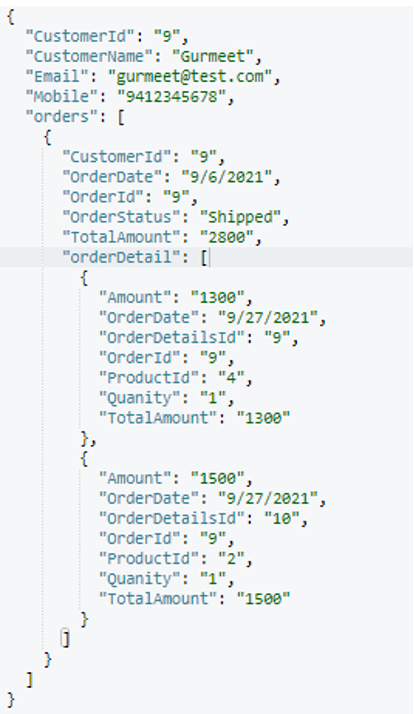
After execution, this is the final customer document structure (randomly picked):
Up to this point, we have achieved denormalization of the order, orderDetail and Customer tables. Now let’s merge address as an array into Customer as we did the others.
Creating the index for the Customer collection:
![]()
Creating the index for the address collection:

The merge query to merge address into Customer:
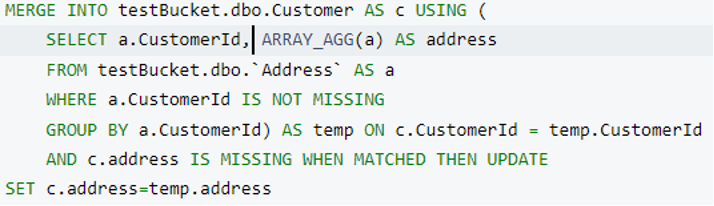
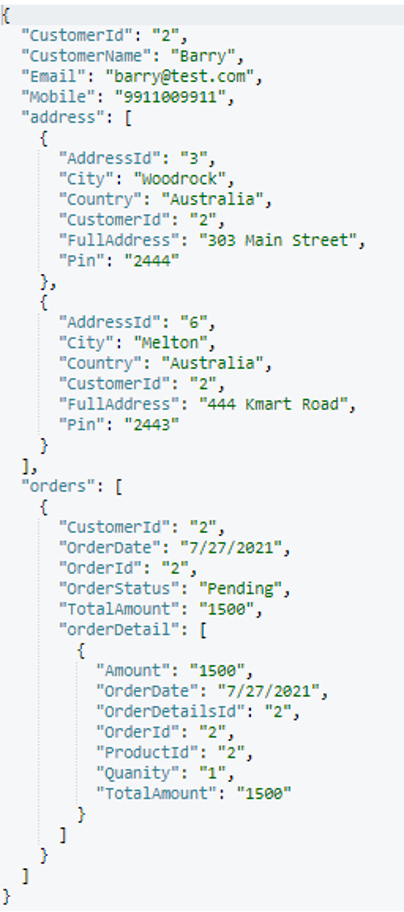
After executing this query, we will get our final data model which is made up of four RDBMS tables.
-
Customerwill be the parent document.Addresswill be an array of objects embedded incustomer.Orderwill be an array of objects embedded incustomer.OrderDetailswill be an array of objects embedded in eachorderobject.
Final structure of the customer document:
Finally, we’ve achieved denormalization as per our target data model using N1QL queries.
We can modify the sub-query to select a number of attributes/columns instead of *. Furthermore, we can use Couchbase object functions to add/remove any attribute in the subquery/parent result.
Step 5 (optional): Now it’s time to clean up. Since we have our target data model with us in the Customer collection, we can delete the other three collections (address, order and orderDetails).
Conclusion
In summary, denormalization at destination can be achieved using the N1QL query language along with appropriate indexes. It can be used for any level of nesting as per your requirement starting with the bottom-most child data in your data model.
