React Native enables you to build Android applications that look and feel native with only JavaScript. In this instance, React Native takes care of managing UI state and synchronizing it with the models. And luckily for us, we can use Couchbase Lite to add sync and persistence to a React Native app. In this tutorial, you will learn how to build a simple application to save documents and replicate them to Sync Gateway. Here are the core concepts you will learn:
- Create a basic project with Couchbase Lite Android and Couchbase Lite Java Listener
- Integrating React Native in your project
- Adding Models and UI components with JavaScript
- Setting up Couchbase Sync Gateway
Here’s a sneak peek of what you are going to build:
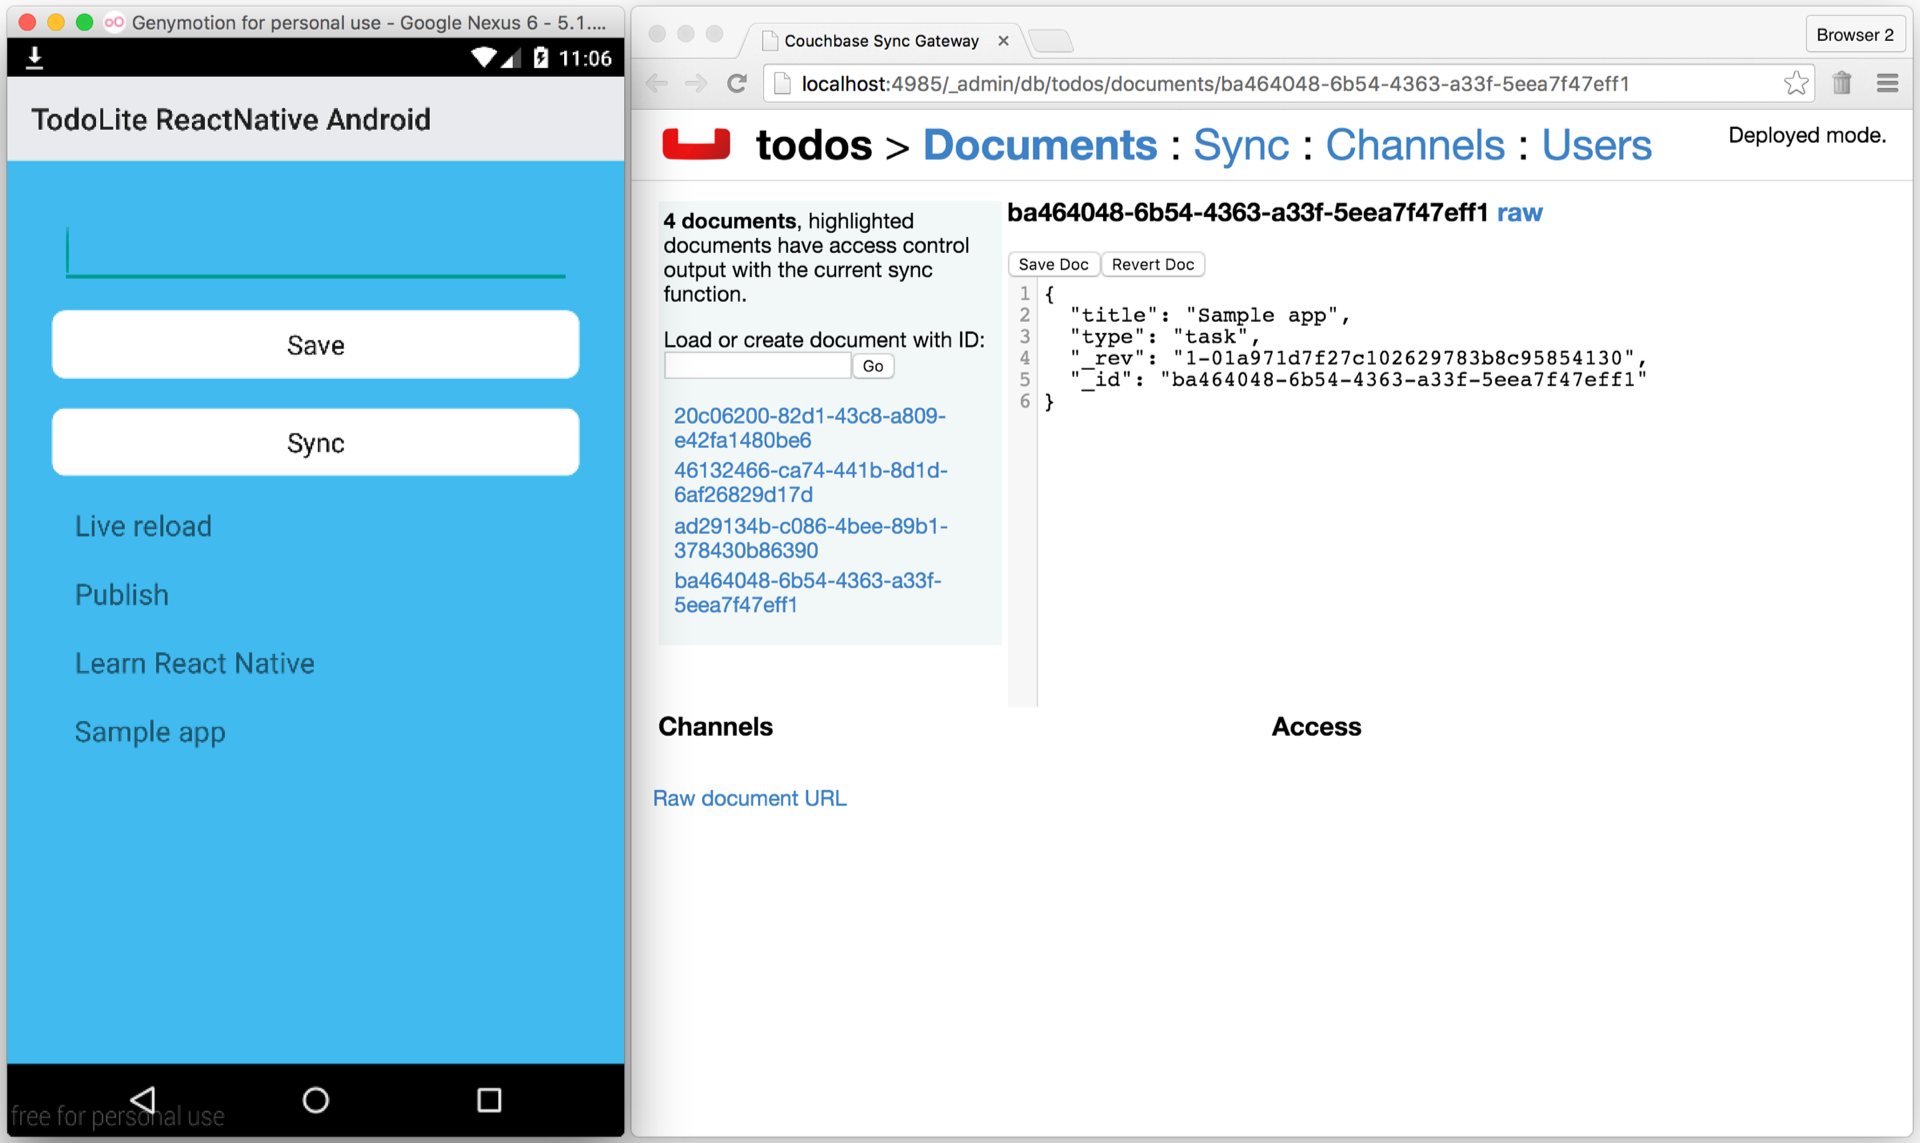
You can download the completed project from GitHub.
Prerequisites
- Node.js 4.0 or higher
- Android Studio and an emulator
Getting Started
In this section, you will create a new Android Studio project from scratch and integrate React Native to it.
New Android Studio Project
Before you start writing some JavaScript you need to create a new Android Studio project with all the dependencies. Open Android Studio and from the welcome screen select New Project. In the New Project window, enter TodoLite ReactNative Android for the application name and todolite-reactnative-android for the folder name:
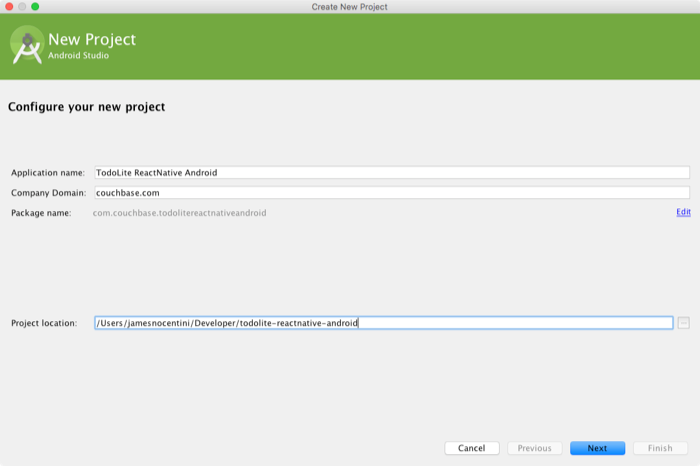
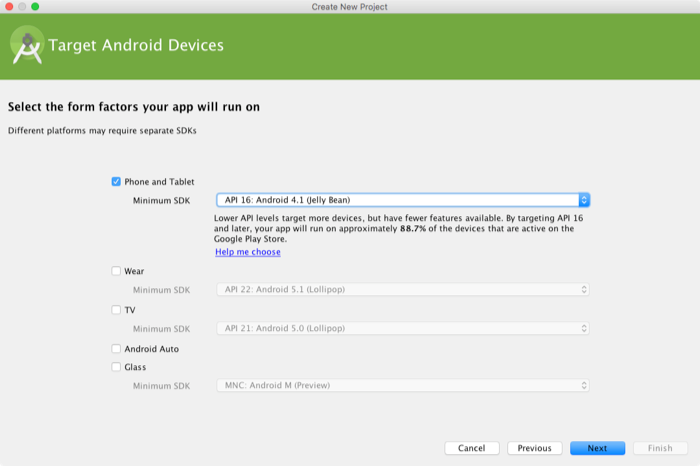
Set the minimum required SDK to API 16: Android 4.1 or later and use the currently recommended Android API. After you fill in the fields, the New Project window should look something like this:
Click Next, and choose the Blank Activity template:
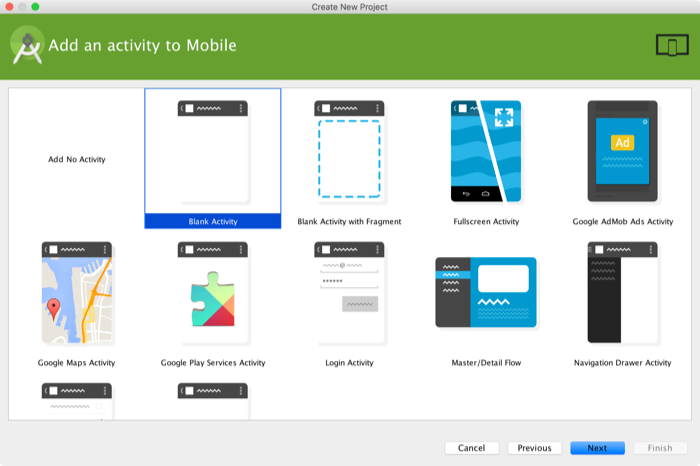

Click Finish and you should see the following in the project navigator:

Bundling dependencies
Expand the app folder, and then open the build.gradle file. Make sure you open the one located in the app folder (also called the module) and add the following in the android section:
|
1 2 3 4 5 6 7 |
// workaround for "duplicate files during packaging of APK" issue // see https://groups.google.com/d/msg/adt-dev/bl5Rc4Szpzg/wC8cylTWuIEJ packagingOptions { exclude 'META-INF/ASL2.0' exclude 'META-INF/LICENSE' exclude 'META-INF/NOTICE' } |
Next, open build.gradle at the root (also referred to as the project level gradle file) and add a reference to the Couchbase Maven repository:
|
1 2 3 4 5 6 7 8 |
allprojects { repositories { jcenter() maven { url "https://files.couchbase.com/maven2/" } } } |
Now, add the following lines to the top-level dependencies section:
|
1 2 3 4 5 6 7 8 9 10 |
dependencies { compile fileTree(dir: 'libs', include: ['*.jar']) testCompile 'junit:junit:4.12' compile 'com.android.support:appcompat-v7:23.1.0' compile 'com.couchbase.lite:couchbase-lite-android:1.1.0' compile 'com.couchbase.lite:couchbase-lite-java-listener:1.1.0' compile 'com.couchbase.lite:couchbase-lite-java-javascript:1.1.0' compile 'com.facebook.react:react-native:0.13.0' } |
In the Android Studio tool bar, click Sync Project with Gradle Files.
Setting up Couchbase Lite and the Listener
Open AndroidManifest.xml located in app/src/main and add the permissions:
|
1 2 3 |
The React Native Android Activity
You need to add some native code in order to start the React Native runtime and get it to render something. Replace the content of MainActivity.java with the following and we’ll explain what is going on next:
|
1 2 3 4 5 6 7 8 9 10 11 12 13 14 15 16 17 18 19 20 21 22 23 24 25 26 27 28 29 30 31 32 33 34 35 36 37 38 39 40 41 42 43 44 45 46 47 48 49 50 51 52 53 54 55 56 57 58 59 60 61 62 63 64 65 66 67 68 69 70 71 72 73 74 75 76 77 78 79 80 81 82 83 84 85 86 87 88 89 90 91 92 93 94 95 96 97 98 99 100 101 102 103 104 105 106 107 108 109 110 111 112 113 114 115 116 117 118 |
public class MainActivity extends Activity implements DefaultHardwareBackBtnHandler { private ReactRootView mReactRootView; private ReactInstanceManager mReactInstanceManager; private final String TAG = "TodoLite"; private static final int DEFAULT_LISTEN_PORT = 5984; private int listenPort; private Credentials allowedCredentials; @Override protected void onCreate(Bundle savedInstanceState) { super.onCreate(savedInstanceState); Log.d(TAG, "onCreate method called"); // 1 mReactRootView = new ReactRootView(this); mReactInstanceManager = ReactInstanceManager.builder() .setApplication(getApplication()) .setBundleAssetName("index.android.bundle") .setJSMainModuleName("index.android") .addPackage(new MainReactPackage()) .setUseDeveloperSupport(BuildConfig.DEBUG) .setInitialLifecycleState(LifecycleState.RESUMED) .build(); mReactRootView.startReactApplication(mReactInstanceManager, "TodoLite-ReactNative-Android", null); setContentView(mReactRootView); initCBLite(); } private void initCBLite() { try { // 2 allowedCredentials = new Credentials("", ""); // 3 View.setCompiler(new JavaScriptViewCompiler()); // 4 AndroidContext context = new AndroidContext(this); Manager.enableLogging(Log.TAG, Log.VERBOSE); Manager.enableLogging(Log.TAG_SYNC, Log.VERBOSE); Manager.enableLogging(Log.TAG_QUERY, Log.VERBOSE); Manager.enableLogging(Log.TAG_VIEW, Log.VERBOSE); Manager.enableLogging(Log.TAG_CHANGE_TRACKER, Log.VERBOSE); Manager.enableLogging(Log.TAG_BLOB_STORE, Log.VERBOSE); Manager.enableLogging(Log.TAG_DATABASE, Log.VERBOSE); Manager.enableLogging(Log.TAG_LISTENER, Log.VERBOSE); Manager.enableLogging(Log.TAG_MULTI_STREAM_WRITER, Log.VERBOSE); Manager.enableLogging(Log.TAG_REMOTE_REQUEST, Log.VERBOSE); Manager.enableLogging(Log.TAG_ROUTER, Log.VERBOSE); Manager manager = new Manager(context, Manager.DEFAULT_OPTIONS); // 5 listenPort = startCBLListener(DEFAULT_LISTEN_PORT, manager, allowedCredentials); Log.i(TAG, "initCBLite() completed successfully with: " + String.format( "https://%s:%s@localhost:%d/", allowedCredentials.getLogin(), allowedCredentials.getPassword(), listenPort)); } catch (final Exception e) { e.printStackTrace(); } } private int startCBLListener(int listenPort, Manager manager, Credentials allowedCredentials) { LiteListener listener = new LiteListener(manager, listenPort, allowedCredentials); int boundPort = listener.getListenPort(); Thread thread = new Thread(listener); thread.start(); return boundPort; } @Override protected void onPause() { super.onPause(); if (mReactInstanceManager != null) { mReactInstanceManager.onPause(); } } @Override protected void onResume() { super.onResume(); if (mReactInstanceManager != null) { mReactInstanceManager.onResume(this); } } @Override public void onBackPressed() { if (mReactInstanceManager != null) { mReactInstanceManager.onBackPressed(); } else { super.onBackPressed(); } } @Override public boolean onKeyUp(int keyCode, KeyEvent event) { if (keyCode == KeyEvent.KEYCODE_MENU && mReactInstanceManager != null) { mReactInstanceManager.showDevOptionsDialog(); return true; } return super.onKeyUp(keyCode, event); } @Override public void invokeDefaultOnBackPressed() { super.onBackPressed(); } } |
A few things are happening here:
- You create an Activity that creates a
ReactRootView, starts a React application inside it and sets it as the main content view. Next, you’re calling theinitCBLitemethod which does a few things. - Here you define an empty name and password to be used by the Listener. This means that in theory, anyone could access your database. This is ok for this tutorial but in production you’d replace the line with
new Credentials(). - Plug in the component to compile the JavaScript Views. We’re not going to use Couchbase Views in this tutorial just yet but it might come in handy.
- Instantiate the
Managerand enable logging. - Start the Couchbase Listener passing in the port to listen on, the manager instance and secure credentials.
That’s all for the Android part, now you can turn your attention to JavaScript!
JavaScript Land
In your project’s root folder, run:
|
1 2 3 |
$ npm init $ npm install --save react-native $ curl -o .flowconfig https://raw.githubusercontent.com/facebook/react-native/master/.flowconfig |
This creates a node module for your app and adds the react-native npm dependency. Now open the newly created package.json file and add this line inside of the scripts field:
|
1 |
"start": "node_modules/react-native/packager/packager.sh" |
Hello World
Copy & paste the following code to a new index.android.js file in your root folder:
|
1 2 3 4 5 6 7 8 9 10 11 12 13 14 15 16 17 18 19 20 21 22 23 24 25 26 27 28 29 30 31 32 33 34 35 36 37 38 39 40 41 42 |
/** * Sample React Native App * https://github.com/facebook/react-native */ 'use strict'; var React = require('react-native'); var Home = require('./app/components/Home'); var { AppRegistry, StyleSheet, Text, View, ToolbarAndroid } = React; var styles = StyleSheet.create({ container: { flex: 1, backgroundColor: '#111111' }, toolbar: { backgroundColor: '#e9eaed', height: 56, } }); var TodoLite = React.createClass({ render: function() { return ( ); } }); AppRegistry.registerComponent('TodoLite-ReactNative-Android', () => TodoLite); |
Build and Run!
To run your app, you first need to start the development server. To do this, simply run the following command in your root folder:
|
1 |
npm start |
NOTE: At the time of this writing, you may need to run brew update && brew reinstall watchman to update watchman if you get the error Error building DepdendencyGraph: TypeError: Cannot read property 'root' of null.
Now build and run your Android app in a new Terminal tab:
|
1 |
./gradlew installDebug |
Open it in the Android simulator and you will see the following:

Well done on getting the development environment up and running! React Native includes great features such live reload which make it much easier to iterate on the UI of the application, but first you must define the models and methods to persist documents to the Couchbase Lite database.
A Todo Application
A Simple API
Create a new file app/utils/api.js and add the following:
|
1 2 3 4 5 6 7 8 9 10 11 12 13 14 15 16 17 18 19 20 21 22 23 24 25 26 27 28 29 30 31 32 33 34 35 36 37 38 39 40 41 42 43 44 45 46 47 48 49 50 51 52 53 54 55 56 57 |
var api = { // 1 localDatabaseUrl: 'https://localhost:5984', // 2 remoteDatabaseUrl: 'https://localhost:4984', // 3 saveTodo(title){ return fetch(this.localDatabaseUrl + '/todos', { method: 'post', headers: { 'Content-Type': 'application/json' }, body: JSON.stringify({ type: 'list', title: title }) }).then((res) => res.json()); }, // 4 getTodos(){ return fetch(this.localDatabaseUrl + '/todos/_all_docs?include_docs=true').then((response) => { if (response.status !== 200) { return fetch(this.localDatabaseUrl + '/todos', { method: 'put', headers: { 'Accept': 'application/json', 'Content-Type': 'application/json' }, body: JSON.stringify({ok: true}) }).then((res) => res.json()); } return response.json(); }) }, // 5 startSync(){ return fetch(this.localDatabaseUrl + '/_replicate', { method: 'post', headers: { 'Content-Type': 'application/json' }, body: JSON.stringify({ source: 'todos', target: this.remoteDatabaseUrl + '/todos', continuous: true }) }).then((res) => res.json()); } }; module.exports = api; |
Here is what you’re doing:
- You declare the endpoint the Couchbase Listener is running on.
- The remote database is Sync Gateway in this case. This would be replaced with your Sync Gateway production instance.
- The method to persist a task document.
- Here, you’re getting all the documents from Couchbase Lite.
- Start a push replication from the Couchbase Lite database to Sync Gateway. There could equally be a pull replication as well.
With a basic API in place, you can now turn your attention to building the UI.
Building the UI
Create a new file in app/components/Home.js with the following:
|
1 2 3 4 5 6 7 8 9 10 11 12 13 14 15 16 17 18 19 20 21 22 23 24 25 26 27 28 29 30 31 32 33 34 35 36 37 38 39 40 41 42 43 44 45 46 47 48 49 50 51 52 53 54 55 56 57 58 59 60 61 62 63 64 65 66 67 68 69 70 71 72 73 74 75 76 77 78 79 80 81 82 83 84 85 86 87 88 89 90 91 92 93 94 95 96 97 98 99 100 101 102 103 104 105 106 107 108 109 110 111 112 113 114 115 116 117 118 119 120 121 122 123 124 125 126 127 128 129 130 131 132 133 134 135 136 137 138 139 140 141 142 143 144 145 146 147 148 |
var React = require('react-native'); var api = require('./../utils/api'); var { Text, View, StyleSheet, ScrollView, TextInput, TouchableOpacity } = React; var styles = StyleSheet.create({ container: { flex: 1 }, buttonText: { fontSize: 18, color: 'white', alignSelf: 'center' }, rowContainer: { padding: 10 }, rowTitle: { color: '#48BBEC', fontSize: 16 }, rowContent: { fontSize: 19 }, mainContainer: { flex: 1, padding: 30, marginTop: 65, flexDirection: 'column', justifyContent: 'center', backgroundColor: '#48BBEC' }, searchInput: { height: 50, padding: 4, marginRight: 5, fontSize: 23, borderWidth: 1, borderColor: 'white', borderRadius: 8, color: 'white', margin: 5 }, buttonText: { fontSize: 18, color: '#111', alignSelf: 'center' }, button: { height: 45, flexDirection: 'row', backgroundColor: 'white', borderColor: 'white', borderWidth: 1, borderRadius: 8, marginBottom: 10, marginTop: 10, alignSelf: 'stretch', justifyContent: 'center' }, }); class Home extends React.Component { constructor(props) { super(props); this.state = { newTodo: '', todos: [] }; } componentWillMount() { api.getTodos() .then((res) => { var todos = res.rows.map(function (row) { return row.doc; }); this.setState({ todos: todos }); }); } handleTodoChange(event) { this.setState({ newTodo: event.nativeEvent.text }); } handleSave() { api.saveTodo(this.state.newTodo) .then((res) => { api.getTodos() .then((res) => { var todos = res.rows.map(function (row) { return row.doc; }); this.refs.inputText.value = ''; this.setState({ todos: todos, newTodo: '' }); }); }); } handleSync() { api.startSync() .then(function(res) { console.log(res); }); } render() { var lists = this.state.todos.map((item, index) => { return ( {item.title} ); }); return ( Save Sync {lists} ); } } Home.propTypes = { lists: React.PropTypes.array.isRequired }; module.exports = Home; |
Don’t get intimidated by the length of this code snippet. All we’re doing here is declaring styles and using some built-in React Native UI components to display a text input, buttons and text labels. You can find the list of built-in UI components here.
Updating the Root Component
The final step before you can see your great work in action is to update index.android.js to load the Home component. Below the require statement to import react-native, add the following:
|
1 |
var Home = require('./app/components/Home'); |
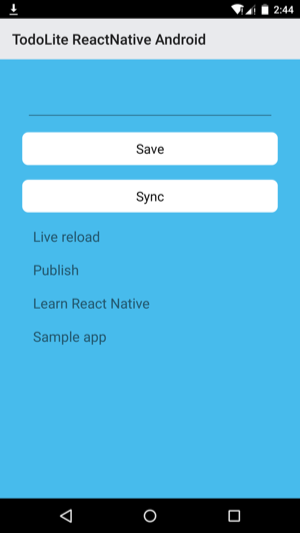
Next, replace the return value of the render method with . Use the ⌘ + m shortcut in Genymotion to reload the JavaScript and you should see a bright blue screen. That’s good news!
Replications with Couchbase Sync Gateway
Download Sync Gateway from the link below and unzip the file:
https://www.couchbase.com/nosql-databases/downloads
In a new file named sync-gateway-config.json, paste the following:
|
1 2 3 4 5 6 7 8 9 |
{ "log": ["*"], "databases": { "todos": { "server": "walrus:", "users": { "GUEST": { "disabled": false, "admin_channels": ["*"] } } } } } |
And run Sync Gateway with this config file:
|
1 |
~/Downloads/couchbase-sync-gateway/bin/sync_gateway /path/to/project/sync-gateway-config.json |
To make the Sync Gateway endpoint reachable inside of the Android VM emulator, you need to enable a port from the host to the VM. In Terminal, run the following:
|
1 |
adb reverse tcp:4984 tcp:4984 |
Open the Admin UI to monitor the documents that were saved to Sync Gateway:
https://localhost:4985/_admin/
Try adding more task documents and notice how they get pushed to Sync Gateway automatically.
Where To Go From Here
Congratulations! You’ve built your first React Native Android + Couchbase Lite application. You’re now ready to add more components such as the following:
- Couchbase Lite Views to write custom queries
- User authentication in a replication
- Continuously deploying the Sync Gateway configuration file and other components
Watch out for a tutorial on debugging your React Native Android + Couchbase Lite application using Charles and Genymotion.
Feel free to share your feedback, findings or ask any questions in the comments below or in the forums. Talk to you soon!
*Open AndroidManifest.xml located in app/src/main and add the permissions:*
the above line states the permissions but none found in the box given below of it. please add those lines.