
In this article, you will get an overview of how to backup both Couchbase Community and Enterprise editions on Ubuntu and how to set up a basic Couchbase backup strategy.
The scripts and techniques described here are not production-ready, you might still need to make a few improvements according to your environment to make it fail tolerant.
I also highly recommend you to read the official documentations referenced during this article as many optional parameters won’t be mentioned.
General Recommendations
Backup Machines
Although in clusters with small data volume and a small number of nodes you could even use one of the nodes to backup the data during off-peak hours, it is highly recommended to always run your backups in an external machine running within the same network.
Don’t underestimate the amount of memory and CPU needed to run healthy backup processes. Sharing the same machine can impact your cluster performance and also cause backups to fail when there are not enough resources available.
If you need to reduce the costs of running an extra server for backups, most cloud providers allow you to schedule when an instance should be started, then in your backup script, you can shutdown the machine once everything is finished.
On Kubernetes, it should be even easier, as you could use CronJobs to do virtually the same thing or simply define backup policies if you are using Couchbase Autonomous Operator.
Retention Policy
Both Incremental and cumulative backups depend on the last full backup. So, It is important to remember that you can’t archive old backups solely based on the date, you should also consider it’s dependencies.
If you have a small SLA you should also consider leaving the last few backups in an easily accessible block storage. Depending on the size of your database and the speed of the network, downloading data from some object storage might cost you precious minutes.
Recovery Testing
Although it is unfeasible to test every single backup, it is crucial to have a recurrent backup testing strategy to check its health. Test backups also help you to get familiar with the data-restoring tools and also to understand how much time you will need to fully recover the database (2 important things to know when something goes wrong).
Couchbase already has internally a number of features that will prevent data loss, for instance, the number of replicas for each vBucket that is configured when you first create the bucket. Assuming that your database is properly configured, the most likely scenarios where you will need to recover the database are :
- If you lose more nodes than the number of replicas. (e.g. You have configured 2 replicas but you have lost 3 nodes at once )
- An operation which will leave the whole database inconsistent (e.g. A new application version is deployed with a bug that update/delete a high number of records )
Preparing the Backup Machine
If you plan to run your backups in a dedicated machine, you must copy the bin folder from your Couchbase installation to this machine, or simply install Couchbase on this machine as well. For instance, on Ubuntu, you need to run the following commands:
|
1 2 3 |
curl –O https://packages.couchbase.com/releases/couchbase–release/couchbase–release–1.0–amd64.deb sudo dpkg –i ./couchbase–release–1.0–amd64.deb sudo apt–get update |
Then you will need to run the following command according to your Couchbase version:
Couchbase Community:
|
1 |
sudo apt–get install couchbase–server–community |
Couchbase Enterprise
|
1 |
sudo apt–get install couchbase–server |
After that, all the files we will need for this article should be under the /opt/couchbase/bin folder (“/Applications/Couchbase Server.app/Contents/Resources/couchbase-core/bin“ on Mac).
To reduce the inconvenience of referencing the bin folder in every command, I suggest you add it to the PATH or create a symbolic link in the /usr/bin directory:
Couchbase Community:
|
1 |
/usr/bin$ sudo ln –s /opt/couchbase/bin/cbbackup cbbackup |
Couchbase Enterprise:
|
1 |
/usr/bin$ sudo ln –s /opt/couchbase/bin/cbbackupmgr cbbackupmgr |
How to Backup Couchbase Community
Couchbase Community comes with two main tools to help you backup and restore the data of your Couchbase cluster: cbbackup and cbrestore. Both tools are available under the bin directory of your Couchbase installation.
CBBACKUP has 3 main modes:
- full – The full mode will perform a full backup.
- diff – (default) The diff mode will perform a differential incremental backup which backups only the changes since the last full or incremental backup.
- accu – The accu mode performs a cumulative incremental backup, which backs up all changes since the last full backup.
A simple backup strategy could be similar to the following:
- Full backup on Sundays 1 am;
- Daily Incremental backups at 1 am;
Let’s start by creating a script which will run our full backup, create a file called full_backup_couchbase.sh with the following content:
|
1 2 3 4 5 6 7 8 |
#!/bin/bash -e echo “Running Couchbase Full Backup” cd /opt/couchbase/bin/ ./cbbackup https://COUCHBASE_NODE_IP:8091 /YOUR/BACKUP/DIR –u yourusername –p yourpassword! –m full echo “Full Couchbase Backup concluded” |
Then, let’s use CronTab to schedule our full backup, run the following command:
|
1 |
sudo vim /etc/crontab |
Press “i” to enter the edition mode and then add the following line:
|
1 |
0 1 * * Sun yourLocalUser /PATH/TO/YOUR/SCRIPT/full_backup_couchbase.sh |
Note that yourLocalUser refers to the local user of the machine, the script will run using that context. Save the file once you finish (“esc”, then “:wq” in case you are not used to vim)
Now, let’s create the script to run the incremental backups, the only difference here is the mode parameter. Create a file called incremental_backup_couchbase.sh and add the following content:
|
1 2 3 4 5 6 7 |
#!/bin/bash -e echo “Running Couchbase Incremental Backup” cd /opt/couchbase/bin/ ./cbbackup https://YOUR_COUCHBASE_NODE_IP:8091 /YOUR/BACKUP/DIR –u your_couchbase_username –p your_couchbase_password –m diff echo “Couchbase Incremental Backup concluded” |
Let’s also add this script to tab CronTab file:
|
1 |
sudo vim /etc/crontab |
And then add the following line:
0
The crontab above says that this script will run from Monday to Saturday at 01 am. Don’t forget to make both your scripts executable:
1
Run both your scripts to be sure that they are working properly. In the last session of this article, you will learn how to also test your crontab.
How to Backup Couchbase Enterprise
Couchbase Enterprise comes with a more comprehensive tool called cbbackupmgr which gives you some extra features:
- Backup compaction in a backup repository to free up disk space;
- Lists the contents of the backup archive;
- Merge two or more backups together;
As we have a few extra features now we could create a more elaborated script that does the following:
- Configure the directory if it is not configured yet (cbbackupmgr config)
- Execute a full/delta backup
- Merge older incremental backups to reclaim disk space
Here is a script called backup_with_periodic_merge.sh that you could use do to exactly what is described above:
2
To run the script you could specify something like the following:
3
In order to avoid typing this command every time, let’s create a second script with all the parameters. Here a script called cb_incremental_backup.sh:
4
Here I am assuming that both files are located under the folder /home/ubuntu/scripts. At the end of the script, I’m also using Postfix to send an email to a group of users once the whole process has been finished. There are definitely better ways to monitor if your backups ran successfully, but if you don’t have any better strategy in place yet, sending an email is at least a basic type of monitoring.
Scheduling this script to run using crontab will be very similar to what we have done on the community edition, just run the following command:
5
And then add the following line:
6
Note that yourLocalUser refers to the local user of the machine, the script will run using that context. Save the file once you finish (“esc”, then “:wq” in case you are not used to vim)
The cb_incremental_backup.sh script will run incremental backups every day at 01 am. I recommend you to additionally run full backups from time to time to avoid having a single full backup with a number of incremental ones.
Testing your CronTab
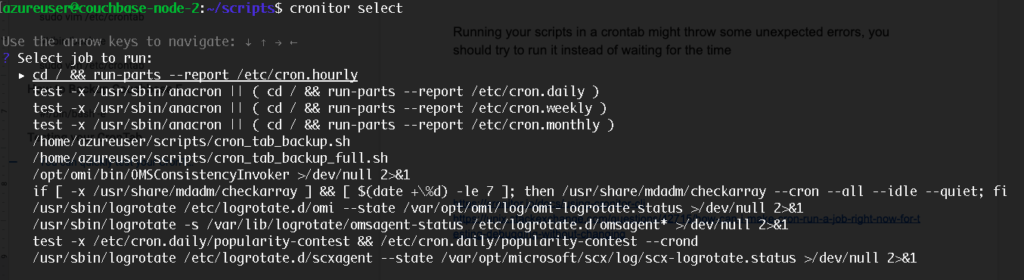
You can quickly test your CronTabs using cronitor, just run the following commands to install it
7
Then, run the command below to list all your scheduled jobs:
8
Navigate through the list using the arrow keys, choose the one you want to run and hit enter:
If everything is properly configured, your script should be executed successfully.
Leave a comment
You must be logged in to post a comment.