Today’s the day your Node.js app learns “go fetch.”
By following this basic tutorial, you’ll learn how to build a REST API for your Node.js app that sends SQL++ (aka N1QL) queries to retrieve data from Couchbase.
This post continues my introductory series on using Node.js with Couchbase, including async functions and building a REST API with Node.js and Express.
Today’s post picks up where the previous ones left off after building a REST API for direct document retrieval.
Setting Up Your Couchbase Database
This post assumes you have installed the travel-sample Bucket that comes with all Couchbase installations. It’s important you have this dataset installed because we’ll use indexes that are automatically created and specific document criteria will be used that are entirely repeatable.
The basic connectivity and REST API foundation is already laid out in the script we created together last week. I’ll include it in today’s code sample, but you’ll need to read all of the previous posts (linked above) for a full explanation.
Also, for the sake of simplicity in today’s example, we’ll use the default Scopes and Collections. As usual, when it comes to Query JSON data, I’ll also assume you have basic familiarity with JavaScript, Node.js and NoSQL document databases.
Understanding N1QL Queries
The N1QL query language for Couchbase is almost exactly like SQL, with just a few exceptions.
When a N1QL query requests a specific column from a Bucket, it returns a list of all matching JSON documents in the Bucket. If there is no data in the document for the column then you get a NULL value, unless it is filtered out with a WHERE clause.
At a minimum, a primary index must be available on the documents in order for those documents to be queried. However, query performance is improved when there is a secondary index defined for a given column.
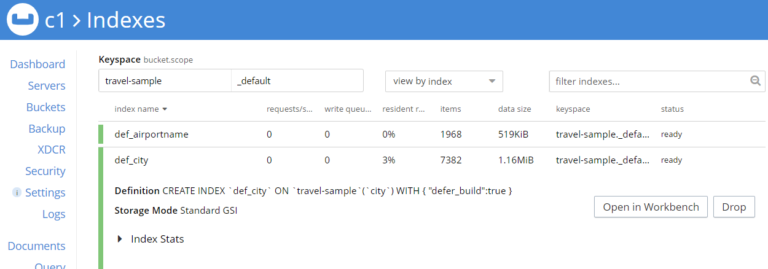
Both of these indexes can be created with a query itself and can be done through a script or through the Couchbase Web Console. In fact, you can learn about these indexes and see the query used to create them by exploring them in the web console.
In the above example, there is an index created on the column called city within any documents that are in the travel-sample Bucket.
A Sample Query
Before diving into code, you can run queries directly in the web console to ensure they return what you expect. Switch to the Query tab and enter the following query, then press Execute.
|
1 |
SELECT * FROM `travel-sample` WHERE city = 'Los Angeles'; |
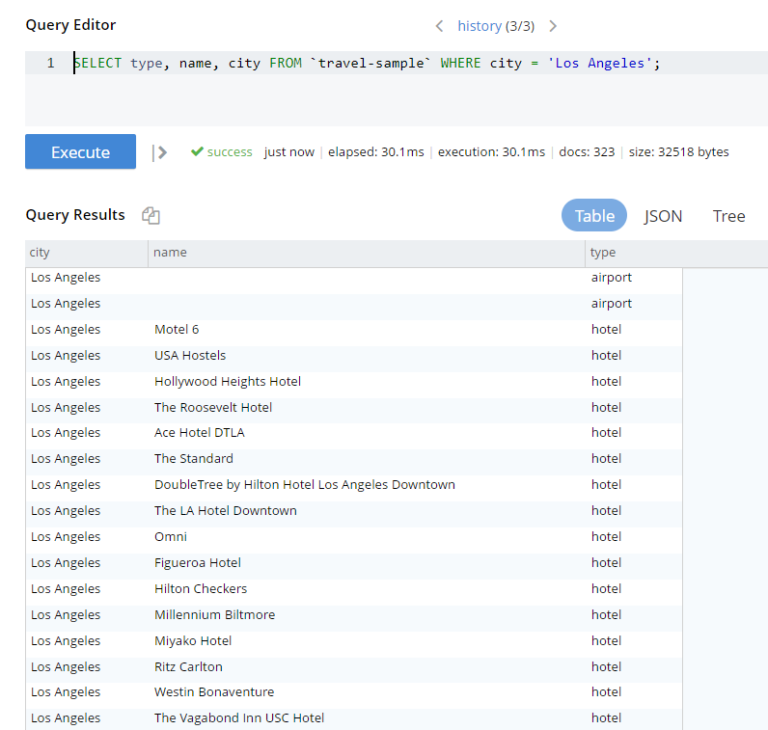
The results show in the console that 323 documents matched. Note that a mix of documents is returned – hotels, airports, etc. as shown in the type column. (Now, I’m saying “columns” but of course these are actually JSON objects/elements that could be embedded inside other objects.)
Tweak your query to return just a few columns, like in the example below.
|
1 |
SELECT type, name, city FROM `travel-sample` WHERE city = 'Los Angeles'; |
Building a Query Function
Before diving into the rest of the code, we’ll start by looking at the basics of passing queries using the Node.js SDK.
Rather than pass a fully-formed query string, you’ll want to use the built-in placeholders to make it reusable code. In this case, use named parameters: Your query will have a placeholder variable in it, and you’ll pass a variable with the values to be used.
First create the query variable:
|
1 |
const querystr = `SELECT type, name, city FROM `travel-sample` WHERE city = $CITY;` |
Then create the input parameters variable:
|
1 |
const params = { parameters: { CITY: 'Los Angeles' }} |
Then pass both of these along to the cluster query function to initiate and return results:
|
1 |
let result = await cluster.query(querystr, params) |
The full function you create is now possible:
|
1 2 3 4 5 6 7 8 9 10 11 12 |
async function getQuery(){ const querystr = `SELECT type, name, city FROM `travel-sample` WHERE city = $CITY;` const params = { parameters: { CITY: 'Los Angeles' }} try { let result = await cluster.query(querystr, params) console.log("Result:", result) return result } catch (error) { console.error("Query failed: ", error) } }; |
REST-ifying Your Query
The next step is to add this query function to our previous REST API code example so you can take an input city name and return HTTP results back to the browser.
First, make the function pass in a variable for the city name, like below:
|
1 |
async function getQuery(cityname){... |
Then, create a query endpoint (instead of the get route we used in an earlier post) and move the logic for the REST response into that function.
|
1 2 3 4 5 6 7 8 9 10 11 |
app.get('/query/:cityname', runAsync(async (req, res) => { var cityname = req.params.cityname; var querystr = `SELECT type, name, city FROM `travel-sample` WHERE city = $CITY;` var params = { parameters: { CITY: cityname}} await cluster.query(querystr, params, function(err, result){ res.json(result) }) })); |
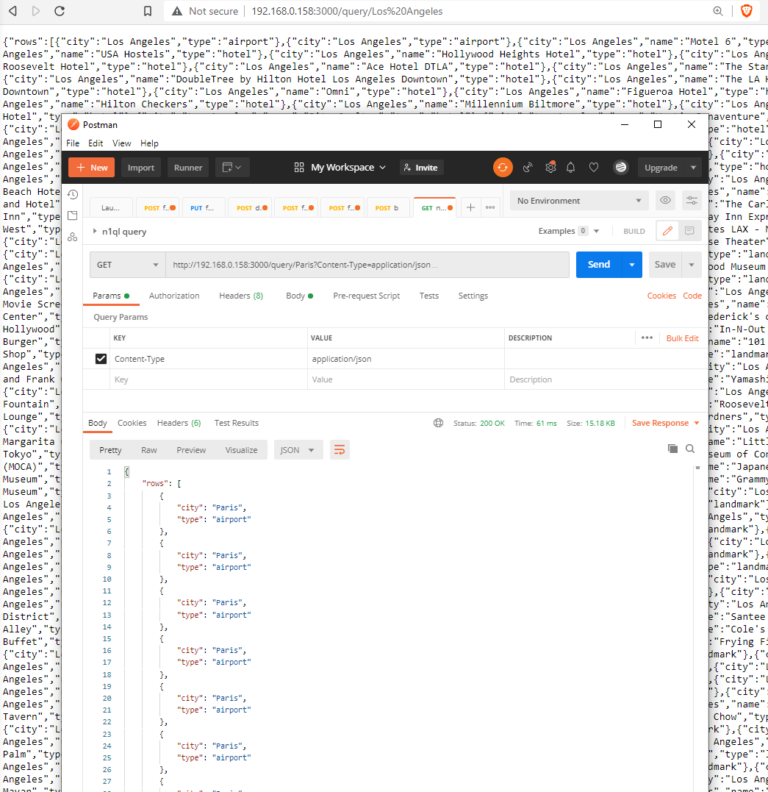
This returns the RAW JSON back from the REST call, as shown in the image below in the web browser or in the Postman REST API tool.
Full Code Example
Here is the full sample code result. Note that some previous code from other articles is retained for your reference.
|
1 2 3 4 5 6 7 8 9 10 11 12 13 14 15 16 17 18 19 20 21 22 23 24 25 26 27 28 29 30 31 32 33 34 35 36 37 38 39 40 41 42 43 44 45 46 47 |
var app = require('express')(); var couchbase = require("couchbase"); async function main(){ app.get('/get/:docid', runAsync(async (req, res) => { var docid = req.params.docid; var docjson = await getDoc(docid, function(err, result){ res.json(result.content) }); })); app.get('/query/:cityname', runAsync(async (req, res) => { var cityname = req.params.cityname; var querystr = `SELECT type, name, city FROM `travel-sample` WHERE city = $CITY;` var params = { parameters: { CITY: cityname}} await cluster.query(querystr, params, function(err, result){ res.json(result) }) })); app.listen(3000, () => console.log('Listening on port 3000')); function runAsync (callback) { return function (req, res, next) { callback(req, res, next) .catch(next) } } var cluster = new couchbase.Cluster("couchbase://localhost", { username: "Administrator", password: "Administrator" }); var bucket = cluster.bucket("travel-sample"); var collection = bucket.defaultCollection(); var getDoc = async (key) => { var result = await collection.get(key); console.log(result) return result } } main(); |
Conclusion
There are a lot of new directions you can take this project. For starters, you might want to include proper error capturing, output log information to the console, or using the results.rows object to create tabular results.
I’d encourage you to take a deeper dive into the Couchbase documentation on using queries from the Node.js SDK.
Catch up with the rest of the Node.js + Couchbase how-to series:
-
- How to Get Started with the Node.js SDK for Couchbase
- How to Create Async Get/Upsert Calls with Node.js and Couchbase
- Build a REST-Based Application with Node.js, Express and Couchbase
- How to Query JSON Data Using SQL++ for Node.js and Couchbase
- How to Add Full-Text Search Functionality to Your JavaScript App


