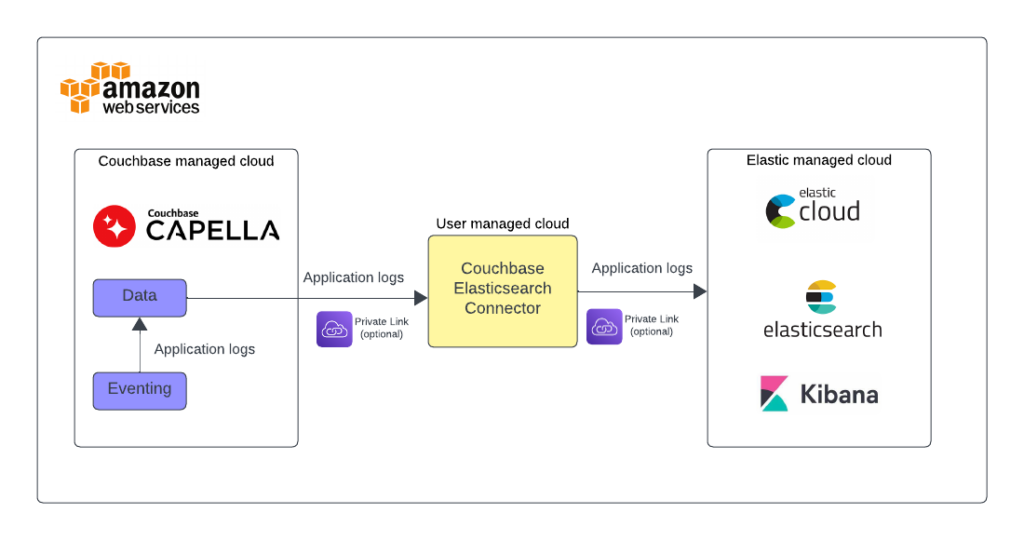
In this blog post, we’ll show how to use Couchbase Capella in conjunction with ElasticSearch and AWS services for efficient Eventing application log shipping and analytics.
Couchbase Capella is a multi-model NoSQL cloud data platform. It delivers millisecond data response at scale, with the best price-performance of any document Database-as-a-Service. Capella Eventing Service, enables user-defined business logic to be triggered in real-time when there are changes to data in Capella. Typical use cases include enriching documents, cascade deletes, propagating data changes inside a database, and more.
Elastic stack (also known as the ELK Stack) offers a powerful centralized logging solution to create insights, set alerts based on KPIs, and keep track of application behavior.
Capella Eventing functions are easy to create using the Data Tools Eventing editor in the UI. Eventing application logs allow users to identify and capture various business logic-related activities and errors via user-defined messages specific to each Eventing function. While the application logs can be viewed in the Capella UI, centralized log management and analytics using specialized logging solutions could be helpful in many scenarios. This blog shows you step-by-step instructions on how to bring Eventing application logs to Elastic and help with centralized log storage and analytics.
Prerequisite
-
- Couchbase Capella Deployment with Data and Eventing services. Sign up for a trial account.
- ElasticSearch Cloud Deployment. Sign up for a trial account.
- AWS account with an EC2 instance for running Couchbase ElasticSearch Connector that can be downloaded here.
Overview of the necessary steps
Setting Up Capella Cluster: Start by creating a Capella Cluster with data and eventing services. A quick guide can be found on Couchbase Capella documentation.
Bucket/Scope/Collection Creation: Create the necessary buckets, scopes, and collections in Couchbase. This includes ‘data’, ‘eventing-logs’, and their respective scopes and collections.
Eventing Functions Preparation: Prepare the eventing functions for data population and transformation. This involves creating synthetic datasets and modifying them to create logs.
ElasticSearch Cluster and Index Creation: Set up your ElasticSearch cluster and create an index for efficient data handling.
VPC and Private Link Setup: Create a new VPC for the Elastic Connector and establish a private link from Couchbase Capella to the VPC.
ElasticSearch Traffic Filter: Implement traffic filtering for secure data transfer.
Install and Run Couchbase ElasticSearch Connector: Install the Couchbase ElasticSearch Connector on an EC2 machine and configure it for log shipping.
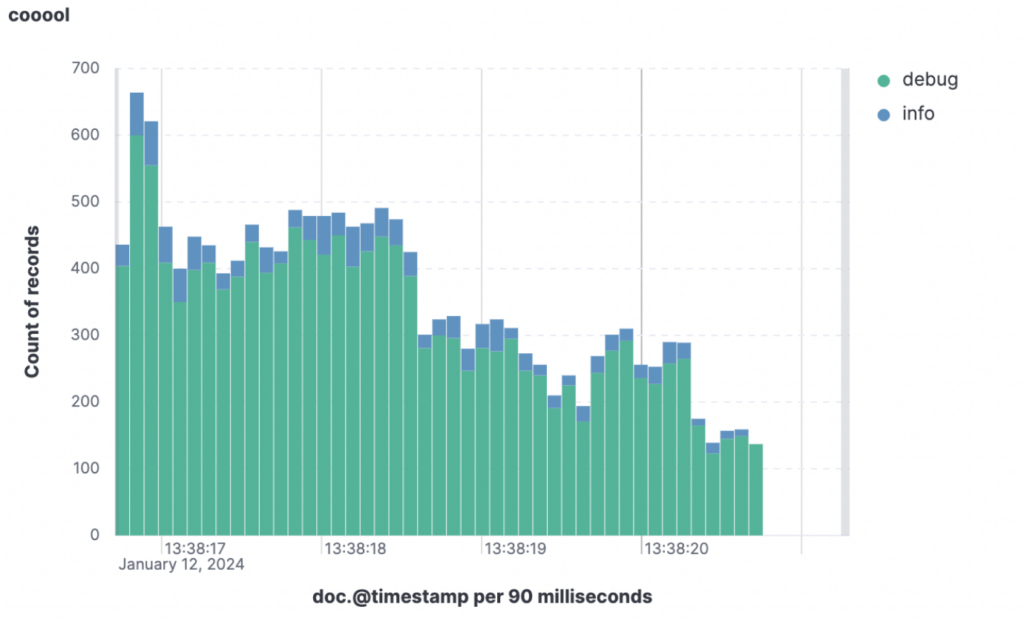
Data Visualization and Analysis: Use the collected data source to visualize and analyze logs, exploring the insights they provide.
Detailed Configuration
Couchbase Environment
We need to create two buckets and their scopes and collection. On one side we will create all we need to manage data and eventing functions. On the other one we will create a second one dedicated to the logs generated by the eventing functions.
The foundations of this simple activity can be found on the Couchbase Capella documentation which illustrates the principles and the actions involved. Note that bucket creation involves the configuration of several settings, of which the most prominent is Memory Quota. For testing purposes you can choose 100 MB, otherwise an accurate evaluation will be necessary.
Create two buckets with the following structure:
-
- Name: “data”
- Scope Name: “eventing”
- Collection Name: “meta”
Storage for eventing functions checkpoints
- Collection Name: “meta”
- Scope Name: “inventory”
- Collection Name: “data”
Storage for actual data
- Collection Name: “data”
- Scope Name: “eventing”
- Name: “eventing-logs”
- Scope Name: “eventing”
- Collection Name: “logs”
Storage for logs. Optionally we can set a TTL to reduce the amount of storage.
- Collection Name: “logs”
- Scope Name: “elastic-checkpoints”
- Collection Name: “connector”
Storage for Couchbase-Elasticsearch Connector checkpoints
- Collection Name: “connector”
- Scope Name: “eventing”
- Name: “data”
Data population
We will now create two eventing functions. If this is the first time you create an eventing function, you can familiarize yourself with the environment following this guide.
The purpose of these functions is to:
-
- First Function: create data we can work on. A dataset representing a product catalog.
This function creates simple json documents, introducing some variability across 100000 iterations. While this is not a realistic product catalog, it sets a good ground for experimenting eventing functions that need to log the way it is performing. Note that the function is triggered the first time by creating an empty document. - Second Function: the actual eventing function with some business logic we would like to observe through ELK stack.
- First Function: create data we can work on. A dataset representing a product catalog.
While the eventing function runs unbounded across all the new dataset, it substitutes the property category whenever it matches the value “Category 3” and it changes this value to “jeans”. In several parts of the function we can observe that it is conveniently called a function called logStuff: Its purpose is to save a log line in a dedicated collection that will be later on replicated to ElasticSearch and indexed.
Data population function
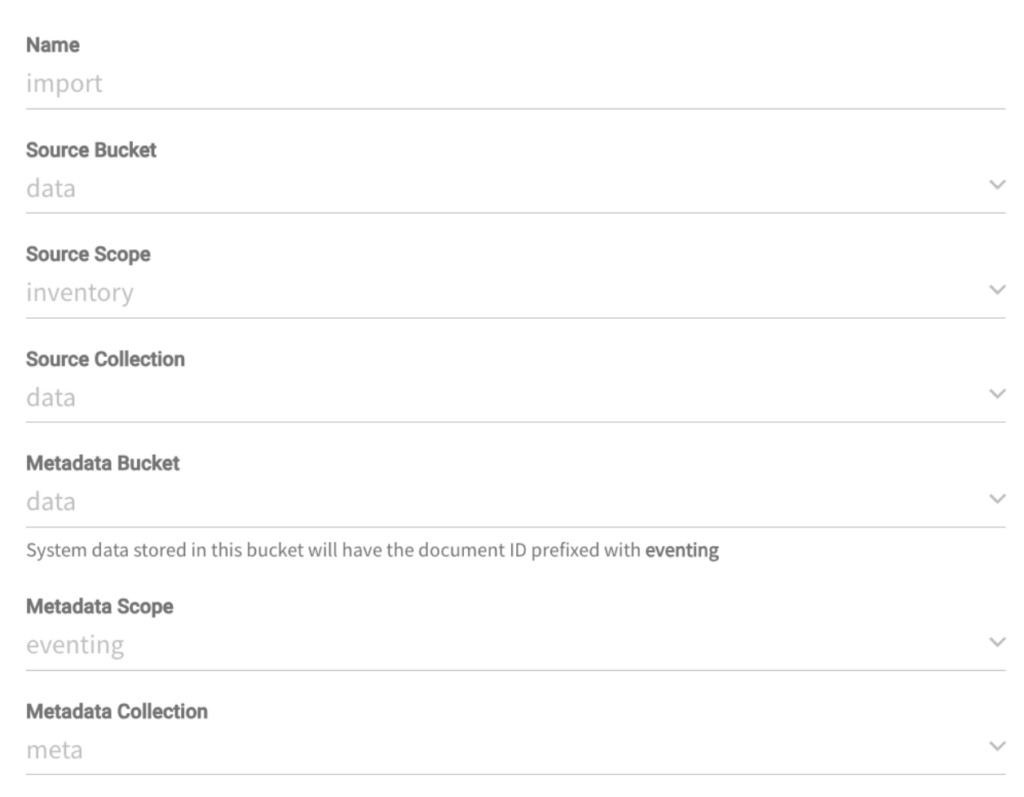
Create an eventing function with the following configurations:
And the following bucket binding:
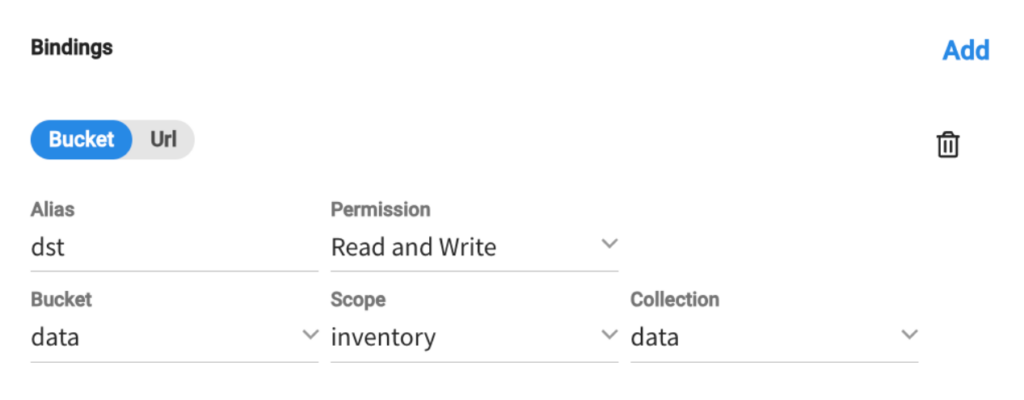
Here is the function:
|
1 2 3 4 5 6 7 8 9 10 11 12 13 14 15 16 17 18 19 20 21 |
function OnUpdate(doc, meta) { // Placeholder function for handling document updates if(meta.id == 'start') { for(let i = 1; i <= 100000; i++) { var item = { "type": "inventoryItem", "itemId": i, "name": "Item " + i, "price": Math.random() * 100, // Random price between 0 and 100 "inStock": true, "category": "Category " + (i % 10) // 10 different categories }; var key = "item_" + i; dst[key] = item; } } } function OnDelete(meta) { // Placeholder function for handling document deletions } |
The moment the function gets a document in data.inventory.data with the ID start, it will generate 100000 random documents.
Note: to generate this document you just need to go to the Data Tools tab, select Documents and then click on the Create New Document button (remember to select the right collection! Data -> Inventory -> Data).
Data Transformation function
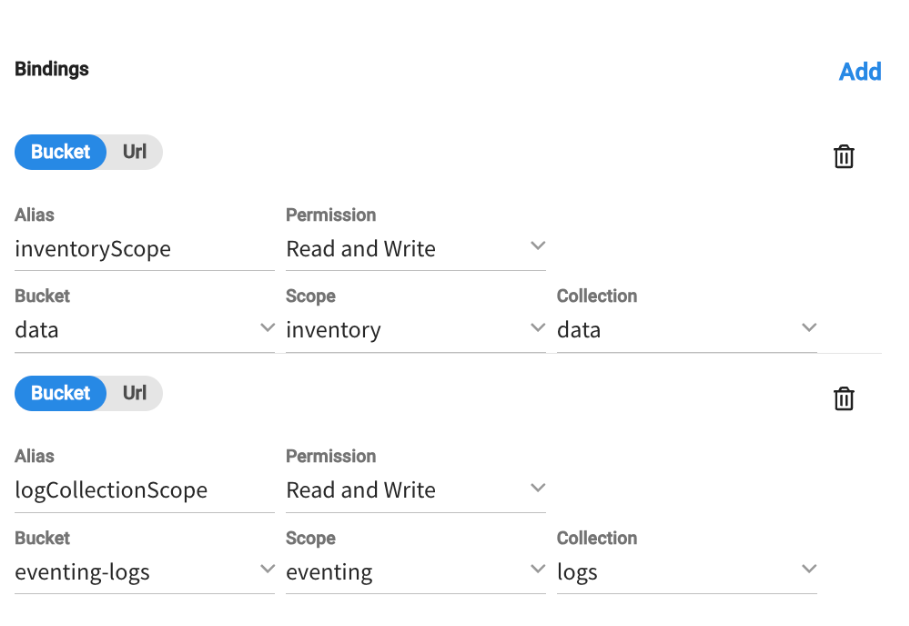
This second function will demonstrate how to persist logs on temporary storage to be used later on the ELK Stack. While performing its business logic on the data.inventory.data collection, it will save some application logs on the eventing-logs.eventing.logs so that it will be able to later on export them to ElasticSearch.
The configuration:
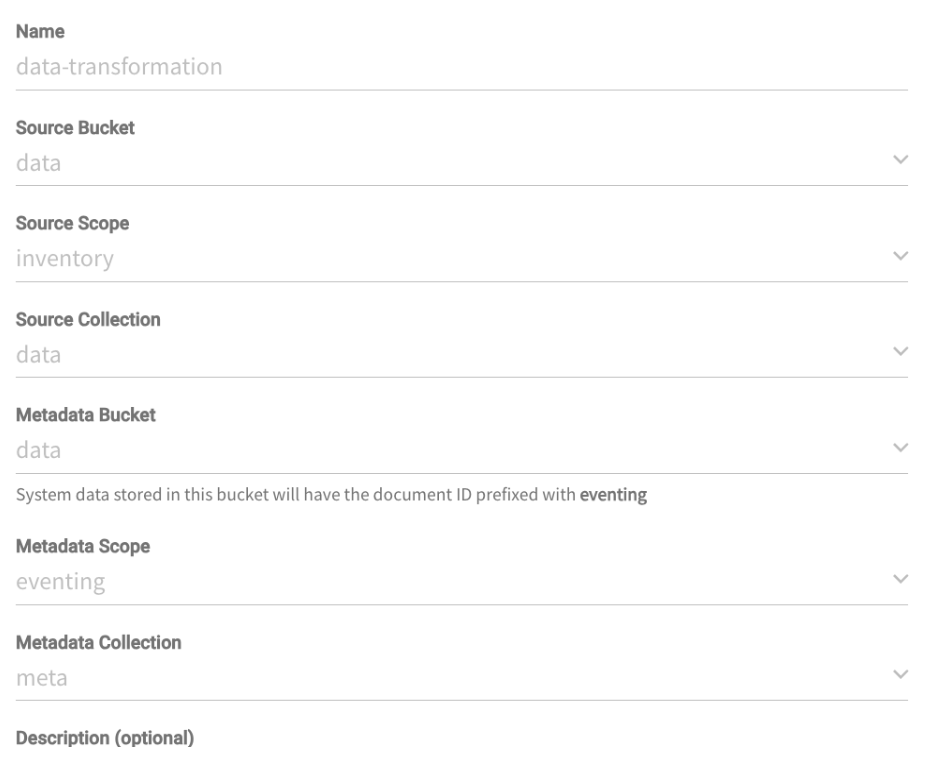
The bindings:
The function:
|
1 2 3 4 5 6 7 8 9 10 11 12 13 14 15 16 17 18 19 20 21 22 23 24 25 26 27 28 29 30 31 32 33 34 35 36 37 38 39 40 41 42 43 44 45 |
function OnUpdate(doc, meta) { logStuff("debug", "start evaluating " + meta.id); if(doc.category == "Category 3") { logStuff("info", "start modifying " + meta.id); doc.category = "jeans"; inventoryScope[meta.id] = doc; logStuff("info", "end modifying " + meta.id); } logStuff("debug", "end evaluating " + meta.id); } function OnDelete(meta, options) { } function simpleHash(str) { let hash = 0; for (let i = 0; i < str.length; i++) { const char = str.charCodeAt(i); hash = (hash << 5) - hash + char; hash &= hash; // Convert to 32bit integer } return new Uint32Array([hash])[0].toString(36); } function logStuff(level, message) { var date = new Date(); date.toISOString(); var logLine = { "@timestamp": date, "log": { "level": level, "logger": "couchbase.eventing", "origin": { "function": "data-transformation-cat-3-to-tee" }, "original": message }, "message": message, "ecs": { "version": "1.6.0" } } var logEntryId = "data-transformation-" + Math.floor(Math.random() * 10000000) + date; logCollectionScope[simpleHash(logEntryId)] = logLine; } |
The function is responsible for modifying a certain category of data and transforming its label. In doing so, we need to keep track of how the function is performing through logs that will be later on analyzed with the ELK stack.
The logStuff function creates a JSON document with an ECS compliant format and persists it on a separate bucket.
Once the eventing function is created, remember to deploy it.
Once the dataset is created and the transformation function executed we should have a populated bucket of logs ready to be shipped to ElasticSearch.
Note: In order to avoid collisions, logs lines are created with timestamps and random numbers later on hashed to save space.
Elastic Cloud configuration
Before starting synchronizing the data we need to create an index in ElasticSearch. Make sure to modify the Elasticsearch endpoint URL and to create an API Key with administrative rights.
Here is a CURL example:
|
1 2 3 4 5 6 7 8 9 10 11 12 13 14 15 16 17 18 19 20 21 22 23 24 25 26 27 28 29 30 31 32 33 34 35 36 37 38 39 40 41 42 43 44 45 46 47 |
curl -X PUT "https://<your ElasticSearch endpoint here>:443/couchbase-ecs" \ -H "Authorization: ApiKey "<your API key>"" \ -H "Content-Type: application/json" \ -d ' { "settings": { "number_of_shards": 1, "number_of_replicas": 1 }, "mappings": { "properties": { "@timestamp": { "type": "date" }, "log": { "properties": { "level": { "type": "keyword" }, "logger": { "type": "keyword" }, "origin": { "properties": { "function": { "type": "keyword" } } }, "original": { "type": "text" } } }, "message": { "type": "text" }, "ecs": { "properties": { "version": { "type": "keyword" } } } } } }' |
The index maps the data type of the logger so that it can be searched efficiently.
ElasticSearch Connector
Network configuration
We need to create a VPC with an EC2 machine with a public IP address that will host the ElasticSearch connector. A regular EC2 instance with a 2-4 cpus will do the job for this test (we used a t2.medium). Of course, if this is going to be a production environment, an evaluation of the sizing of this machine would be an important step for this deployment.
Next step is to secure the connectivity between the newly create VPC and:
-
- Couchbase Capella, and
- Elastic Cloud
The most practical way (testing purpose only!) is through public connectivity. On the Capella cluster settings we need to whitelist the public IP of the EC2 instance so that the Elasticsearch Connector can establish a connection to the database. For Elastic Cloud, instead, we need to create an API key.
There is also the alternative to go through private links and extensive documentation can be found here:
Couchbase-ElasticSearch connector
After having provisioned the EC2 instance we need to download the executables from the Couchbase website. Before that, please have a look at the requirements, here and download here.
We need now to configure it modifying the $CBES_HOME/config/default-connector.toml file.
Here are a few sections that will resonate with you, some sections removed to keep it brief:
|
1 2 3 4 5 6 7 8 9 10 11 12 13 14 15 16 17 18 19 20 21 22 23 24 25 26 27 28 29 30 31 32 33 34 35 36 37 38 39 40 41 42 43 44 45 46 47 48 49 50 |
[group] name = 'example-group' [group.static] memberNumber = 1 # A value from 1 to 'totalMembers', inclusive. totalMembers = 1 [...] [couchbase] hosts = ['<your Capella private endpoint>'] network = 'auto' bucket = 'eventing-logs' metadataBucket = 'eventing-logs' metadataCollection = 'elastic-checkpoints.connector' # your Capella username username = 'hello' # Remember to go to modify this file with the password pathToPassword = 'secrets/couchbase-password.toml' #Capella environment is always secured secureConnection = true [...] [elasticsearch] hosts = ['https://<your ElasticSearch endpoint here>:443'] username = 'elastic' # Remember to go to modify this file with your ElasticSearch ApiKey pathToPassword = 'secrets/elasticsearch-password.toml' secureConnection = true [...] [elasticsearch.elasticCloud] enabled = true [...] # If true, never delete matching documents from Elasticsearch. ignoreDeletes = true [[elasticsearch.type]] matchOnQualifiedKey = true prefix = 'eventing.logs.' index = 'couchbase-ecs' [...] |
Best Practices and Tips
Here are a few things might be useful to keep in mind:
-
- Couchbase ElasticSearch connector – Make sure that you get your data type right, [[elasticsearch.type]]. Your connector won’t feed data unless this is done properly.
- Couchbase Capella – Don’t forget to create the database credentials for the Connector!
- ElasticSearch
- Once an index is created you can create a datasource from which you will be able to build your insights.
- ApiKeys can be created for administrative purpose (e.g., creating indexes) or applications (e.g., sending the data through the Connector). Make sure that you are using the right ones.
- Data Retention
- Saving logs can be very disk consuming. Avoid this by:
- Excluding delete notifications from the ElasticSearch Connector with the ignoreDeletes = true flag
- Setting a TTL for the collection that contains your logs, so that Couchbase Capella will clean up logs automatically that are too old
- Saving logs can be very disk consuming. Avoid this by:
Conclusion
Through this tutorial we have seen how to implement observability for our Eventing Functions deployed in Capella. As a next step you can sign up for a Capella trial and experiment for yourself the many features provided with the most powerful NoSQL database out there. To help you orient, you can also use our playground and our Capella iQ, our generative AI assistant, for learning how to develop and experiment in a safe environment.
